HP Visualize J5000 hp Visualize J5000, J7000 workstations service handbook (a4 - Page 25
CD Drive Optional, CD Drive Features
 |
View all HP Visualize J5000 manuals
Add to My Manuals
Save this manual to your list of manuals |
Page 25 highlights
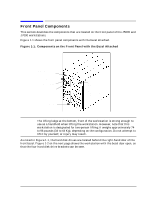
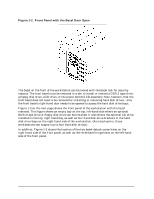
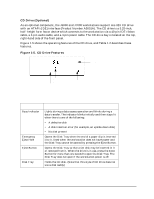
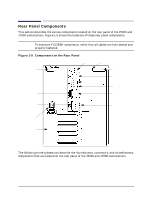
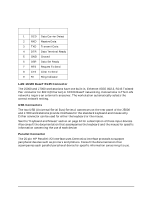
Product Information Front Panel Components CD Drive (Optional) As an optional component, the J5000 and J7000 workstations support one 32X CD drive with an ATAPI (IDE) interface (Product Number A5001A). The CD drive is a 5.25-inch, half- height form factor device which connects to the workstation via a 40-pin IDE ribbon cable, a 4-pin audio cable, and a 4-pin power cable. The CD drive bay is located on the top, right-hand side of the front panel. Figure 1-5 shows the operating features of the CD drive, and Table 1-2 describes these features. Figure 1-5. CD Drive Features Disk Tray Emergency Eject Hole Busy Indicator Eject Button Table 1-2. CD Drive Features Feature Busy Indicator Emergency Eject Hole Eject Button Disk Tray Purpose Lights during a data access operation and blinks during a data transfer. The indicator blinks initially and then stays lit when there is one of the following: • A defective disk • A disk insertion error (for example, an upside-down disk) • No disk present Opens the Disk Tray when the end of a paper clip is inserted into it. Used when the workstation does not have power and the Disk Tray cannot be opened by pressing the Eject Button. Opens the Disk Tray so that a CD disk may be inserted in it or removed from it. When the drive is in use, press the Eject Button for more than one second to open the Disk Tray. The Disk Tray does not open if the workstation power is off. Holds the CD disk. (Note that this style of CD drive does not use a disk caddy.) Chapter 1 21
-
 1
1 -
2
-
3
-
4
-
5
-
6
-
7
-
8
-
9
-
10
-
11
-
12
-
13
-
14
-
15
-
16
-
17
-
18
-
19
-
 20
20 -
 21
21 -
 22
22 -
 23
23 -
 24
24 -
 25
25 -
 26
26 -
 27
27 -
 28
28 -
 29
29 -
 30
30 -
31
-
32
-
33
-
34
-
35
-
36
-
37
-
38
-
39
-
40
-
41
-
42
-
43
-
44
-
45
-
46
-
47
-
48
-
49
-
50
-
51
-
52
-
53
-
54
-
55
-
56
-
57
-
58
-
59
-
60
-
61
-
62
-
63
-
64
-
65
-
66
-
67
-
68
-
69
-
70
-
71
-
72
-
73
-
74
-
75
-
76
-
77
-
78
-
79
-
80
-
81
-
82
-
83
-
84
-
85
-
86
-
87
-
88
-
89
-
90
-
91
-
92
-
93
-
94
-
95
-
96
-
97
-
98
-
99
-
100
-
101
-
102
-
103
-
104
-
105
-
106
-
107
-
108
-
109
-
110
-
111
-
112
-
113
-
114
-
115
-
116
-
117
-
118
-
119
-
120
-
121
-
122
-
123
-
124
-
125
-
126
-
127
-
128
-
129
-
130
-
131
-
132
-
133
-
134
-
135
-
136
-
137
-
138
-
139
-
140
-
141
-
142
-
143
-
144
-
145
-
146
-
147
-
148
-
149
-
150
-
151
-
152
-
153
-
154
-
155
-
156
-
157
-
158
-
159
-
160
-
161
-
162
-
163
-
164
-
165
-
166
-
167
-
168
-
169
-
170
-
171
-
172
-
173
-
174
-
175
-
176
-
177
-
178
-
179
-
180
-
181
-
182
-
183
-
184
-
185
-
186
-
187
-
188
-
189
-
190
-
191
-
192
-
193
-
194
-
195
-
196
-
197
-
198
-
199
-
200
-
201
-
202
-
203
-
204
-
205
-
206
-
207
-
208
-
209
-
210
-
211
-
212
 |
 |
