HP Visualize J5000 hp Visualize J5000, J7000 workstations service handbook (a4 - Page 141
Replacing the SCA Hard Disk Interface, do the following
 |
View all HP Visualize J5000 manuals
Add to My Manuals
Save this manual to your list of manuals |
Page 141 highlights
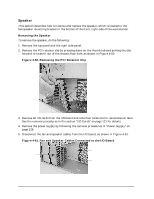
Field Replaceable Units (FRUs) FRU Removal and Replacement 6. Remove the four screws from the SCA hard disk interface, as shown in Figure 4-52 on the previous page. 7. Raise the SCA hard disk interface straight up and pull outward to relieve it from the internal chassis hooks. Replacing the SCA Hard Disk Interface To replace the SCA hard disk interface, do the following: 1. Remove the top panel and the right side panel from the workstation. 2. Perform the previous removal steps in reverse. Chapter 4 137
-
 1
1 -
2
-
3
-
4
-
5
-
6
-
7
-
8
-
9
-
10
-
11
-
12
-
13
-
14
-
15
-
16
-
17
-
18
-
19
-
20
-
21
-
22
-
23
-
24
-
25
-
26
-
27
-
28
-
29
-
30
-
31
-
32
-
33
-
34
-
35
-
36
-
37
-
38
-
39
-
40
-
41
-
42
-
43
-
44
-
45
-
46
-
47
-
48
-
49
-
50
-
51
-
52
-
53
-
54
-
55
-
56
-
57
-
58
-
59
-
60
-
61
-
62
-
63
-
64
-
65
-
66
-
67
-
68
-
69
-
70
-
71
-
72
-
73
-
74
-
75
-
76
-
77
-
78
-
79
-
80
-
81
-
82
-
83
-
84
-
85
-
86
-
87
-
88
-
89
-
90
-
91
-
92
-
93
-
94
-
95
-
96
-
97
-
98
-
99
-
100
-
101
-
102
-
103
-
104
-
105
-
106
-
107
-
108
-
109
-
110
-
111
-
112
-
113
-
114
-
115
-
116
-
117
-
118
-
119
-
120
-
121
-
122
-
123
-
124
-
125
-
126
-
127
-
128
-
129
-
130
-
131
-
132
-
133
-
134
-
135
-
 136
136 -
 137
137 -
 138
138 -
 139
139 -
 140
140 -
 141
141 -
 142
142 -
 143
143 -
 144
144 -
 145
145 -
 146
146 -
147
-
148
-
149
-
150
-
151
-
152
-
153
-
154
-
155
-
156
-
157
-
158
-
159
-
160
-
161
-
162
-
163
-
164
-
165
-
166
-
167
-
168
-
169
-
170
-
171
-
172
-
173
-
174
-
175
-
176
-
177
-
178
-
179
-
180
-
181
-
182
-
183
-
184
-
185
-
186
-
187
-
188
-
189
-
190
-
191
-
192
-
193
-
194
-
195
-
196
-
197
-
198
-
199
-
200
-
201
-
202
-
203
-
204
-
205
-
206
-
207
-
208
-
209
-
210
-
211
-
212
 |
 |

Chapter 4
137
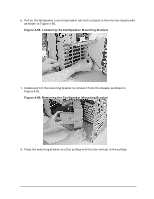
Field Replaceable Units (FRUs)
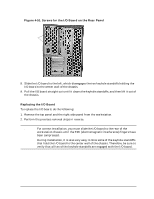
FRU Removal and Replacement
6.
Remove the four screws from the SCA hard disk interface, as shown in Figure 4-52 on
the previous page.
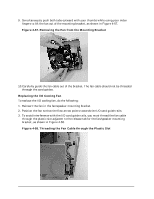
7.
Raise the SCA hard disk interface straight up and pull outward to relieve it from the
internal chassis hooks.
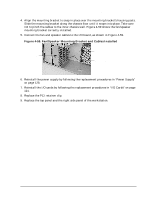
Replacing the SCA Hard Disk Interface
To replace the SCA hard disk interface, do the following:
1.
Remove the top panel and the right side panel from the workstation.
2.
Perform the previous removal steps in reverse.