Konica Minolta Fujitsu fi-6800 Operating Guide - Page 142
Error Indications on Operator Panel
 |
View all Konica Minolta Fujitsu fi-6800 manuals
Add to My Manuals
Save this manual to your list of manuals |
Page 142 highlights
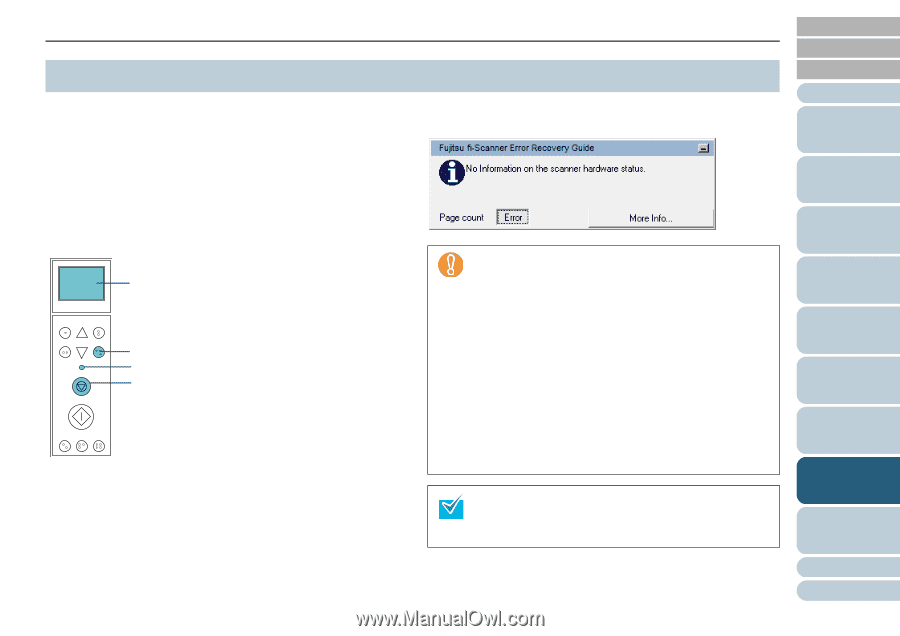
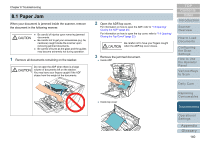
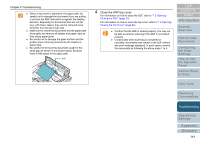
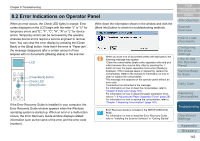
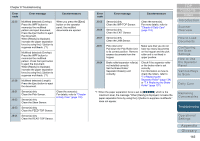
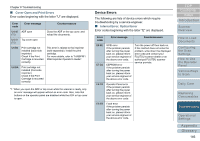
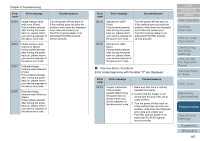
Chapter 8 Troubleshooting 8.2 Error Indications on Operator Panel When an error occurs, the Check LED lights in orange. Error codes displayed on the LCD begin with the letter "J" or "U" for temporary errors and "E", "F", "C", "H", "A" or "L" for device errors. Temporary errors can be recovered by the operator, whereas device errors require a service engineer to recover from. You can clear the error display by pressing the [Clear/ Back] or the [Stop] button. Note that if the error is "Paper jam", the message disappears after a certain amount of time elapses with no documents ([Ready] status) in the scanner. LCD Menu Function /Enter Send to /Pause Check Clear /Back Stop Scan [Clear/Back] Button Check LED [Stop] Button Counter iMFF Reset Eject If the Error Recovery Guide is installed in your computer, the Error Recovery Guide window appears when the Windows operating system is started up. When an error or a malfunction occurs, the Error Recovery Guide window displays related information such as the name of the error and the error code (number). Write down the information shown in the window and click the [More Info] button to check for troubleshooting methods. When you scan a lot of documents written with lead pencil, the following message may appear: "Clean the consumables (brake roller, separator roller and pick roller) because they may be dirty. Also try pressing the V button to lower the paper separation force when [Ready] is displayed. If this message keeps on appearing, replace the consumables. Refer to the manual for information on how to clean or replace the consumables." This message only appears on the operator panel without an error code. Troubleshoot as instructed in the message. For information on how to clean the consumables, refer to "Chapter 6 Daily Care" (page 118). For information on how to adjust the paper separation force, refer to "1.9 Adjusting the Paper Separation Force" (page 26). For information on how to replace the consumables, refer to "Chapter 7 Replacing Consumables" (page 130). Error Recovery Guide is included in the SETUP DISK DVDROM. For information on how to install the Error Recovery Guide, refer to "Installing the Scanner Software" in "Getting Started". TOP Contents Index Introduction Scanner Overview How to Load Documents Configuring the Scan Settings How to Use the Operator Panel Various Ways to Scan Daily Care Replacing Consumables Troubleshooting Operational Settings Appendix Glossary 142
-
 1
1 -
2
-
3
-
4
-
5
-
6
-
7
-
8
-
9
-
10
-
11
-
12
-
13
-
14
-
15
-
16
-
17
-
18
-
19
-
20
-
21
-
22
-
23
-
24
-
25
-
26
-
27
-
28
-
29
-
30
-
31
-
32
-
33
-
34
-
35
-
36
-
37
-
38
-
39
-
40
-
41
-
42
-
43
-
44
-
45
-
46
-
47
-
48
-
49
-
50
-
51
-
52
-
53
-
54
-
55
-
56
-
57
-
58
-
59
-
60
-
61
-
62
-
63
-
64
-
65
-
66
-
67
-
68
-
69
-
70
-
71
-
72
-
73
-
74
-
75
-
76
-
77
-
78
-
79
-
80
-
81
-
82
-
83
-
84
-
85
-
86
-
87
-
88
-
89
-
90
-
91
-
92
-
93
-
94
-
95
-
96
-
97
-
98
-
99
-
100
-
101
-
102
-
103
-
104
-
105
-
106
-
107
-
108
-
109
-
110
-
111
-
112
-
113
-
114
-
115
-
116
-
117
-
118
-
119
-
120
-
121
-
122
-
123
-
124
-
125
-
126
-
127
-
128
-
129
-
130
-
131
-
132
-
133
-
134
-
135
-
136
-
 137
137 -
 138
138 -
 139
139 -
 140
140 -
 141
141 -
 142
142 -
 143
143 -
 144
144 -
 145
145 -
 146
146 -
 147
147 -
148
-
149
-
150
-
151
-
152
-
153
-
154
-
155
-
156
-
157
-
158
-
159
-
160
-
161
-
162
-
163
-
164
-
165
-
166
-
167
-
168
-
169
-
170
-
171
-
172
-
173
-
174
-
175
-
176
-
177
-
178
-
179
-
180
-
181
-
182
-
183
-
184
-
185
-
186
-
187
-
188
-
189
-
190
-
191
-
192
-
193
-
194
-
195
-
196
-
197
-
198
-
199
-
200
-
201
-
202
-
203
-
204
-
205
-
206
-
207
-
208
-
209
-
210
-
211
-
212
-
213
-
214
-
215
-
216
-
217
-
218
-
219
-
220
-
221
-
222
-
223
-
224
-
225
-
226
-
227
-
228
-
229
-
230
-
231
-
232
-
233
-
234
-
235
-
236
-
237
-
238
-
239
-
240
-
241
-
242
-
243
 |
 |