Konica Minolta Fujitsu fi-6800 Operating Guide - Page 91
Removing Punch Holes, Start up ScandAll PRO and open the [TWAIN Driver 32]
 |
View all Konica Minolta Fujitsu fi-6800 manuals
Add to My Manuals
Save this manual to your list of manuals |
Page 91 highlights
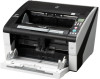
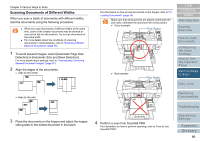
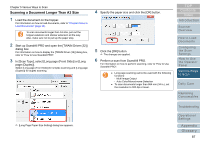
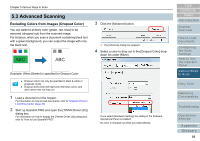
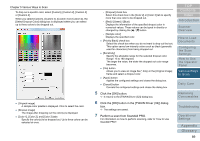
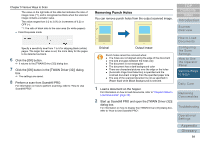
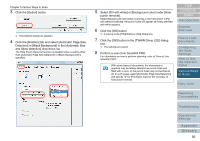
Chapter 5 Various Ways to Scan The value on the right side of the slide bar indicates the ratio of image noise (*1), and is recognized as blank when the scanned image contains a smaller value. The value ranges from 0.2 to 3.0% (in increments of 0.2) or OFF (--). *1: The ratio of black dots to the scan area (for white papers). z Color/Grayscale mode Specify a sensitivity level from 1 to 5 for skipping blank (white) pages. The larger the value is set, the more likely for the pages to be detected as blank. 6 Click the [OK] button. D It returns to the [TWAIN Driver (32)] dialog box. 7 Click the [OK] button in the [TWAIN Driver (32)] dialog box. D The settings are saved. 8 Perform a scan from ScandAll PRO. For information on how to perform scanning, refer to "How to Use ScandAll PRO". Removing Punch Holes You can remove punch holes from the output scanned image. TOP Contents Index Introduction Scanner Overview Original Output image Punch holes cannot be removed when: z The holes are not aligned along the edge of the document z The size and gaps between the holes vary z The document is not rectangular z The document has a dark background color z There are characters/pictures over the edge or the holes z [Automatic Page Size Detection] is specified and the scanned document is larger than the specified paper size z The size of the scanned document is not as specified in [Paper Size] while [Black Background] is selected. 1 Load a document on the hopper. For information on how to load documents, refer to "Chapter 2 How to Load Documents" (page 33). 2 Start up ScandAll PRO and open the [TWAIN Driver (32)] dialog box. For information on how to display the [TWAIN Driver (32)] dialog box, refer to "How to Use ScandAll PRO". How to Load Documents Configuring the Scan Settings How to Use the Operator Panel Various Ways to Scan Daily Care Replacing Consumables Troubleshooting Operational Settings Appendix Glossary 91
-
 1
1 -
2
-
3
-
4
-
5
-
6
-
7
-
8
-
9
-
10
-
11
-
12
-
13
-
14
-
15
-
16
-
17
-
18
-
19
-
20
-
21
-
22
-
23
-
24
-
25
-
26
-
27
-
28
-
29
-
30
-
31
-
32
-
33
-
34
-
35
-
36
-
37
-
38
-
39
-
40
-
41
-
42
-
43
-
44
-
45
-
46
-
47
-
48
-
49
-
50
-
51
-
52
-
53
-
54
-
55
-
56
-
57
-
58
-
59
-
60
-
61
-
62
-
63
-
64
-
65
-
66
-
67
-
68
-
69
-
70
-
71
-
72
-
73
-
74
-
75
-
76
-
77
-
78
-
79
-
80
-
81
-
82
-
83
-
84
-
85
-
 86
86 -
 87
87 -
 88
88 -
 89
89 -
 90
90 -
 91
91 -
 92
92 -
 93
93 -
 94
94 -
 95
95 -
 96
96 -
97
-
98
-
99
-
100
-
101
-
102
-
103
-
104
-
105
-
106
-
107
-
108
-
109
-
110
-
111
-
112
-
113
-
114
-
115
-
116
-
117
-
118
-
119
-
120
-
121
-
122
-
123
-
124
-
125
-
126
-
127
-
128
-
129
-
130
-
131
-
132
-
133
-
134
-
135
-
136
-
137
-
138
-
139
-
140
-
141
-
142
-
143
-
144
-
145
-
146
-
147
-
148
-
149
-
150
-
151
-
152
-
153
-
154
-
155
-
156
-
157
-
158
-
159
-
160
-
161
-
162
-
163
-
164
-
165
-
166
-
167
-
168
-
169
-
170
-
171
-
172
-
173
-
174
-
175
-
176
-
177
-
178
-
179
-
180
-
181
-
182
-
183
-
184
-
185
-
186
-
187
-
188
-
189
-
190
-
191
-
192
-
193
-
194
-
195
-
196
-
197
-
198
-
199
-
200
-
201
-
202
-
203
-
204
-
205
-
206
-
207
-
208
-
209
-
210
-
211
-
212
-
213
-
214
-
215
-
216
-
217
-
218
-
219
-
220
-
221
-
222
-
223
-
224
-
225
-
226
-
227
-
228
-
229
-
230
-
231
-
232
-
233
-
234
-
235
-
236
-
237
-
238
-
239
-
240
-
241
-
242
-
243
 |
 |