ASRock Z87 Extreme11/ac LSI Mega RAID Storage Manager Guide - Page 64
Deleting a Virtual Drive - reviews
 |
View all ASRock Z87 Extreme11/ac manuals
Add to My Manuals
Save this manual to your list of manuals |
Page 64 highlights
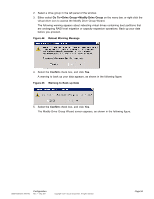
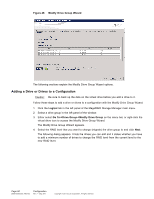
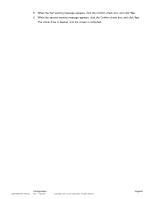
The Summary screen appears. This screen shows the current settings and what the settings will be after the drives are added. 6. Review the configuration information. You can click Back if you need to change any selections. 7. Click Finish to accept the changes. A confirmation message appears. The message states that this operation cannot be aborted and asks whether you want to continue. 8. Click Yes to accept and complete the migration to the new RAID level. The operation begins on the virtual disk. To monitor the progress of the RAID level change, select Manage->Show Progress in the menu bar. New Drives Attached to a MegaRAID Controller When you insert a new drive on a MegaRAID system, if the inserted drive does not contain valid DDF metadata, the drive appears as JBOD for MegaRAID entry-level controllers, such as the SAS 9240-4i/8i. If the drive does contain valid DDF metadata, its drive state is Unconfigured Good. A new drive in JBOD drive state is exposed to the host operating system as a stand-alone drive. Drives in a JBOD drive state are not part of the RAID configuration because they do not have valid DDF records. The operating system can install and run anything on JBOD drives. Automatic rebuilds always occur when the drive slot status changes, for example, when you insert a drive or remove a drive, so that a hot spare can be used. However, a new drive in JBOD drive state (without a valid DDF record), does not perform an automatic rebuild. To start an automatic rebuild on the new JBOD drive, you have to change the drive state from JBOD to Unconfigured Good. (Rebuilds start only on Unconfigured Good drives.) After you set the drive state to Unconfigured Good, the drive state information always remains on the drive, and you can use the drive for configuration. See Marking a Drive Offline or Missing for the procedure to change a drive to the Unconfigured Good drive state. See Rebuilding a Drive for the procedure to rebuild a drive. Deleting a Virtual Drive Warning: Make sure to back up the data on the virtual drive before you delete it, and make sure that the operating system is not installed on this virtual drive. You can delete virtual drives to rearrange the storage space. Before you can do this, you must be logged on to the server in Full Access mode. To delete a virtual drive, follow these steps: 1. Back up all of the user data on the virtual drive you intend to delete. 2. On the MegaRAID Storage Manager main menu window, select the Logical tab, and click the icon of the virtual drive you want to delete. 3. Select Go To->Virtual Drive->Delete Virtual Drive. 4. When the warning messages appear, click Yes to confirm that you want to delete the virtual drive. You are asked twice whether you want to delete the virtual disk to avoid deleting the virtual disk by mistake. Page 64 DB09-000202-05 37857-02 Configuration Rev. F - May 2011 Copyright © 2011 by LSI Corporation. All rights reserved.
-
 1
1 -
2
-
3
-
4
-
5
-
6
-
7
-
8
-
9
-
10
-
11
-
12
-
13
-
14
-
15
-
16
-
17
-
18
-
19
-
20
-
21
-
22
-
23
-
24
-
25
-
26
-
27
-
28
-
29
-
30
-
31
-
32
-
33
-
34
-
35
-
36
-
37
-
38
-
39
-
40
-
41
-
42
-
43
-
44
-
45
-
46
-
47
-
48
-
49
-
50
-
51
-
52
-
53
-
54
-
55
-
56
-
57
-
58
-
 59
59 -
 60
60 -
 61
61 -
 62
62 -
 63
63 -
 64
64 -
 65
65 -
 66
66 -
 67
67 -
 68
68 -
 69
69 -
70
-
71
-
72
-
73
-
74
-
75
-
76
-
77
-
78
-
79
-
80
-
81
-
82
-
83
-
84
-
85
-
86
-
87
-
88
-
89
-
90
-
91
-
92
-
93
-
94
-
95
-
96
-
97
-
98
-
99
-
100
-
101
-
102
-
103
-
104
-
105
-
106
-
107
-
108
-
109
-
110
-
111
-
112
-
113
-
114
-
115
-
116
-
117
-
118
-
119
-
120
-
121
-
122
-
123
-
124
-
125
-
126
-
127
-
128
-
129
-
130
-
131
-
132
-
133
-
134
-
135
-
136
-
137
-
138
-
139
-
140
-
141
-
142
-
143
-
144
-
145
-
146
-
147
-
148
-
149
-
150
-
151
-
152
-
153
-
154
-
155
-
156
-
157
-
158
-
159
-
160
-
161
-
162
-
163
-
164
-
165
-
166
-
167
-
168
-
169
-
170
-
171
-
172
-
173
-
174
-
175
-
176
-
177
-
178
 |
 |