Epson Stylus Pro 9000 Service Manual - Page 102
Overview, 5.1.1 Precautions, 5.1.2 Adjustment Tools, EPSON Stylus Pro 9000, Adjustments - kit
 |
View all Epson Stylus Pro 9000 manuals
Add to My Manuals
Save this manual to your list of manuals |
Page 102 highlights
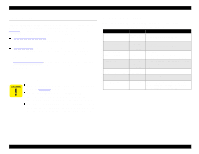
EPSON Stylus Pro 9000 5.1 Overview Follow the instructions in this section to perform any needed adjustments on the EPSON Stylus Pro 9000. After reading the precautions below, see Table 5-2 on page 103, which lists all possible adjustments and when you need to perform them. Then follow the links in the table to one these sections: ROM Backup and Updating on page 105 tells you how to backup the printer's ROM prior to replacing the main board. It also explains how to update the ROM. Self-Diagnostics on page 107 explains how to adjust various printer settings through the printer's control panel. You can also use the selfdiagnostic functions to clean the printhead, reset various counters, and make test prints. Mechanical Adjustments on page 130 explains how to check and adjust gear backlash, belt tension, and other mechanical settings of the motors and sensors. 5.1.1 Precautions Observe these precautions: Be sure to perform any adjustments in the order as listed in Table 5-2 on page 103. Avoid strong light (such as sunlight) while performing adjustments. The printer's optical sensors won't work properly under strong lighting. When performing an adjustment, read and follow the detailed instructions and caution information for that procedure; otherwise you may damage the printer. 5.1.2 Adjustment Tools Make sure you have the correct adjustment tools as described below: Table 5-1. Adjustment Tools Name Tension Gauge Tension Gauge #F712 Straight-edge ruler 1000 mm #F713 Vernier scale CR Cover Position Adjustment Tool #F724 Self-Training Kit #F708 Flash Memory Card #F727 Part Code B747700300; standard tool acceptable 1047744; standard tool acceptable 1047746; standard tool acceptable 1047745; standard tool acceptable Special Tool 1049975 1047105 Notes Max. 4000 g For PF Belt tension adjustment Max. 200 g For CR Belt tension adjustment Min. length: 1000 mm For adjusting PF distance and other settings; somewhat longer would be better Used in combination with straight-edge ruler for more accurate measurements (0.1 mm scale) - CD-ROM based 1050073 2MB flash memory card. Conforms to the 5 V read/write specification and PCMCIA Rel 2.1/JEIDA Ver 4.2 (Type II). Adjustments 102
-
 1
1 -
2
-
3
-
4
-
5
-
6
-
7
-
8
-
9
-
10
-
11
-
12
-
13
-
14
-
15
-
16
-
17
-
18
-
19
-
20
-
21
-
22
-
23
-
24
-
25
-
26
-
27
-
28
-
29
-
30
-
31
-
32
-
33
-
34
-
35
-
36
-
37
-
38
-
39
-
40
-
41
-
42
-
43
-
44
-
45
-
46
-
47
-
48
-
49
-
50
-
51
-
52
-
53
-
54
-
55
-
56
-
57
-
58
-
59
-
60
-
61
-
62
-
63
-
64
-
65
-
66
-
67
-
68
-
69
-
70
-
71
-
72
-
73
-
74
-
75
-
76
-
77
-
78
-
79
-
80
-
81
-
82
-
83
-
84
-
85
-
86
-
87
-
88
-
89
-
90
-
91
-
92
-
93
-
94
-
95
-
96
-
 97
97 -
 98
98 -
 99
99 -
 100
100 -
 101
101 -
 102
102 -
 103
103 -
 104
104 -
 105
105 -
 106
106 -
 107
107 -
108
-
109
-
110
-
111
-
112
-
113
-
114
-
115
-
116
-
117
-
118
-
119
-
120
-
121
-
122
-
123
-
124
-
125
-
126
-
127
-
128
-
129
-
130
-
131
-
132
-
133
-
134
-
135
-
136
-
137
-
138
-
139
-
140
-
141
-
142
-
143
-
144
-
145
-
146
-
147
-
148
-
149
-
150
-
151
-
152
-
153
-
154
-
155
-
156
-
157
-
158
-
159
-
160
-
161
-
162
-
163
-
164
-
165
-
166
-
167
-
168
-
169
-
170
-
171
-
172
-
173
-
174
-
175
-
176
-
177
-
178
-
179
-
180
-
181
-
182
-
183
-
184
-
185
-
186
-
187
-
188
-
189
-
190
-
191
-
192
-
193
-
194
-
195
-
196
-
197
-
198
 |
 |