Epson Stylus Pro 9000 Service Manual - Page 105
ROM Backup and Updating, Requirements for Backup, Backup Procedure
 |
View all Epson Stylus Pro 9000 manuals
Add to My Manuals
Save this manual to your list of manuals |
Page 105 highlights
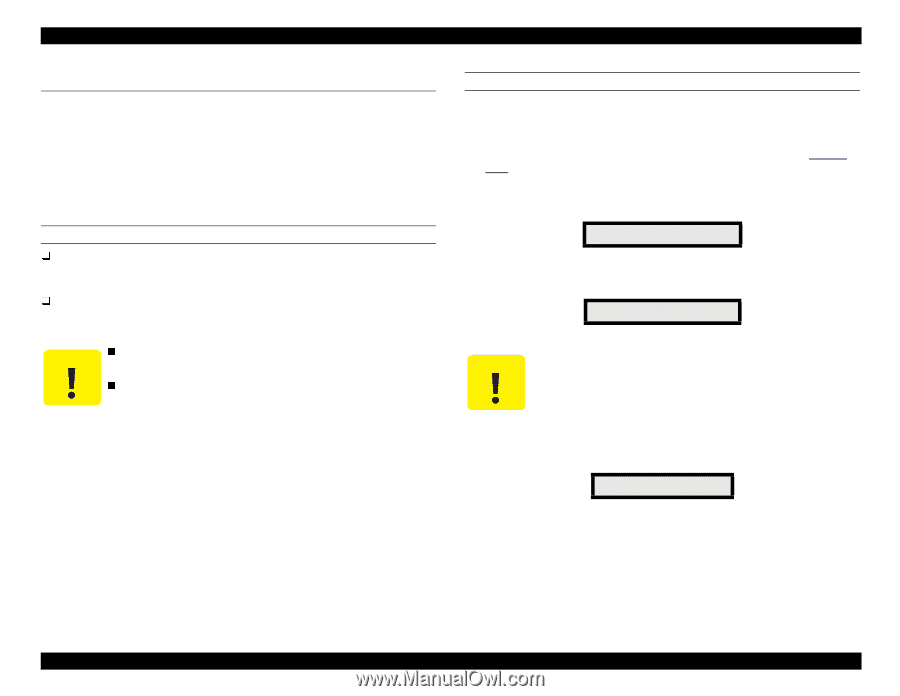
EPSON Stylus Pro 9000 5.2 ROM Backup and Updating The main board contains a flash ROM memory which stores the adjustment values and firmware commands that control the printer. This information must be correct for the printer to work properly. Before removing the main board, you should back up the ROM in case you have to replace the main board. You can then transfer the backup copy to the ROM on the new board, which reduces the number of adjustments you'll have to perform. REQUIREMENTS FOR BACKUP PC Card (2MB flash memory card) EPSON Part No. 1050073 (#F727 Flash Memory Card) Conforms to PCMCIA Rel 2.1/JEIDA Ver 4.2 (Type II) IPL data Before backing up the PC card, the following file must be copied to the PC card: Backup.exe (distributed on the STK CD) The PC card must meet the 5V read/write specification for PC cards. Do not try to back up the firmware that is stored on the firmware backup PC card. Doing so will result in the loss of firmware data. BACKUP PROCEDURE To backup (upload) data to the PC card, follow these steps: 1. Turn the printer off. 2. Remove the access plate on top of the Upper Paper Guide (see Figure 4-13 on page 64). Make sure the printer's control panel remains attached. 3. Insert the PC card into the PC card slot connector on the Main Board, and then turn on the printer. The following message appears on the LCD: Wait:F->M Push:M->F 4. The backup procedure starts about 15 seconds after the message appears. Flash -> Mcard Do not touch the Control Panel buttons during this procedure. Doing so will cause the PC card to download its data to the printer's ROM, instead of backing up the ROM. This will erase the contents of the ROM. 5. When the backup procedure is finished, you see the following: End [Success] Turn off the printer and remove the PC card. Adjustments 105
-
 1
1 -
2
-
3
-
4
-
5
-
6
-
7
-
8
-
9
-
10
-
11
-
12
-
13
-
14
-
15
-
16
-
17
-
18
-
19
-
20
-
21
-
22
-
23
-
24
-
25
-
26
-
27
-
28
-
29
-
30
-
31
-
32
-
33
-
34
-
35
-
36
-
37
-
38
-
39
-
40
-
41
-
42
-
43
-
44
-
45
-
46
-
47
-
48
-
49
-
50
-
51
-
52
-
53
-
54
-
55
-
56
-
57
-
58
-
59
-
60
-
61
-
62
-
63
-
64
-
65
-
66
-
67
-
68
-
69
-
70
-
71
-
72
-
73
-
74
-
75
-
76
-
77
-
78
-
79
-
80
-
81
-
82
-
83
-
84
-
85
-
86
-
87
-
88
-
89
-
90
-
91
-
92
-
93
-
94
-
95
-
96
-
97
-
98
-
99
-
 100
100 -
 101
101 -
 102
102 -
 103
103 -
 104
104 -
 105
105 -
 106
106 -
 107
107 -
 108
108 -
 109
109 -
 110
110 -
111
-
112
-
113
-
114
-
115
-
116
-
117
-
118
-
119
-
120
-
121
-
122
-
123
-
124
-
125
-
126
-
127
-
128
-
129
-
130
-
131
-
132
-
133
-
134
-
135
-
136
-
137
-
138
-
139
-
140
-
141
-
142
-
143
-
144
-
145
-
146
-
147
-
148
-
149
-
150
-
151
-
152
-
153
-
154
-
155
-
156
-
157
-
158
-
159
-
160
-
161
-
162
-
163
-
164
-
165
-
166
-
167
-
168
-
169
-
170
-
171
-
172
-
173
-
174
-
175
-
176
-
177
-
178
-
179
-
180
-
181
-
182
-
183
-
184
-
185
-
186
-
187
-
188
-
189
-
190
-
191
-
192
-
193
-
194
-
195
-
196
-
197
-
198
 |
 |