Epson Stylus Pro 9000 Service Manual - Page 108
Using the Self-Diagnostic Mode, Self-Diagnostic Controls, Table 5-3.
 |
View all Epson Stylus Pro 9000 manuals
Add to My Manuals
Save this manual to your list of manuals |
Page 108 highlights
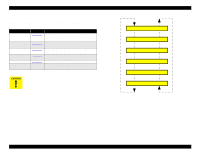
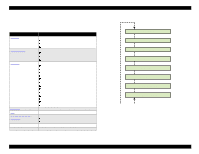
EPSON Stylus Pro 9000 5.3.1 Using the Self-Diagnostic Mode 1. To enter the Self-Diagnostic mode, press the following buttons on the Control Panel while turning on the printer (make sure the Paper Release Lever is lowered): Paper Feed ↓ + Cut/Eject + Cleaning "Check: Test" immediately appears on the LCD; if any other message appears, the printer has not entered the Self-Diagnostic mode. 2. Use the Control Panel buttons to activate a Self-Diagnostic function, as described in the table below. Table 5-3. Self-Diagnostic Mode Controls Normal Function Pause SelecType Paper Source + (Paper Feed ↑) (Paper Feed ↓) Cut/Eject Self-Diagnostic Function Return up one level Next menu Previous menu Next item or value Previous item or value Enter Meaning Moves up one level (without selecting at item). Displays the next menu. Displays the previous menu. Displays the next item or increases the value of the item shown on the LCD. Displays the previous item or decreases the value of the item shown on the LCD. Selects/activates the item. 3. To exit the Self-Diagnostic mode, turn off the printer. NOTE: Unless otherwise indicated, you should not use costly roll paper to print test patterns. Use standard cut-sheet sizes, 11 × 17 inch or larger. For adjustments that require a high degree of precision (Bi-D and head angle adjustments), be sure to use coated ink jet paper. All explanations in Self-Diagnostic mode refer to the printheads in the following way: Head B = K/C/M side (left side facing the printer) Head C = Lc/Lm/Y side (right side facing the printer) Adjustments Operate Pause Reset 3 sec. Ink Out K CM Paper Out LC LM Y SelecType Roll Auto Cut Roll Cutter Off Sheet Paper Source Item + Paper Feed _ Cut /Eject Power Enter Cleaning 3 sec. Move up one level To next or previous menu To next or previous item Selects or activates the item Figure 5-1. Self-Diagnostic Controls 108
-
 1
1 -
2
-
3
-
4
-
5
-
6
-
7
-
8
-
9
-
10
-
11
-
12
-
13
-
14
-
15
-
16
-
17
-
18
-
19
-
20
-
21
-
22
-
23
-
24
-
25
-
26
-
27
-
28
-
29
-
30
-
31
-
32
-
33
-
34
-
35
-
36
-
37
-
38
-
39
-
40
-
41
-
42
-
43
-
44
-
45
-
46
-
47
-
48
-
49
-
50
-
51
-
52
-
53
-
54
-
55
-
56
-
57
-
58
-
59
-
60
-
61
-
62
-
63
-
64
-
65
-
66
-
67
-
68
-
69
-
70
-
71
-
72
-
73
-
74
-
75
-
76
-
77
-
78
-
79
-
80
-
81
-
82
-
83
-
84
-
85
-
86
-
87
-
88
-
89
-
90
-
91
-
92
-
93
-
94
-
95
-
96
-
97
-
98
-
99
-
100
-
101
-
102
-
 103
103 -
 104
104 -
 105
105 -
 106
106 -
 107
107 -
 108
108 -
 109
109 -
 110
110 -
 111
111 -
 112
112 -
 113
113 -
114
-
115
-
116
-
117
-
118
-
119
-
120
-
121
-
122
-
123
-
124
-
125
-
126
-
127
-
128
-
129
-
130
-
131
-
132
-
133
-
134
-
135
-
136
-
137
-
138
-
139
-
140
-
141
-
142
-
143
-
144
-
145
-
146
-
147
-
148
-
149
-
150
-
151
-
152
-
153
-
154
-
155
-
156
-
157
-
158
-
159
-
160
-
161
-
162
-
163
-
164
-
165
-
166
-
167
-
168
-
169
-
170
-
171
-
172
-
173
-
174
-
175
-
176
-
177
-
178
-
179
-
180
-
181
-
182
-
183
-
184
-
185
-
186
-
187
-
188
-
189
-
190
-
191
-
192
-
193
-
194
-
195
-
196
-
197
-
198
 |
 |
