Epson Stylus Pro 9000 Service Manual - Page 132
Carriage Belt Tension Adjustment, CR Drive, Belt Pulley, Carriage Assembly, Motor
 |
View all Epson Stylus Pro 9000 manuals
Add to My Manuals
Save this manual to your list of manuals |
Page 132 highlights
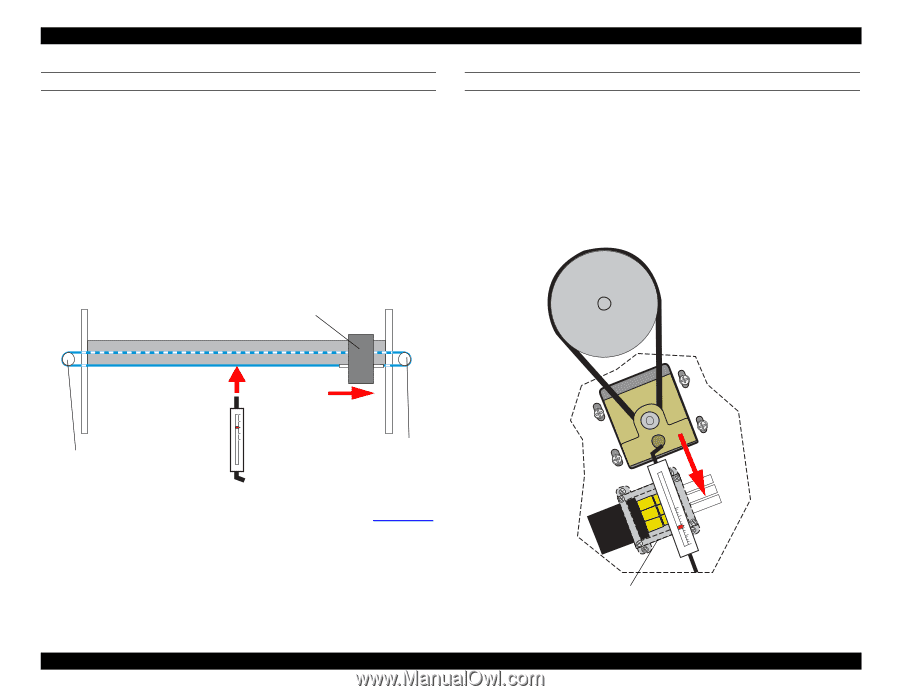
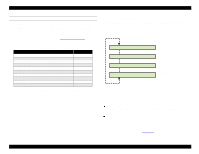
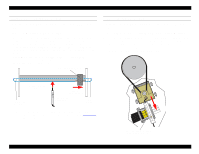
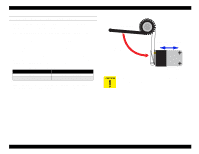
EPSON Stylus Pro 9000 CARRIAGE BELT TENSION ADJUSTMENT Perform this adjustment whenever you remove or loosen the CR Motor or CR Belt. 1. Make sure the Carriage is in home position. 2. Apply the tip of the tension gauge to the underside of the CR Belt in the middle of the printer. While stabilizing the belt with your free hand, push the gauge far enough up so that the belt presses firmly against the underside of the Carriage Guide Rail. You can also place a piece of double-backed tape on the belt while making the measurement to help hold the tip of the gauge in place. 3. Carefully lower the gauge just until the belt loses contact with the underside of the Carriage Guide Rail. The belt tension is correct if the gauge reads 3.5 oz (100 g) ± 10%. Carriage Assembly PF BELT TENSION ADJUSTMENT Perform this adjustment whenever you remove or loosen the PF Motor or PF Belt. 1. Loosen the four screws securing the PF Motor assembly to the printer. 2. Hook the tension gauge in the PF Motor Mounting Bracket, and pull it away from the bracket as shown below. If the ink tubes are in the way, you can remove the pipe holder and let the ink tubes hang freely. 3. The adjustment is correct when the gauge reads 7.7 lb (3500 g) ± 10%. Retighten the screws to complete the adjustment. 2) Test the tension in the center. CR Drive Belt Pulley 1) Move to capping position 3) Verify tension is 100g ± 10% CR Motor 4. If the belt's tension is not correct, adjust the tensioning screws on the CR Drive Belt Pulley located on the left side of the printer. See Figure 4-29 on page 75. Then recheck the tension. Adjustments You may need to remove the pipe holder and let the ink tubes hang freely. 132
-
 1
1 -
2
-
3
-
4
-
5
-
6
-
7
-
8
-
9
-
10
-
11
-
12
-
13
-
14
-
15
-
16
-
17
-
18
-
19
-
20
-
21
-
22
-
23
-
24
-
25
-
26
-
27
-
28
-
29
-
30
-
31
-
32
-
33
-
34
-
35
-
36
-
37
-
38
-
39
-
40
-
41
-
42
-
43
-
44
-
45
-
46
-
47
-
48
-
49
-
50
-
51
-
52
-
53
-
54
-
55
-
56
-
57
-
58
-
59
-
60
-
61
-
62
-
63
-
64
-
65
-
66
-
67
-
68
-
69
-
70
-
71
-
72
-
73
-
74
-
75
-
76
-
77
-
78
-
79
-
80
-
81
-
82
-
83
-
84
-
85
-
86
-
87
-
88
-
89
-
90
-
91
-
92
-
93
-
94
-
95
-
96
-
97
-
98
-
99
-
100
-
101
-
102
-
103
-
104
-
105
-
106
-
107
-
108
-
109
-
110
-
111
-
112
-
113
-
114
-
115
-
116
-
117
-
118
-
119
-
120
-
121
-
122
-
123
-
124
-
125
-
126
-
 127
127 -
 128
128 -
 129
129 -
 130
130 -
 131
131 -
 132
132 -
 133
133 -
 134
134 -
 135
135 -
 136
136 -
 137
137 -
138
-
139
-
140
-
141
-
142
-
143
-
144
-
145
-
146
-
147
-
148
-
149
-
150
-
151
-
152
-
153
-
154
-
155
-
156
-
157
-
158
-
159
-
160
-
161
-
162
-
163
-
164
-
165
-
166
-
167
-
168
-
169
-
170
-
171
-
172
-
173
-
174
-
175
-
176
-
177
-
178
-
179
-
180
-
181
-
182
-
183
-
184
-
185
-
186
-
187
-
188
-
189
-
190
-
191
-
192
-
193
-
194
-
195
-
196
-
197
-
198
 |
 |