Epson Stylus Pro 9000 Service Manual - Page 77
PF Motor Removal, Timing Belt Removal, CPW2 M3x8
 |
View all Epson Stylus Pro 9000 manuals
Add to My Manuals
Save this manual to your list of manuals |
Page 77 highlights
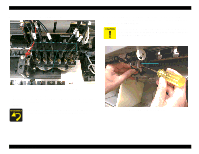
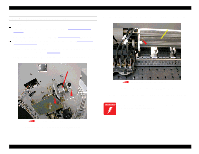
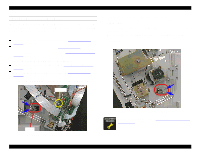
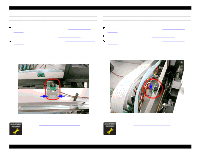
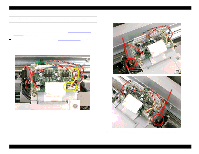
EPSON Stylus Pro 9000 3. Disconnect the PF Motor Encoder cable connector (black, gray, and white wires). 4. Remove the two CP(W2) M3x8 screws securing the PF Motor to the PF Motor Mounting Bracket, and then remove the PF Motor. If necessary, raise up the PF Motor Mounting Bracket to reduce belt tension while removing the motor. 5. If you need to remove the timing belt, remove the four screws (CP(W2) M4x8) securing the Speed-Reduction Gear Frame, and then remove the frame and the belt. CP(W2) M3x8 Figure 4-33. PF Motor Removal Speed-Reduction Gear Frame CP(W2) M4x8 Figure 4-34. Timing Belt Removal After reinstalling the Lower Paper Guide, perform the Cutter Position Adjustment. Disassembly & Assembly 77
-
 1
1 -
2
-
3
-
4
-
5
-
6
-
7
-
8
-
9
-
10
-
11
-
12
-
13
-
14
-
15
-
16
-
17
-
18
-
19
-
20
-
21
-
22
-
23
-
24
-
25
-
26
-
27
-
28
-
29
-
30
-
31
-
32
-
33
-
34
-
35
-
36
-
37
-
38
-
39
-
40
-
41
-
42
-
43
-
44
-
45
-
46
-
47
-
48
-
49
-
50
-
51
-
52
-
53
-
54
-
55
-
56
-
57
-
58
-
59
-
60
-
61
-
62
-
63
-
64
-
65
-
66
-
67
-
68
-
69
-
70
-
71
-
 72
72 -
 73
73 -
 74
74 -
 75
75 -
 76
76 -
 77
77 -
 78
78 -
 79
79 -
 80
80 -
 81
81 -
 82
82 -
83
-
84
-
85
-
86
-
87
-
88
-
89
-
90
-
91
-
92
-
93
-
94
-
95
-
96
-
97
-
98
-
99
-
100
-
101
-
102
-
103
-
104
-
105
-
106
-
107
-
108
-
109
-
110
-
111
-
112
-
113
-
114
-
115
-
116
-
117
-
118
-
119
-
120
-
121
-
122
-
123
-
124
-
125
-
126
-
127
-
128
-
129
-
130
-
131
-
132
-
133
-
134
-
135
-
136
-
137
-
138
-
139
-
140
-
141
-
142
-
143
-
144
-
145
-
146
-
147
-
148
-
149
-
150
-
151
-
152
-
153
-
154
-
155
-
156
-
157
-
158
-
159
-
160
-
161
-
162
-
163
-
164
-
165
-
166
-
167
-
168
-
169
-
170
-
171
-
172
-
173
-
174
-
175
-
176
-
177
-
178
-
179
-
180
-
181
-
182
-
183
-
184
-
185
-
186
-
187
-
188
-
189
-
190
-
191
-
192
-
193
-
194
-
195
-
196
-
197
-
198
 |
 |

EPSON Stylus Pro 9000
Disassembly & Assembly
77
3.
Disconnect the PF Motor Encoder cable connector (black, gray, and white
wires).
4.
Remove the two CP(W2) M3x8 screws securing the PF Motor to the
PF Motor Mounting Bracket, and then remove the PF Motor. If necessary,
raise up the PF Motor Mounting Bracket to reduce belt tension while
removing the motor.
Figure 4-33.
PF Motor Removal
5.
If you need to remove the timing belt, remove the four screws (CP(W2)
M4x8) securing the Speed-Reduction Gear Frame, and then remove the
frame and the belt.
Figure 4-34.
Timing Belt Removal
CP(W2) M3x8
A
D
J
U
S
T
M
E
N
T
R
E
Q
U
I
R
E
D
After reinstalling the Lower Paper Guide, perform the Cutter
Position Adjustment.
CP(W2) M4x8
Speed-Reduction
Gear Frame