Epson Stylus Pro 9000 Service Manual - Page 84
Ink Holder Disassembly, 4.6.1 Removing the I/C Holder Assembly
 |
View all Epson Stylus Pro 9000 manuals
Add to My Manuals
Save this manual to your list of manuals |
Page 84 highlights
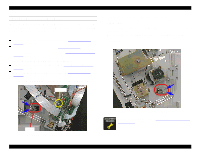
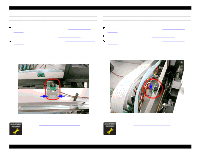
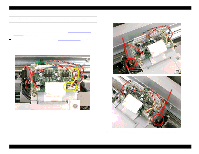
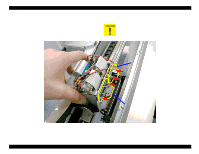
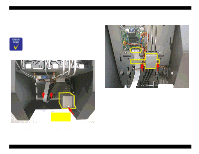
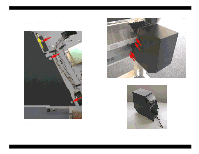
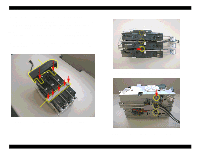
EPSON Stylus Pro 9000 4.6 Ink Holder Disassembly This section describes how to remove and disassemble the Ink Holder Assembly. Before removing the Ink Holder Assembly, you have to discharge all ink from the ink system. See step 1 below. After reassembling the Ink Holder Assembly, install new ink cartridges and perform the Initial Ink Charge operation. See Cleaning menu on page 128. 4.6.1 Removing the I/C Holder Assembly 1. Perform the ink discharge operation to eject inks from all ink paths. See Clean Head (Drain Ink) on page 127. 2. Remove the side covers (L/R). See Left and Right Side Cover Removal on page 60. 3. Remove the four screws (CP(W2) M3x6) secureing the ink tube fixing plate, and loosen the lock nut securing the ink tubes to the ink pipes ad disconnect the ink tubes from the ink pipes. 4. Remove the four screws (CP(W2) M2x4) securing the access cover attached at the back of the I/H assembly. Ink tube fixing plate Figure 4-46. Disconnecting the ink tubes Disassembly & Assembly Figure 4-47. Removing the access cover 84
-
 1
1 -
2
-
3
-
4
-
5
-
6
-
7
-
8
-
9
-
10
-
11
-
12
-
13
-
14
-
15
-
16
-
17
-
18
-
19
-
20
-
21
-
22
-
23
-
24
-
25
-
26
-
27
-
28
-
29
-
30
-
31
-
32
-
33
-
34
-
35
-
36
-
37
-
38
-
39
-
40
-
41
-
42
-
43
-
44
-
45
-
46
-
47
-
48
-
49
-
50
-
51
-
52
-
53
-
54
-
55
-
56
-
57
-
58
-
59
-
60
-
61
-
62
-
63
-
64
-
65
-
66
-
67
-
68
-
69
-
70
-
71
-
72
-
73
-
74
-
75
-
76
-
77
-
78
-
 79
79 -
 80
80 -
 81
81 -
 82
82 -
 83
83 -
 84
84 -
 85
85 -
 86
86 -
 87
87 -
 88
88 -
 89
89 -
90
-
91
-
92
-
93
-
94
-
95
-
96
-
97
-
98
-
99
-
100
-
101
-
102
-
103
-
104
-
105
-
106
-
107
-
108
-
109
-
110
-
111
-
112
-
113
-
114
-
115
-
116
-
117
-
118
-
119
-
120
-
121
-
122
-
123
-
124
-
125
-
126
-
127
-
128
-
129
-
130
-
131
-
132
-
133
-
134
-
135
-
136
-
137
-
138
-
139
-
140
-
141
-
142
-
143
-
144
-
145
-
146
-
147
-
148
-
149
-
150
-
151
-
152
-
153
-
154
-
155
-
156
-
157
-
158
-
159
-
160
-
161
-
162
-
163
-
164
-
165
-
166
-
167
-
168
-
169
-
170
-
171
-
172
-
173
-
174
-
175
-
176
-
177
-
178
-
179
-
180
-
181
-
182
-
183
-
184
-
185
-
186
-
187
-
188
-
189
-
190
-
191
-
192
-
193
-
194
-
195
-
196
-
197
-
198
 |
 |
