Epson Stylus Pro 9000 Service Manual - Page 85
Removing the fixing plate, Removing the FFC
 |
View all Epson Stylus Pro 9000 manuals
Add to My Manuals
Save this manual to your list of manuals |
Page 85 highlights
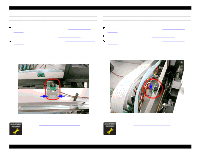
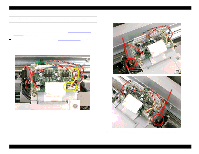
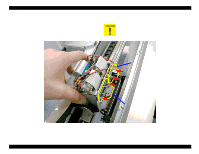
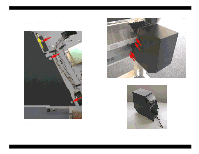
EPSON Stylus Pro 9000 5. Loosen two screws securing the fixintg plate that holding the ink tubes and a FFC inside the I/H assembly. And unhook two tabs and remove the hand hold cover. 6. Remove the two screws (CP(W2) M3x6) securing the ink tube holder plate, and disconnect the FFC from the connector on the I/H relay board attached at the bottom of the I/H assembly as shown at right. To remove two screws securing the ink tube holder plate, you need a short-neck screwdriver. Push to release the tabs Figure 4-48. Removing the fixing plate Disassembly & Assembly Figure 4-49. Removing the FFC 85
-
 1
1 -
2
-
3
-
4
-
5
-
6
-
7
-
8
-
9
-
10
-
11
-
12
-
13
-
14
-
15
-
16
-
17
-
18
-
19
-
20
-
21
-
22
-
23
-
24
-
25
-
26
-
27
-
28
-
29
-
30
-
31
-
32
-
33
-
34
-
35
-
36
-
37
-
38
-
39
-
40
-
41
-
42
-
43
-
44
-
45
-
46
-
47
-
48
-
49
-
50
-
51
-
52
-
53
-
54
-
55
-
56
-
57
-
58
-
59
-
60
-
61
-
62
-
63
-
64
-
65
-
66
-
67
-
68
-
69
-
70
-
71
-
72
-
73
-
74
-
75
-
76
-
77
-
78
-
79
-
 80
80 -
 81
81 -
 82
82 -
 83
83 -
 84
84 -
 85
85 -
 86
86 -
 87
87 -
 88
88 -
 89
89 -
 90
90 -
91
-
92
-
93
-
94
-
95
-
96
-
97
-
98
-
99
-
100
-
101
-
102
-
103
-
104
-
105
-
106
-
107
-
108
-
109
-
110
-
111
-
112
-
113
-
114
-
115
-
116
-
117
-
118
-
119
-
120
-
121
-
122
-
123
-
124
-
125
-
126
-
127
-
128
-
129
-
130
-
131
-
132
-
133
-
134
-
135
-
136
-
137
-
138
-
139
-
140
-
141
-
142
-
143
-
144
-
145
-
146
-
147
-
148
-
149
-
150
-
151
-
152
-
153
-
154
-
155
-
156
-
157
-
158
-
159
-
160
-
161
-
162
-
163
-
164
-
165
-
166
-
167
-
168
-
169
-
170
-
171
-
172
-
173
-
174
-
175
-
176
-
177
-
178
-
179
-
180
-
181
-
182
-
183
-
184
-
185
-
186
-
187
-
188
-
189
-
190
-
191
-
192
-
193
-
194
-
195
-
196
-
197
-
198
 |
 |

EPSON Stylus Pro 9000
Disassembly & Assembly
85
5.
Loosen two screws securing the fixintg plate that holding the ink tubes and
a FFC inside the I/H assembly. And unhook two tabs and remove the hand
hold cover.
6.
Remove the two screws (CP(W2) M3x6) securing the ink tube holder plate,
and disconnect the FFC from the connector on the I/H relay board attached
at the bottom of the I/H assembly as shown at right.
Figure 4-48.
Removing the fixing plate
Figure 4-49.
Removing the FFC
C
H
E
C
K
P
O
I
N
T
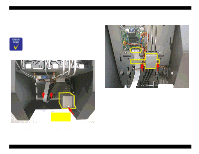
To remove two screws securing the ink tube holder plate,
you need a short-neck screwdriver.
Push to release
the tabs