Epson Stylus Pro 9000 Service Manual - Page 123
Head LR Adjustment (Head Gap Timing), Make sure Adj: Head LR Adj. appears on the LCD
 |
View all Epson Stylus Pro 9000 manuals
Add to My Manuals
Save this manual to your list of manuals |
Page 123 highlights
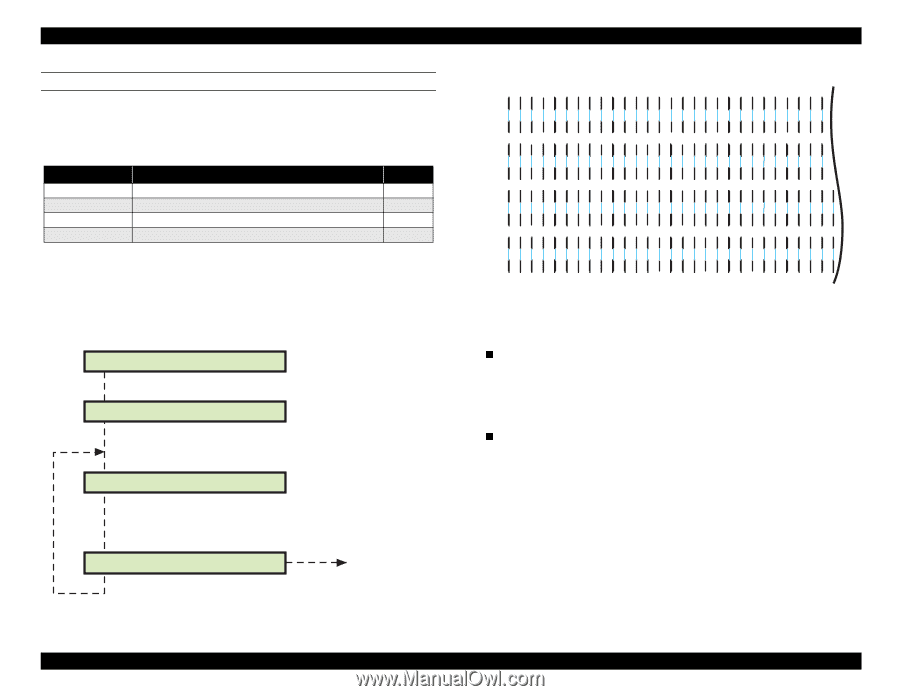
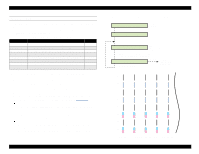
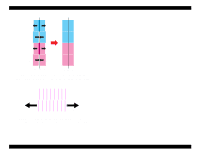
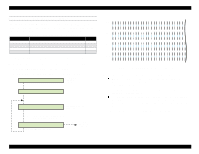
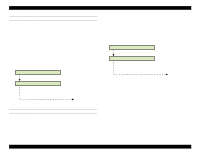
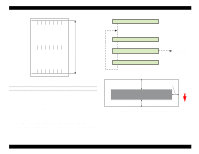
EPSON Stylus Pro 9000 HEAD LR ADJUSTMENT (HEAD GAP TIMING) This function electronically compensates for the gap between Head B and Head C. By referring to the printed test pattern, check the adjustment setting and make any needed corrections in each of the following modes: Table 5-9. Head Gap Adjustment Mode Mode Description Number Gap/200/N Gap/200/M Gap/300/N Gap/300/M Gap adjustment/200cps/Normal-Dot 9 Gap adjustment/200cps/Micro-Dot 10 Gap adjustment/300cps/Normal-Dot 11 Gap adjustment/300cps/Micro-Dot 12 Note: "Number" refers to the numbered pattern on the printed Head Gap test pattern. 1. Make sure "Adj: Head LR Adj." appears on the LCD, and press Enter. 2. Load paper if not already loaded and press Enter. 3. All the patterns print, and "Gap, 200, N: xxx" appears on the LCD. [Enter] Adjust Print Load paper and press [Enter] Printing Pattern Gap XXX Y: 0 XXX= "300" or "200"/ Y="N" or "M" Based on the printed pattern, make sure each numbered pattern is aligned. Gap Check End [Enter] [SelecType]/[Paper Source] End adjustment/ next menu #9 #10 #11 #12 Figure 5-10. Gap Adjustment Test Pattern 4. Check the alignment of the lines on the printed test pattern. If all the lines are correctly lined up as in the above sample, press SelecType or Item until "Gap End" appears on the LCD, and then press Enter to finish. NOTE: "Gap End" may appear as the following string of garbled characters: "Gap 0" If some lines are not aligned, select the numbered pattern using the SelecType or Item button and then press Enter. Then use the Paper Feed +/- buttons to correct the pattern. Press Enter to print another test pattern using the setting you just made. 5. Repeat the steps until all numbered patterns are aligned. Adjustments 123
-
 1
1 -
2
-
3
-
4
-
5
-
6
-
7
-
8
-
9
-
10
-
11
-
12
-
13
-
14
-
15
-
16
-
17
-
18
-
19
-
20
-
21
-
22
-
23
-
24
-
25
-
26
-
27
-
28
-
29
-
30
-
31
-
32
-
33
-
34
-
35
-
36
-
37
-
38
-
39
-
40
-
41
-
42
-
43
-
44
-
45
-
46
-
47
-
48
-
49
-
50
-
51
-
52
-
53
-
54
-
55
-
56
-
57
-
58
-
59
-
60
-
61
-
62
-
63
-
64
-
65
-
66
-
67
-
68
-
69
-
70
-
71
-
72
-
73
-
74
-
75
-
76
-
77
-
78
-
79
-
80
-
81
-
82
-
83
-
84
-
85
-
86
-
87
-
88
-
89
-
90
-
91
-
92
-
93
-
94
-
95
-
96
-
97
-
98
-
99
-
100
-
101
-
102
-
103
-
104
-
105
-
106
-
107
-
108
-
109
-
110
-
111
-
112
-
113
-
114
-
115
-
116
-
117
-
 118
118 -
 119
119 -
 120
120 -
 121
121 -
 122
122 -
 123
123 -
 124
124 -
 125
125 -
 126
126 -
 127
127 -
 128
128 -
129
-
130
-
131
-
132
-
133
-
134
-
135
-
136
-
137
-
138
-
139
-
140
-
141
-
142
-
143
-
144
-
145
-
146
-
147
-
148
-
149
-
150
-
151
-
152
-
153
-
154
-
155
-
156
-
157
-
158
-
159
-
160
-
161
-
162
-
163
-
164
-
165
-
166
-
167
-
168
-
169
-
170
-
171
-
172
-
173
-
174
-
175
-
176
-
177
-
178
-
179
-
180
-
181
-
182
-
183
-
184
-
185
-
186
-
187
-
188
-
189
-
190
-
191
-
192
-
193
-
194
-
195
-
196
-
197
-
198
 |
 |