Epson Stylus Pro 9000 Service Manual - Page 148
EPSON Stylus Pro 9000, Appendix, Make sure the four holes on the upper support are
 |
View all Epson Stylus Pro 9000 manuals
Add to My Manuals
Save this manual to your list of manuals |
Page 148 highlights
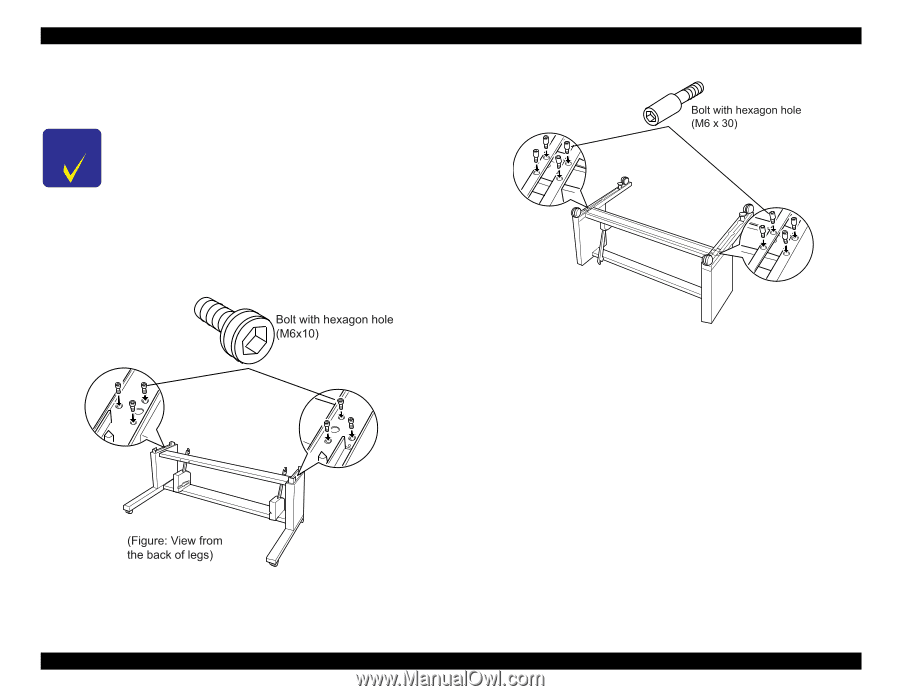
EPSON Stylus Pro 9000 3. Install the top and bottom horizontal stand supports (holes facing correct direction) to the right-side leg and temporarily secure the top support with the hexagonal bolts (M6 x 10). Repeat for the left-side leg Make sure the four holes on the upper support are on the left when facing the rear and on the right when facing the front. 4. Turn over the stand so that the bottom faces up. Then, connect the bottom support and secure the support with the hexagonal bolts (M6 x 30). 5. Turn over the assembled stand again, and completely secure the topsupport bolts. Appendix 148
-
 1
1 -
2
-
3
-
4
-
5
-
6
-
7
-
8
-
9
-
10
-
11
-
12
-
13
-
14
-
15
-
16
-
17
-
18
-
19
-
20
-
21
-
22
-
23
-
24
-
25
-
26
-
27
-
28
-
29
-
30
-
31
-
32
-
33
-
34
-
35
-
36
-
37
-
38
-
39
-
40
-
41
-
42
-
43
-
44
-
45
-
46
-
47
-
48
-
49
-
50
-
51
-
52
-
53
-
54
-
55
-
56
-
57
-
58
-
59
-
60
-
61
-
62
-
63
-
64
-
65
-
66
-
67
-
68
-
69
-
70
-
71
-
72
-
73
-
74
-
75
-
76
-
77
-
78
-
79
-
80
-
81
-
82
-
83
-
84
-
85
-
86
-
87
-
88
-
89
-
90
-
91
-
92
-
93
-
94
-
95
-
96
-
97
-
98
-
99
-
100
-
101
-
102
-
103
-
104
-
105
-
106
-
107
-
108
-
109
-
110
-
111
-
112
-
113
-
114
-
115
-
116
-
117
-
118
-
119
-
120
-
121
-
122
-
123
-
124
-
125
-
126
-
127
-
128
-
129
-
130
-
131
-
132
-
133
-
134
-
135
-
136
-
137
-
138
-
139
-
140
-
141
-
142
-
 143
143 -
 144
144 -
 145
145 -
 146
146 -
 147
147 -
 148
148 -
 149
149 -
 150
150 -
 151
151 -
 152
152 -
 153
153 -
154
-
155
-
156
-
157
-
158
-
159
-
160
-
161
-
162
-
163
-
164
-
165
-
166
-
167
-
168
-
169
-
170
-
171
-
172
-
173
-
174
-
175
-
176
-
177
-
178
-
179
-
180
-
181
-
182
-
183
-
184
-
185
-
186
-
187
-
188
-
189
-
190
-
191
-
192
-
193
-
194
-
195
-
196
-
197
-
198
 |
 |
EPSON Stylus Pro 9000
Appendix
148
3.
Install the top and bottom horizontal stand supports (holes facing correct
direction) to the right-side leg and temporarily secure the top support with
the hexagonal bolts (M6 x 10). Repeat for the left-side leg
4.
Turn over the stand so that the bottom faces up. Then, connect the bottom
support and secure the support with the hexagonal bolts (M6 x 30).
5.
Turn over the assembled stand again, and completely secure the top-
support bolts.
C
H
E
C
K
P
O
I
N
T
Make sure the four holes on the upper support are on
the left when facing the rear and on the right when
facing the front.