Epson Stylus Pro 9000 Service Manual - Page 138
Overview, 6.2 Physical Inspection and Cleaning, EPSON Stylus Pro 9000, Maintenance
 |
View all Epson Stylus Pro 9000 manuals
Add to My Manuals
Save this manual to your list of manuals |
Page 138 highlights
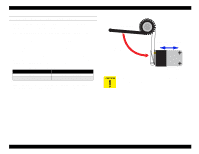
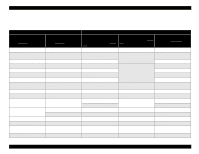
EPSON Stylus Pro 9000 6.1 Overview When servicing the printer, you need to perform certain routine inspection and maintenance procedures: Examine the parts listed in Physical Inspection and Cleaning on page 138 and perform any maintenance as needed. Check the printer's maintenance counters as described in Checking and Clearing Counters on page 139. If a part is at or near the end of its life, replace it as instructed and clear the corresponding counter. If the printer displays a Service Call or Maintenance Call error, a part may need to be replaced; see Service Error Codes and Replaceable Parts on page 143. If an Ink Out light is flashing or on, see Ink Cartridge Replacement on page 144. If you notice that the paper doesn't cut cleanly, the cutter blade may need to be replaced. See Cutter Blade Replacement on page 144. If your printouts have jagged or missing lines or gaps, see Print Quality Troubleshooting on page 49. This tells you how to: print a nozzle check pattern clean the printhead adjust the printhead alignment 6.2 Physical Inspection and Cleaning When servicing the printer, inpect the following parts and perform any maintenance as needed: Table 6-1. Parts to be Checked During Service Where to look What to look for Maintenance Lower Paper Guide and the surface of the Subplaten Paper shreds, paper dust, foreign objects, or ink stains Clean with a moist cloth, if necessary, and then wipe dry Timing Fence (timing strip used by linear encoder to determine CR position) Dust, stains, or foreign objects that may interfere with the sensor; also make sure the timing fence is not bent or torn Clean with a moist cloth, if possible; otherwise replace CR Guide Rail Paper shreds or other foreign Remove any foreign matter matter Front and Rear Paper Sensors Paper shreds, paper dust, or other debris on the sensor surface Clean using compressed air This printer does not require any lubrication. Refrain from applying any oil or grease, since it may damage the printer. Maintenance 138
-
 1
1 -
2
-
3
-
4
-
5
-
6
-
7
-
8
-
9
-
10
-
11
-
12
-
13
-
14
-
15
-
16
-
17
-
18
-
19
-
20
-
21
-
22
-
23
-
24
-
25
-
26
-
27
-
28
-
29
-
30
-
31
-
32
-
33
-
34
-
35
-
36
-
37
-
38
-
39
-
40
-
41
-
42
-
43
-
44
-
45
-
46
-
47
-
48
-
49
-
50
-
51
-
52
-
53
-
54
-
55
-
56
-
57
-
58
-
59
-
60
-
61
-
62
-
63
-
64
-
65
-
66
-
67
-
68
-
69
-
70
-
71
-
72
-
73
-
74
-
75
-
76
-
77
-
78
-
79
-
80
-
81
-
82
-
83
-
84
-
85
-
86
-
87
-
88
-
89
-
90
-
91
-
92
-
93
-
94
-
95
-
96
-
97
-
98
-
99
-
100
-
101
-
102
-
103
-
104
-
105
-
106
-
107
-
108
-
109
-
110
-
111
-
112
-
113
-
114
-
115
-
116
-
117
-
118
-
119
-
120
-
121
-
122
-
123
-
124
-
125
-
126
-
127
-
128
-
129
-
130
-
131
-
132
-
 133
133 -
 134
134 -
 135
135 -
 136
136 -
 137
137 -
 138
138 -
 139
139 -
 140
140 -
 141
141 -
 142
142 -
 143
143 -
144
-
145
-
146
-
147
-
148
-
149
-
150
-
151
-
152
-
153
-
154
-
155
-
156
-
157
-
158
-
159
-
160
-
161
-
162
-
163
-
164
-
165
-
166
-
167
-
168
-
169
-
170
-
171
-
172
-
173
-
174
-
175
-
176
-
177
-
178
-
179
-
180
-
181
-
182
-
183
-
184
-
185
-
186
-
187
-
188
-
189
-
190
-
191
-
192
-
193
-
194
-
195
-
196
-
197
-
198
 |
 |