Epson Stylus Pro 9000 Service Manual - Page 31
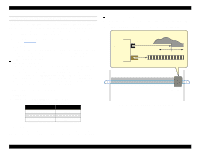
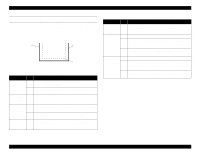
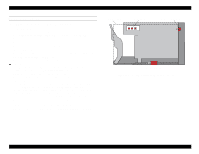
Paper Width Determination (Left and Right edge Detection), Right Paper Edge, Printable Area
 |
View all Epson Stylus Pro 9000 manuals
Add to My Manuals
Save this manual to your list of manuals |
Page 31 highlights
EPSON Stylus Pro 9000 PAPER WIDTH DETERMINATION (LEFT AND RIGHT EDGE DETECTION) Before printing, the printer sets the platen gap and then flushes the printheads to make sure no ink smears the paper. The printer then detects the left and right edges of the paper. Note how "left" and "right" are defined below: Right Paper Edge Left Paper Edge Printable Area To detect the left and right edges, the printer performs the following steps: Table 2-5. Left and Right Edge Detection Purpose Step Action To make sure paper is loaded correctly 1 The carriage moves just to the inside of where the left edge should be, if the paper is loaded correctly. 2 The Paper Width Sensor checks for paper. If paper is detected, go to step 3; otherwise report "Reload Paper" error. To establish sensor signal level 3 The printer registers the sensor's "paper present" (ON) signal level. To make sure paper is loaded correctly 4 The carriage moves just to the outside of where the left edge should be, if the paper is loaded correctly. 5 The Paper Width Sensor checks for paper. If paper is not detected, go to step 6; otherwise report "Reload Paper" error. To establish sensor signal level 6 The printer registers the sensor's "no paper" (OFF) signal level. Table 2-5. Left and Right Edge Detection (continued) Purpose Step Action To determine position of left edge 7 The carriage moves to the left paper edge and registers its position. 8 The carriage moves to the right edge of the paper. To determine position of right edge The Paper Width Sensor checks for paper. If paper is not 9 detected, go to step 10; otherwise, report "Reload Paper" error. 10 The printer registers the position of the right edge of the paper. 11 The carriage returns to the left paper edge. To verify left edge position and determine paper width The Paper Width Sensor checks for paper. If paper is not 12 detected, go to step 13; otherwise, report "Reload Paper" error. 13 The printer verifies the edge position and registers the distance from one edge of the paper to the other. Technical Overview 31
-
 1
1 -
2
-
3
-
4
-
5
-
6
-
7
-
8
-
9
-
10
-
11
-
12
-
13
-
14
-
15
-
16
-
17
-
18
-
19
-
20
-
21
-
22
-
23
-
24
-
25
-
 26
26 -
 27
27 -
 28
28 -
 29
29 -
 30
30 -
 31
31 -
 32
32 -
 33
33 -
 34
34 -
 35
35 -
 36
36 -
37
-
38
-
39
-
40
-
41
-
42
-
43
-
44
-
45
-
46
-
47
-
48
-
49
-
50
-
51
-
52
-
53
-
54
-
55
-
56
-
57
-
58
-
59
-
60
-
61
-
62
-
63
-
64
-
65
-
66
-
67
-
68
-
69
-
70
-
71
-
72
-
73
-
74
-
75
-
76
-
77
-
78
-
79
-
80
-
81
-
82
-
83
-
84
-
85
-
86
-
87
-
88
-
89
-
90
-
91
-
92
-
93
-
94
-
95
-
96
-
97
-
98
-
99
-
100
-
101
-
102
-
103
-
104
-
105
-
106
-
107
-
108
-
109
-
110
-
111
-
112
-
113
-
114
-
115
-
116
-
117
-
118
-
119
-
120
-
121
-
122
-
123
-
124
-
125
-
126
-
127
-
128
-
129
-
130
-
131
-
132
-
133
-
134
-
135
-
136
-
137
-
138
-
139
-
140
-
141
-
142
-
143
-
144
-
145
-
146
-
147
-
148
-
149
-
150
-
151
-
152
-
153
-
154
-
155
-
156
-
157
-
158
-
159
-
160
-
161
-
162
-
163
-
164
-
165
-
166
-
167
-
168
-
169
-
170
-
171
-
172
-
173
-
174
-
175
-
176
-
177
-
178
-
179
-
180
-
181
-
182
-
183
-
184
-
185
-
186
-
187
-
188
-
189
-
190
-
191
-
192
-
193
-
194
-
195
-
196
-
197
-
198
 |
 |
