Epson Stylus Pro 9000 Service Manual - Page 68
Left Waste Ink Box, Remove the Waste Ink Pads from the left and right Waste Ink Boxes.
 |
View all Epson Stylus Pro 9000 manuals
Add to My Manuals
Save this manual to your list of manuals |
Page 68 highlights
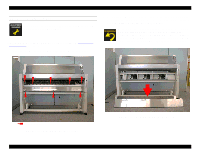
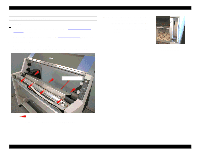
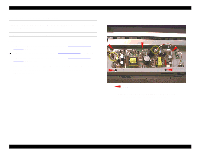
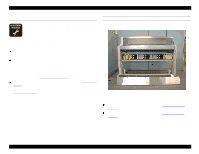
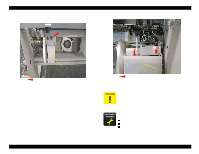
EPSON Stylus Pro 9000 1. Remove the screws that secure the Waste Ink Boxes to the printer (see the figures below), and then remove the Waste Ink Boxes. Waste Ink Box L CP(W2) M4x8 Figure 4-18. Left Waste Ink Box Disassembly & Assembly Waste Ink Box R CP(W2) M4x8 screws Figure 4-19. Right Waste Ink Box 2. Remove the Waste Ink Pads from the left and right Waste Ink Boxes. Prepare a vinyl bag beforehand for disposing of the pads. After replacing the Waste Ink Pads, perform the following adjustments: reset the waste ink counter reset the initial cleaning flag [???right name???] perform the Cutter Position Adjustment 68
-
 1
1 -
2
-
3
-
4
-
5
-
6
-
7
-
8
-
9
-
10
-
11
-
12
-
13
-
14
-
15
-
16
-
17
-
18
-
19
-
20
-
21
-
22
-
23
-
24
-
25
-
26
-
27
-
28
-
29
-
30
-
31
-
32
-
33
-
34
-
35
-
36
-
37
-
38
-
39
-
40
-
41
-
42
-
43
-
44
-
45
-
46
-
47
-
48
-
49
-
50
-
51
-
52
-
53
-
54
-
55
-
56
-
57
-
58
-
59
-
60
-
61
-
62
-
 63
63 -
 64
64 -
 65
65 -
 66
66 -
 67
67 -
 68
68 -
 69
69 -
 70
70 -
 71
71 -
 72
72 -
 73
73 -
74
-
75
-
76
-
77
-
78
-
79
-
80
-
81
-
82
-
83
-
84
-
85
-
86
-
87
-
88
-
89
-
90
-
91
-
92
-
93
-
94
-
95
-
96
-
97
-
98
-
99
-
100
-
101
-
102
-
103
-
104
-
105
-
106
-
107
-
108
-
109
-
110
-
111
-
112
-
113
-
114
-
115
-
116
-
117
-
118
-
119
-
120
-
121
-
122
-
123
-
124
-
125
-
126
-
127
-
128
-
129
-
130
-
131
-
132
-
133
-
134
-
135
-
136
-
137
-
138
-
139
-
140
-
141
-
142
-
143
-
144
-
145
-
146
-
147
-
148
-
149
-
150
-
151
-
152
-
153
-
154
-
155
-
156
-
157
-
158
-
159
-
160
-
161
-
162
-
163
-
164
-
165
-
166
-
167
-
168
-
169
-
170
-
171
-
172
-
173
-
174
-
175
-
176
-
177
-
178
-
179
-
180
-
181
-
182
-
183
-
184
-
185
-
186
-
187
-
188
-
189
-
190
-
191
-
192
-
193
-
194
-
195
-
196
-
197
-
198
 |
 |

EPSON Stylus Pro 9000
Disassembly & Assembly
68
1.
Remove the screws that secure the Waste Ink Boxes to the printer (see the
figures below), and then remove the Waste Ink Boxes.
Figure 4-18.
Left Waste Ink Box
Figure 4-19.
Right Waste Ink Box
2.
Remove the Waste Ink Pads from the left and right Waste Ink Boxes.
Waste Ink Box L
CP(W2) M4x8
C
A
U
T
I
O
N
Prepare a vinyl bag beforehand for disposing of the pads.
A
D
J
U
S
T
M
E
N
T
R
E
Q
U
I
R
E
D
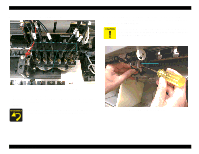
After replacing the Waste Ink Pads, perform the following
adjustments:
reset the waste ink counter
reset the initial cleaning flag [???right name???]
perform the Cutter Position Adjustment
CP(W2) M4x8 screws
Waste Ink Box R