HP Color 9850mfp HP Color 9850mfp - System Administrator Guide - Page 108
Non-Image Area Erase, Reverse Image, AUTO Layout, and Overlay. However, they can be, CHANGE SETTING
 |
View all HP Color 9850mfp manuals
Add to My Manuals
Save this manual to your list of manuals |
Page 108 highlights
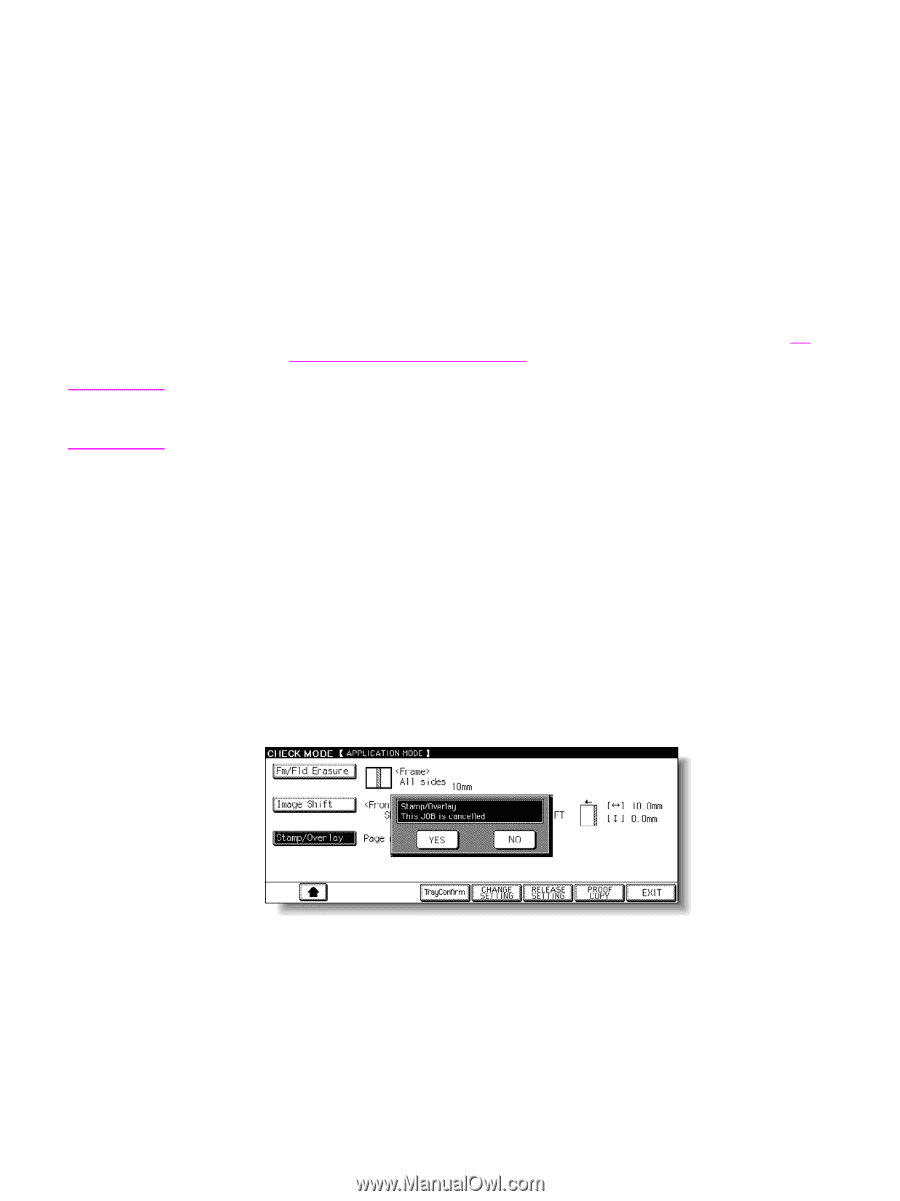
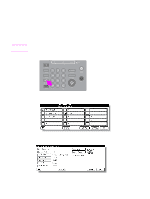
Note b Touch CHANGE SETTING. The LCD displays an appropriate screen to change the copying condition selected. ● Selecting a Basic Copying Condition key displays the Main screen. ● Selecting a Special Original mode key displays the Special Original popup menu. ● Selecting an Image Adjust mode key displays the Change Image Adjustment Setting screen. ● When BOOK MARK has been checked on a subsequent screen, selecting the mode key jumps to that screen. ● Selecting an Application Mode key displays the Change Application Selection screen. ● When BOOK MARK has been checked on a subsequent screen, selecting the application function key will jump to that screen. For more information, see To display application selection screen. CHANGE SETTING will not function for the following application functions: Program Job, Non-Image Area Erase, Reverse Image, AUTO Layout, and Overlay. However, they can be released by touching RELEASE SETTING. c Change the setting as desired, and then restore the Check screen to return to the checking steps. d From the Main screen, press Check to return to the Check screen. e From the Special Original pop-up menu, Change Image Adjustment Setting screen, or Change Application Selection screen, touch OK to return to the Check screen. ● When making a set or sample copy, proceed to step 6. ● To start printing without proof copying, proceed to step 8. 5 To release the settings: Touch the desired copying condition key on the Check screen to highlight it, and then touch RELEASE SETTING. The confirmation screen appears on the Check screen. a Touch YES to cancel the function, or NO to restore. ● If making a sample copy, proceed to the next step. ● To start printing, proceed to step 8. b Press Proof Copy on the control panel or touch PROOF COPY on the Check screen. A sample copy is generated. 96 Helpful functions ENWW
-
 1
1 -
2
-
3
-
4
-
5
-
6
-
7
-
8
-
9
-
10
-
11
-
12
-
13
-
14
-
15
-
16
-
17
-
18
-
19
-
20
-
21
-
22
-
23
-
24
-
25
-
26
-
27
-
28
-
29
-
30
-
31
-
32
-
33
-
34
-
35
-
36
-
37
-
38
-
39
-
40
-
41
-
42
-
43
-
44
-
45
-
46
-
47
-
48
-
49
-
50
-
51
-
52
-
53
-
54
-
55
-
56
-
57
-
58
-
59
-
60
-
61
-
62
-
63
-
64
-
65
-
66
-
67
-
68
-
69
-
70
-
71
-
72
-
73
-
74
-
75
-
76
-
77
-
78
-
79
-
80
-
81
-
82
-
83
-
84
-
85
-
86
-
87
-
88
-
89
-
90
-
91
-
92
-
93
-
94
-
95
-
96
-
97
-
98
-
99
-
100
-
101
-
102
-
 103
103 -
 104
104 -
 105
105 -
 106
106 -
 107
107 -
 108
108 -
 109
109 -
 110
110 -
 111
111 -
 112
112 -
 113
113 -
114
-
115
-
116
-
117
-
118
-
119
-
120
-
121
-
122
-
123
-
124
-
125
-
126
-
127
-
128
-
129
-
130
-
131
-
132
-
133
-
134
-
135
-
136
-
137
-
138
-
139
-
140
-
141
-
142
-
143
-
144
-
145
-
146
-
147
-
148
-
149
-
150
-
151
-
152
-
153
-
154
-
155
-
156
-
157
-
158
-
159
-
160
-
161
-
162
-
163
-
164
-
165
-
166
-
167
-
168
-
169
-
170
-
171
-
172
-
173
-
174
-
175
-
176
-
177
-
178
-
179
-
180
-
181
-
182
-
183
-
184
-
185
-
186
-
187
-
188
-
189
-
190
-
191
-
192
-
193
-
194
-
195
-
196
-
197
-
198
-
199
-
200
-
201
-
202
-
203
-
204
-
205
-
206
-
207
-
208
-
209
-
210
-
211
-
212
-
213
-
214
-
215
-
216
-
217
-
218
-
219
-
220
-
221
-
222
-
223
-
224
-
225
-
226
-
227
-
228
-
229
-
230
-
231
-
232
-
233
-
234
-
235
-
236
-
237
-
238
-
239
-
240
-
241
-
242
-
243
-
244
-
245
-
246
-
247
-
248
-
249
-
250
-
251
-
252
-
253
-
254
-
255
-
256
-
257
-
258
-
259
-
260
-
261
-
262
-
263
-
264
-
265
-
266
-
267
-
268
-
269
-
270
-
271
-
272
-
273
-
274
-
275
-
276
-
277
-
278
-
279
-
280
-
281
-
282
-
283
-
284
-
285
-
286
-
287
-
288
-
289
-
290
-
291
-
292
-
293
-
294
-
295
-
296
-
297
-
298
-
299
-
300
-
301
-
302
-
303
-
304
-
305
-
306
-
307
-
308
-
309
-
310
-
311
-
312
-
313
-
314
-
315
-
316
-
317
-
318
-
319
-
320
-
321
-
322
-
323
-
324
-
325
-
326
-
327
-
328
-
329
-
330
-
331
-
332
-
333
-
334
-
335
-
336
-
337
-
338
-
339
-
340
-
341
-
342
-
343
-
344
-
345
-
346
-
347
-
348
-
349
-
350
-
351
-
352
-
353
-
354
-
355
-
356
-
357
-
358
-
359
-
360
-
361
-
362
-
363
-
364
-
365
-
366
-
367
-
368
-
369
-
370
-
371
-
372
-
373
-
374
-
375
-
376
-
377
-
378
 |
 |