HP Color 9850mfp HP Color 9850mfp - System Administrator Guide - Page 329
Non STD size, STD size special
 |
View all HP Color 9850mfp manuals
Add to My Manuals
Save this manual to your list of manuals |
Page 329 highlights
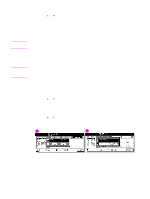
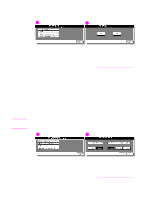
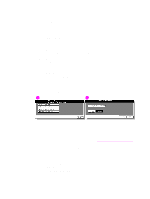
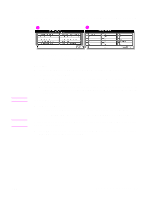
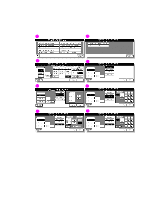
Note Procedure 1 Touch (6) Paper type/special size set to display the Paper type/special size setting menu screen. 2 Touch (1) Paper type/special size set. The Paper type setting screen is displayed. 3 Specify a paper type and weight. a Touch the desired tray key to highlight it. b Touch the desired paper type and weight keys to highlight them. The selected paper type and number indicating the paper weight appears on the tray key. 4 Specify a special size. a Touch Special size setting on the Paper type setting screen to display the Special size setting screen. b Touch the desired tray key to highlight it. c Touch a paper size key to specify a paper size for the selected tray. ● Select STD size to allow the engine to automatically detect the size of paper loaded in the tray and indicate it on the tray key. If tray 4 is selected in step (2), selecting STD size displays the popup menu to show available paper sizes to be specified. Use arrow keys on the popup menu to select the desired size. ● Select STD size (special) to display the popup menu to show available paper sizes to be specified. Use arrow keys on the popup menu to select the desired size. ● Select Non STD size to display the popup menu to enter the paper size by using arrow keys or touch display keypad. The selected tray key indicates "SPECIAL" instead of the entered numeric value. ● Select Wide paper to display the popup menu to show available wide paper sizes to be specified. Use arrow keys on the popup menu to select the desired wide size. Touch Lead edge or Rear edge to select the image starting position. Then, touch Input size to display the popup menu to enter the actual paper size using the arrow keys or touch display keypad. The entered number should fall within the range from the standard size of the selected wide size, to a maximum of 314 mm by 459 mm (12.5 by 18 inches). When selecting Wide paper, make sure to input the actual paper size to be used. 5 Touch OK on the Special size setting screen to complete the setting and return to the Paper type/special size setting menu screen, or touch CANCEL to restore the previous setting. 6 Touch PREVIOUS SCREEN to return to the Key operator mode screen. ENWW An outline of the key operator mode 317
-
 1
1 -
2
-
3
-
4
-
5
-
6
-
7
-
8
-
9
-
10
-
11
-
12
-
13
-
14
-
15
-
16
-
17
-
18
-
19
-
20
-
21
-
22
-
23
-
24
-
25
-
26
-
27
-
28
-
29
-
30
-
31
-
32
-
33
-
34
-
35
-
36
-
37
-
38
-
39
-
40
-
41
-
42
-
43
-
44
-
45
-
46
-
47
-
48
-
49
-
50
-
51
-
52
-
53
-
54
-
55
-
56
-
57
-
58
-
59
-
60
-
61
-
62
-
63
-
64
-
65
-
66
-
67
-
68
-
69
-
70
-
71
-
72
-
73
-
74
-
75
-
76
-
77
-
78
-
79
-
80
-
81
-
82
-
83
-
84
-
85
-
86
-
87
-
88
-
89
-
90
-
91
-
92
-
93
-
94
-
95
-
96
-
97
-
98
-
99
-
100
-
101
-
102
-
103
-
104
-
105
-
106
-
107
-
108
-
109
-
110
-
111
-
112
-
113
-
114
-
115
-
116
-
117
-
118
-
119
-
120
-
121
-
122
-
123
-
124
-
125
-
126
-
127
-
128
-
129
-
130
-
131
-
132
-
133
-
134
-
135
-
136
-
137
-
138
-
139
-
140
-
141
-
142
-
143
-
144
-
145
-
146
-
147
-
148
-
149
-
150
-
151
-
152
-
153
-
154
-
155
-
156
-
157
-
158
-
159
-
160
-
161
-
162
-
163
-
164
-
165
-
166
-
167
-
168
-
169
-
170
-
171
-
172
-
173
-
174
-
175
-
176
-
177
-
178
-
179
-
180
-
181
-
182
-
183
-
184
-
185
-
186
-
187
-
188
-
189
-
190
-
191
-
192
-
193
-
194
-
195
-
196
-
197
-
198
-
199
-
200
-
201
-
202
-
203
-
204
-
205
-
206
-
207
-
208
-
209
-
210
-
211
-
212
-
213
-
214
-
215
-
216
-
217
-
218
-
219
-
220
-
221
-
222
-
223
-
224
-
225
-
226
-
227
-
228
-
229
-
230
-
231
-
232
-
233
-
234
-
235
-
236
-
237
-
238
-
239
-
240
-
241
-
242
-
243
-
244
-
245
-
246
-
247
-
248
-
249
-
250
-
251
-
252
-
253
-
254
-
255
-
256
-
257
-
258
-
259
-
260
-
261
-
262
-
263
-
264
-
265
-
266
-
267
-
268
-
269
-
270
-
271
-
272
-
273
-
274
-
275
-
276
-
277
-
278
-
279
-
280
-
281
-
282
-
283
-
284
-
285
-
286
-
287
-
288
-
289
-
290
-
291
-
292
-
293
-
294
-
295
-
296
-
297
-
298
-
299
-
300
-
301
-
302
-
303
-
304
-
305
-
306
-
307
-
308
-
309
-
310
-
311
-
312
-
313
-
314
-
315
-
316
-
317
-
318
-
319
-
320
-
321
-
322
-
323
-
 324
324 -
 325
325 -
 326
326 -
 327
327 -
 328
328 -
 329
329 -
 330
330 -
 331
331 -
 332
332 -
 333
333 -
 334
334 -
335
-
336
-
337
-
338
-
339
-
340
-
341
-
342
-
343
-
344
-
345
-
346
-
347
-
348
-
349
-
350
-
351
-
352
-
353
-
354
-
355
-
356
-
357
-
358
-
359
-
360
-
361
-
362
-
363
-
364
-
365
-
366
-
367
-
368
-
369
-
370
-
371
-
372
-
373
-
374
-
375
-
376
-
377
-
378
 |
 |