HP Color 9850mfp HP Color 9850mfp - System Administrator Guide - Page 223
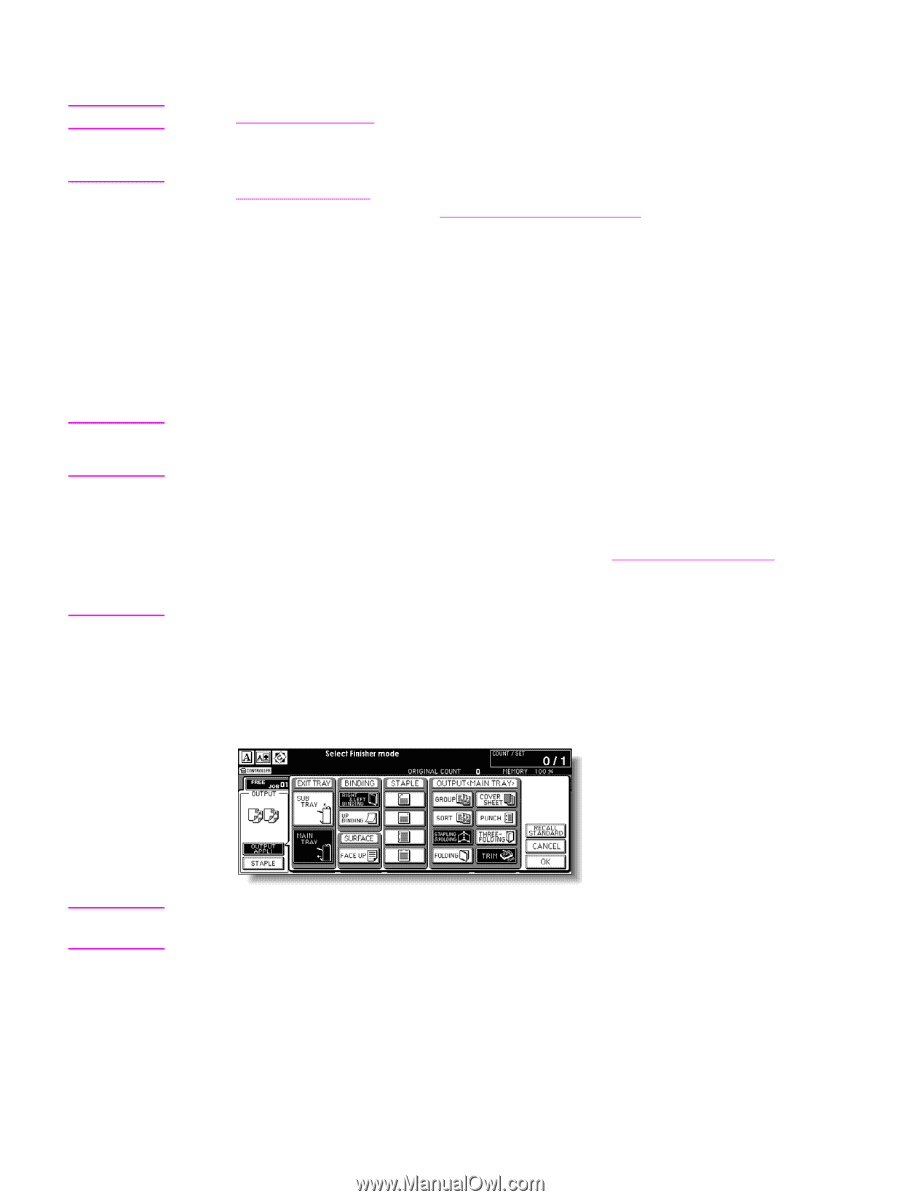
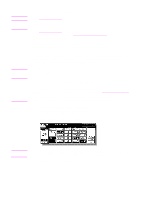
Selecting Folding/Stapling & Folding Mode, Start, OUTPUT APPLI, MAIN TRAY, STAPLING & FOLDING
 |
View all HP Color 9850mfp manuals
Add to My Manuals
Save this manual to your list of manuals |
Page 223 highlights
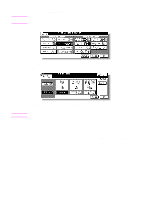
Note Note CAUTION 9 Type the desired print quantity using the control panel keypad. See Setting print quantity for more information. 10 Position originals face up in the document feeder. See Positioning originals for more information. Use RADF (ADF) store mode (see To scan originals into memory for more information) when the original count exceeds 100. Original pages should be a multiple of four in 1 > 2 mode or a multiple of two in 2 > 2 mode; otherwise blank pages are automatically inserted at the end of the document. When loading originals, note the following limits on capacity: Folding mode: 12 pages or less for simplex copying, six pages or less for duplex copying Stapling & Folding mode: 80/64 pages or less for simplex copying (20/28 lb paper) 40/32 pages or less for duplex copying (20/28 lb paper) Exceeding the above limits on capacity may cause the paper to misfeed. 11 Press Start. When the Finisher/Trimmer Unit/100-sheet output tray capacity is exceeded due to the print quantity selected, remove the copied sets as they exit to avoid misfed paper. When the Booklet/Trimmer Unit tray capacity is exceeded, the Finisher/Trimmer Unit will stop operating. To avoid this, select an appropriate print quantity. See Tray/output tray capacity. The roller drive unit is located inside the Booklet tray of the Finisher. To avoid injury, do not put hands into the roller drive unit when removing folded or stapled and folded sheets. Selecting Folding/Stapling & Folding Mode 1 Touch OUTPUT APPLI on the Main screen to display the Output mode popup menu, and then touch MAIN TRAY to highlight it. 2 Touch STAPLING & FOLDING or FOLDING, as desired. . Note Selecting FOLDING or STAPLING & FOLDING automatically switches the output tray to the Booklet tray. Notice that the arrow shown beside the Main tray shifts to the Booklet tray. 3 Touch OK on the Output mode popup menu. The Main screen is restored with the OUTPUT APPLI highlighted. ENWW 211
-
 1
1 -
2
-
3
-
4
-
5
-
6
-
7
-
8
-
9
-
10
-
11
-
12
-
13
-
14
-
15
-
16
-
17
-
18
-
19
-
20
-
21
-
22
-
23
-
24
-
25
-
26
-
27
-
28
-
29
-
30
-
31
-
32
-
33
-
34
-
35
-
36
-
37
-
38
-
39
-
40
-
41
-
42
-
43
-
44
-
45
-
46
-
47
-
48
-
49
-
50
-
51
-
52
-
53
-
54
-
55
-
56
-
57
-
58
-
59
-
60
-
61
-
62
-
63
-
64
-
65
-
66
-
67
-
68
-
69
-
70
-
71
-
72
-
73
-
74
-
75
-
76
-
77
-
78
-
79
-
80
-
81
-
82
-
83
-
84
-
85
-
86
-
87
-
88
-
89
-
90
-
91
-
92
-
93
-
94
-
95
-
96
-
97
-
98
-
99
-
100
-
101
-
102
-
103
-
104
-
105
-
106
-
107
-
108
-
109
-
110
-
111
-
112
-
113
-
114
-
115
-
116
-
117
-
118
-
119
-
120
-
121
-
122
-
123
-
124
-
125
-
126
-
127
-
128
-
129
-
130
-
131
-
132
-
133
-
134
-
135
-
136
-
137
-
138
-
139
-
140
-
141
-
142
-
143
-
144
-
145
-
146
-
147
-
148
-
149
-
150
-
151
-
152
-
153
-
154
-
155
-
156
-
157
-
158
-
159
-
160
-
161
-
162
-
163
-
164
-
165
-
166
-
167
-
168
-
169
-
170
-
171
-
172
-
173
-
174
-
175
-
176
-
177
-
178
-
179
-
180
-
181
-
182
-
183
-
184
-
185
-
186
-
187
-
188
-
189
-
190
-
191
-
192
-
193
-
194
-
195
-
196
-
197
-
198
-
199
-
200
-
201
-
202
-
203
-
204
-
205
-
206
-
207
-
208
-
209
-
210
-
211
-
212
-
213
-
214
-
215
-
216
-
217
-
 218
218 -
 219
219 -
 220
220 -
 221
221 -
 222
222 -
 223
223 -
 224
224 -
 225
225 -
 226
226 -
 227
227 -
 228
228 -
229
-
230
-
231
-
232
-
233
-
234
-
235
-
236
-
237
-
238
-
239
-
240
-
241
-
242
-
243
-
244
-
245
-
246
-
247
-
248
-
249
-
250
-
251
-
252
-
253
-
254
-
255
-
256
-
257
-
258
-
259
-
260
-
261
-
262
-
263
-
264
-
265
-
266
-
267
-
268
-
269
-
270
-
271
-
272
-
273
-
274
-
275
-
276
-
277
-
278
-
279
-
280
-
281
-
282
-
283
-
284
-
285
-
286
-
287
-
288
-
289
-
290
-
291
-
292
-
293
-
294
-
295
-
296
-
297
-
298
-
299
-
300
-
301
-
302
-
303
-
304
-
305
-
306
-
307
-
308
-
309
-
310
-
311
-
312
-
313
-
314
-
315
-
316
-
317
-
318
-
319
-
320
-
321
-
322
-
323
-
324
-
325
-
326
-
327
-
328
-
329
-
330
-
331
-
332
-
333
-
334
-
335
-
336
-
337
-
338
-
339
-
340
-
341
-
342
-
343
-
344
-
345
-
346
-
347
-
348
-
349
-
350
-
351
-
352
-
353
-
354
-
355
-
356
-
357
-
358
-
359
-
360
-
361
-
362
-
363
-
364
-
365
-
366
-
367
-
368
-
369
-
370
-
371
-
372
-
373
-
374
-
375
-
376
-
377
-
378
 |
 |