HP Color 9850mfp HP Color 9850mfp - System Administrator Guide - Page 215
DELETE, CHANGE OF THE TRAY, Start, The Main screen is restored.
 |
View all HP Color 9850mfp manuals
Add to My Manuals
Save this manual to your list of manuals |
Page 215 highlights
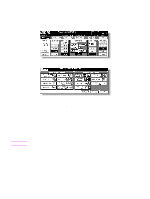
6 When selecting Insertion mode, type the page number. Touch to select the desired insertion mode, and then using the control panel keypad type the page number of the insertion location. Touch SET after each entry to move to the next key. To clear an incorrect entry, touch DELETE. The insertion location will be deleted. Note Note CAUTION Fifteen keys are displayed on the screen to designate each insertion location. When setting more than 15 locations, touch the arrow key to move to the next page. The first (upper left) key displays the Front Cover icon if selected. The Back Cover icon, if selected, appears as the last (fixed) key, with one active blank key preceding it. For example: If page 4 is typed in blank mode, a blank sheet is inserted between page 4 and page 5; in copy mode, a copied sheet is inserted at page 4. The page numbers typed at random will be sorted automatically. Typing "0" or the same page number twice will be ignored on the screen. When a page number typed is larger than the total original page count, it will be ignored. 7 Touch CHANGE OF THE TRAY to select the insertion tray source. The tray source for covers currently selected is displayed on the Sheet/cover insertion screen. Every touch of the key shifts the selection in the display that includes paper type as specified in the Key Operator mode. 8 When all settings are completed, touch OK to return to the Application selection screen. The Main screen is restored. 9 Type the desired print quantity using the control panel keypad. See Setting print quantity for details on setting the print quantity. 10 Position originals face up in the document feeder. See Positioning originals for more information. Use RADF (ADF) store mode (see To scan originals into memoryfor more information) when the original count exceeds 100. 11 Press Start. When the Finisher /Trimmer Unit/100-sheet output tray capacity is exceeded due to the print quantity selected, remove the copied sets as they exit to avoid misfed paper. ENWW 203
-
 1
1 -
2
-
3
-
4
-
5
-
6
-
7
-
8
-
9
-
10
-
11
-
12
-
13
-
14
-
15
-
16
-
17
-
18
-
19
-
20
-
21
-
22
-
23
-
24
-
25
-
26
-
27
-
28
-
29
-
30
-
31
-
32
-
33
-
34
-
35
-
36
-
37
-
38
-
39
-
40
-
41
-
42
-
43
-
44
-
45
-
46
-
47
-
48
-
49
-
50
-
51
-
52
-
53
-
54
-
55
-
56
-
57
-
58
-
59
-
60
-
61
-
62
-
63
-
64
-
65
-
66
-
67
-
68
-
69
-
70
-
71
-
72
-
73
-
74
-
75
-
76
-
77
-
78
-
79
-
80
-
81
-
82
-
83
-
84
-
85
-
86
-
87
-
88
-
89
-
90
-
91
-
92
-
93
-
94
-
95
-
96
-
97
-
98
-
99
-
100
-
101
-
102
-
103
-
104
-
105
-
106
-
107
-
108
-
109
-
110
-
111
-
112
-
113
-
114
-
115
-
116
-
117
-
118
-
119
-
120
-
121
-
122
-
123
-
124
-
125
-
126
-
127
-
128
-
129
-
130
-
131
-
132
-
133
-
134
-
135
-
136
-
137
-
138
-
139
-
140
-
141
-
142
-
143
-
144
-
145
-
146
-
147
-
148
-
149
-
150
-
151
-
152
-
153
-
154
-
155
-
156
-
157
-
158
-
159
-
160
-
161
-
162
-
163
-
164
-
165
-
166
-
167
-
168
-
169
-
170
-
171
-
172
-
173
-
174
-
175
-
176
-
177
-
178
-
179
-
180
-
181
-
182
-
183
-
184
-
185
-
186
-
187
-
188
-
189
-
190
-
191
-
192
-
193
-
194
-
195
-
196
-
197
-
198
-
199
-
200
-
201
-
202
-
203
-
204
-
205
-
206
-
207
-
208
-
209
-
 210
210 -
 211
211 -
 212
212 -
 213
213 -
 214
214 -
 215
215 -
 216
216 -
 217
217 -
 218
218 -
 219
219 -
 220
220 -
221
-
222
-
223
-
224
-
225
-
226
-
227
-
228
-
229
-
230
-
231
-
232
-
233
-
234
-
235
-
236
-
237
-
238
-
239
-
240
-
241
-
242
-
243
-
244
-
245
-
246
-
247
-
248
-
249
-
250
-
251
-
252
-
253
-
254
-
255
-
256
-
257
-
258
-
259
-
260
-
261
-
262
-
263
-
264
-
265
-
266
-
267
-
268
-
269
-
270
-
271
-
272
-
273
-
274
-
275
-
276
-
277
-
278
-
279
-
280
-
281
-
282
-
283
-
284
-
285
-
286
-
287
-
288
-
289
-
290
-
291
-
292
-
293
-
294
-
295
-
296
-
297
-
298
-
299
-
300
-
301
-
302
-
303
-
304
-
305
-
306
-
307
-
308
-
309
-
310
-
311
-
312
-
313
-
314
-
315
-
316
-
317
-
318
-
319
-
320
-
321
-
322
-
323
-
324
-
325
-
326
-
327
-
328
-
329
-
330
-
331
-
332
-
333
-
334
-
335
-
336
-
337
-
338
-
339
-
340
-
341
-
342
-
343
-
344
-
345
-
346
-
347
-
348
-
349
-
350
-
351
-
352
-
353
-
354
-
355
-
356
-
357
-
358
-
359
-
360
-
361
-
362
-
363
-
364
-
365
-
366
-
367
-
368
-
369
-
370
-
371
-
372
-
373
-
374
-
375
-
376
-
377
-
378
 |
 |
