Yamaha LS9-32 Owner's Manual - Page 108
Recording to USB memory, recorded on the recorder, raise the fader
 |
View all Yamaha LS9-32 manuals
Add to My Manuals
Save this manual to your list of manuals |
Page 108 highlights
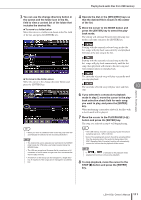
Recording to USB memory Recording to USB memory Here's how to record the signal of the desired output channels as an audio file (MP3) onto the USB memory inserted in the USB connector located at the right of the display. 1 In the DISPLAY ACCESS section, press the [RECORDER] key repeatedly to access the RECORDER screen. For playback as well, you will only be able to play back audio files that are saved in the SONGS folder or in the currently selected folder below that level. ■ USB memory folder structure Root directory YPE folder SONGS folder Songs 1 (Audio files) 2 34 5 6 1 Audio file display field The track number, title, artist, format (MP3/WMA/ AAC), and bit rate of during playback or the most recently played audio file are displayed. B REMAIN/ELAPSE button This button selects the content that is shown in the TIME FIELD (3). When you move the cursor to this button and press the [ENTER] key, the field will alternate between showing REMAIN (remaining time display) and ELAPSE (elapsed time display). C TIME (remaining time / elapsed time) field According to the setting in (2), this shows either the remaining time that can be recorded to USB memory, or the elapsed time. D Transport These buttons perform record/play/stop operations for the USB memory recorder. E REC RATE (bit depth) button This selects the bit depth for recording. F FREE SIZE field This indicates the amount of free capacity in USB memory, in terms of MB and as a percentage. 2 Connect USB memory with sufficient free capacity to the USB connector. The FREE SIZE field indicates the amount of free capacity. When you connect USB memory to the USB connector, a YPE folder and a SONGS folder within that YPE folder will be created automatically in the root directory of the USB memory. The files created by recording operations will be saved in the above SONGS folder, or in the currently selected folder below that level. 108 LS9-16/32 Owner's Manual 3 Assign the desired channels to the input and output of the USB memory recorder (→ p. 106). 4 So that you can monitor the signal being recorded on the recorder, raise the fader of the channel(s) that are patched to the input/ output of the recorder. The level meter in the RECORDER screen shows the signal level before and after the recorder. If necessary, use the ATT knob in the RECORDER INPUT field to adjust the input level to the recorder. NOTE • The signal being recorded will not be output from the recorder output jacks (PLAYBACK OUT). HINT • Operating the ATT knob will not affect the level of the signal being output to other ports from the corresponding output channel. 5 Move the cursor to the REC RATE field in the lower right of the screen, and use the dial or the [DEC]/[INC] keys to select the bit depth of the audio file that will be recorded. You can choose 96 kbps, 128 kbps, or 192 kbps. Higher bit rates will improve the audio quality, but will increase the size of the data. HINT • The word clock rate at which the LS9 is currently operating (44.1 kHz or 48 kHz) will automatically be selected as the sampling rate of the audio file.
-
 1
1 -
2
-
3
-
4
-
5
-
6
-
7
-
8
-
9
-
10
-
11
-
12
-
13
-
14
-
15
-
16
-
17
-
18
-
19
-
20
-
21
-
22
-
23
-
24
-
25
-
26
-
27
-
28
-
29
-
30
-
31
-
32
-
33
-
34
-
35
-
36
-
37
-
38
-
39
-
40
-
41
-
42
-
43
-
44
-
45
-
46
-
47
-
48
-
49
-
50
-
51
-
52
-
53
-
54
-
55
-
56
-
57
-
58
-
59
-
60
-
61
-
62
-
63
-
64
-
65
-
66
-
67
-
68
-
69
-
70
-
71
-
72
-
73
-
74
-
75
-
76
-
77
-
78
-
79
-
80
-
81
-
82
-
83
-
84
-
85
-
86
-
87
-
88
-
89
-
90
-
91
-
92
-
93
-
94
-
95
-
96
-
97
-
98
-
99
-
100
-
101
-
102
-
 103
103 -
 104
104 -
 105
105 -
 106
106 -
 107
107 -
 108
108 -
 109
109 -
 110
110 -
 111
111 -
 112
112 -
 113
113 -
114
-
115
-
116
-
117
-
118
-
119
-
120
-
121
-
122
-
123
-
124
-
125
-
126
-
127
-
128
-
129
-
130
-
131
-
132
-
133
-
134
-
135
-
136
-
137
-
138
-
139
-
140
-
141
-
142
-
143
-
144
-
145
-
146
-
147
-
148
-
149
-
150
-
151
-
152
-
153
-
154
-
155
-
156
-
157
-
158
-
159
-
160
-
161
-
162
-
163
-
164
-
165
-
166
-
167
-
168
-
169
-
170
-
171
-
172
-
173
-
174
-
175
-
176
-
177
-
178
-
179
-
180
-
181
-
182
-
183
-
184
-
185
-
186
-
187
-
188
-
189
-
190
-
191
-
192
-
193
-
194
-
195
-
196
-
197
-
198
-
199
-
200
-
201
-
202
-
203
-
204
-
205
-
206
-
207
-
208
-
209
-
210
-
211
-
212
-
213
-
214
-
215
-
216
-
217
-
218
-
219
-
220
-
221
-
222
-
223
-
224
-
225
-
226
-
227
-
228
-
229
-
230
-
231
-
232
-
233
-
234
-
235
-
236
-
237
-
238
-
239
-
240
-
241
-
242
-
243
-
244
-
245
-
246
-
247
-
248
-
249
-
250
-
251
-
252
-
253
-
254
-
255
-
256
-
257
-
258
-
259
-
260
-
261
-
262
-
263
-
264
-
265
-
266
-
267
-
268
-
269
-
270
-
271
-
272
-
273
-
274
-
275
-
276
-
277
-
278
-
279
-
280
-
281
-
282
-
283
-
284
-
285
-
286
-
287
-
288
-
289
-
290
 |
 |
