Yamaha LS9-32 Owner's Manual - Page 55
Specifying the channel name / icon
 |
View all Yamaha LS9-32 manuals
Add to My Manuals
Save this manual to your list of manuals |
Page 55 highlights
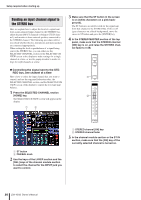
Specifying the channel name / icon Specifying the channel name / icon On the LS9, the name and icon shown in the screen can be specified for each input channel. Here we will explain how to specify the channel name and icon. 1 Press the SELECTED CHANNEL section [HOME] key. The SELECTED CH VIEW screen will appear in the display. 2 Use the LAYER section to select the desired fader layer. 3 Press a [SEL] key in the channel module section or ST IN section to select the input channel that you want to operate. 4 Move the cursor to the input port select popup button in the HA field of the screen, and press the [ENTER] key. The PATCH/NAME popup window will appear, allowing you to select an input port and icon for the input channel, and to assign a name. 5 41 2 3 1 Input channel operations 1 Input port select popup button LS9-32 This popup window contains the following items. 1 Input port button This indicates the currently selected input port. When you're selecting the icon or editing the channel name, moving the cursor to this button and pressing the [ENTER] key will take you back to the input port selection screen. B Icon button This indicates the icon selected for that channel. When you move the cursor to this button and press the [ENTER] key, a screen where you can select an icon and a sample name will appear. C Channel name input box This indicates the name assigned to that channel. When you move the cursor to this field and press the [ENTER] key, a keyboard window will appear, allowing you to enter a name. D Tabs These tabs switch the items that are shown in the window. LS9-16/32 Owner's Manual 55
-
 1
1 -
2
-
3
-
4
-
5
-
6
-
7
-
8
-
9
-
10
-
11
-
12
-
13
-
14
-
15
-
16
-
17
-
18
-
19
-
20
-
21
-
22
-
23
-
24
-
25
-
26
-
27
-
28
-
29
-
30
-
31
-
32
-
33
-
34
-
35
-
36
-
37
-
38
-
39
-
40
-
41
-
42
-
43
-
44
-
45
-
46
-
47
-
48
-
49
-
 50
50 -
 51
51 -
 52
52 -
 53
53 -
 54
54 -
 55
55 -
 56
56 -
 57
57 -
 58
58 -
 59
59 -
 60
60 -
61
-
62
-
63
-
64
-
65
-
66
-
67
-
68
-
69
-
70
-
71
-
72
-
73
-
74
-
75
-
76
-
77
-
78
-
79
-
80
-
81
-
82
-
83
-
84
-
85
-
86
-
87
-
88
-
89
-
90
-
91
-
92
-
93
-
94
-
95
-
96
-
97
-
98
-
99
-
100
-
101
-
102
-
103
-
104
-
105
-
106
-
107
-
108
-
109
-
110
-
111
-
112
-
113
-
114
-
115
-
116
-
117
-
118
-
119
-
120
-
121
-
122
-
123
-
124
-
125
-
126
-
127
-
128
-
129
-
130
-
131
-
132
-
133
-
134
-
135
-
136
-
137
-
138
-
139
-
140
-
141
-
142
-
143
-
144
-
145
-
146
-
147
-
148
-
149
-
150
-
151
-
152
-
153
-
154
-
155
-
156
-
157
-
158
-
159
-
160
-
161
-
162
-
163
-
164
-
165
-
166
-
167
-
168
-
169
-
170
-
171
-
172
-
173
-
174
-
175
-
176
-
177
-
178
-
179
-
180
-
181
-
182
-
183
-
184
-
185
-
186
-
187
-
188
-
189
-
190
-
191
-
192
-
193
-
194
-
195
-
196
-
197
-
198
-
199
-
200
-
201
-
202
-
203
-
204
-
205
-
206
-
207
-
208
-
209
-
210
-
211
-
212
-
213
-
214
-
215
-
216
-
217
-
218
-
219
-
220
-
221
-
222
-
223
-
224
-
225
-
226
-
227
-
228
-
229
-
230
-
231
-
232
-
233
-
234
-
235
-
236
-
237
-
238
-
239
-
240
-
241
-
242
-
243
-
244
-
245
-
246
-
247
-
248
-
249
-
250
-
251
-
252
-
253
-
254
-
255
-
256
-
257
-
258
-
259
-
260
-
261
-
262
-
263
-
264
-
265
-
266
-
267
-
268
-
269
-
270
-
271
-
272
-
273
-
274
-
275
-
276
-
277
-
278
-
279
-
280
-
281
-
282
-
283
-
284
-
285
-
286
-
287
-
288
-
289
-
290
 |
 |
