Yamaha LS9-32 Owner's Manual - Page 113
Linking scene recall with audio file playback, Scene list, No. scene number, TITLE scene title
 |
View all Yamaha LS9-32 manuals
Add to My Manuals
Save this manual to your list of manuals |
Page 113 highlights
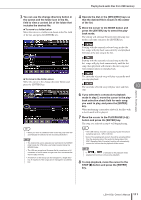
Editing the title list • Linking scene recall with audio file playback NOTE • Two-byte code or Latin-1 (ISO-8859-1) code characters will not be sorted correctly. buttons When you move the cursor to these buttons and press the [ENTER] key, the track number of the file currently selected in the title list will be moved upward or downward by one. ● SAVE LIST button When you move the cursor to this button and press the [ENTER] key, the title list order and playback selections will be saved in USB memory. You should perform this operation if you want the title list to be preserved even after you disconnect the USB memory or turn off the power. Since these settings are stored for each folder, a confirmation dialog box will ask you whether you want to save them if you move to a different folder. Linking scene recall with audio file playback You can make link settings so that a specific audio file from USB memory is played back when you recall a certain scene. This is a convenient way to automatically play back a sound effect or background music at a certain point in the performance. To link scene recall with audio file playback, proceed as follows. 1 Connect the USB memory containing the audio file to the USB connector. 2 In the DISPLAY ACCESS section, press the [SCENE MEMORY] key repeatedly to access the SCENE PLAYBACK LINK screen. 12 3 46 7 85 F LINK This indicates whether linking from the scene to an audio file is enabled. The PLAY indicator is shown if linking is enabled. If the PLAY indicator is off even though a file is selected, the audio file will not play when scene recall occurs. G SONG TITLE/FILE NAME field This shows the title or file name of the audio file. NOTE • The audio file to be played must be saved in the SONGS folder within the YPE folder. Please note that you won't be able to specify a file that is in the root directory or another folder. When you execute playback, the path in the TITLE LIST screen will change to \YPE\SONGS\. • The file name is shown in black if the specified file no longer exists, and the song title or file name is shown in yellow if the file can no longer be recognized. • The file specified for linking is distinguished by its eight-character file name + three-character extension. If you change the file name after specifying it for linking, or if you repeatedly delete and copy the file, there may be rare cases in which the linked file can no longer be recognized. 9 J 1 Scene list This is the list of scenes to which you can assign a song (audio file). The line with the blue background in the middle of the list is the scene that's selected for operation. B No. (scene number) C TITLE (scene title) D Protect These respectively indicate the scene number, title, and protect status. E Song list This is the list of songs (audio files) that can be linked. The line with the blue background in the middle of the list is the file that's selected for operation. H OFFSET (Offset time) This shows the time from the recall operation until the corresponding audio file will begin playing. I SONG TITLE/FILE NAME buttons These buttons select the item that is shown in the SONG TITLE/FILE NAME field. J JPN button If this button is on, the song title will be displayed using Shift-JIS code (double-byte character code) to support Japanese. NOTE • Other items in the SCENE PLAYBACK LINK screen are the same as in the SCENE LIST screen (→ p. 134). 3 Operate the dial or the [DEC]/[INC] keys so that the scene to which you want to assign a song is displayed in the middle. USB memory recorder 10 LS9-16/32 Owner's Manual 113
-
 1
1 -
2
-
3
-
4
-
5
-
6
-
7
-
8
-
9
-
10
-
11
-
12
-
13
-
14
-
15
-
16
-
17
-
18
-
19
-
20
-
21
-
22
-
23
-
24
-
25
-
26
-
27
-
28
-
29
-
30
-
31
-
32
-
33
-
34
-
35
-
36
-
37
-
38
-
39
-
40
-
41
-
42
-
43
-
44
-
45
-
46
-
47
-
48
-
49
-
50
-
51
-
52
-
53
-
54
-
55
-
56
-
57
-
58
-
59
-
60
-
61
-
62
-
63
-
64
-
65
-
66
-
67
-
68
-
69
-
70
-
71
-
72
-
73
-
74
-
75
-
76
-
77
-
78
-
79
-
80
-
81
-
82
-
83
-
84
-
85
-
86
-
87
-
88
-
89
-
90
-
91
-
92
-
93
-
94
-
95
-
96
-
97
-
98
-
99
-
100
-
101
-
102
-
103
-
104
-
105
-
106
-
107
-
 108
108 -
 109
109 -
 110
110 -
 111
111 -
 112
112 -
 113
113 -
 114
114 -
 115
115 -
 116
116 -
 117
117 -
 118
118 -
119
-
120
-
121
-
122
-
123
-
124
-
125
-
126
-
127
-
128
-
129
-
130
-
131
-
132
-
133
-
134
-
135
-
136
-
137
-
138
-
139
-
140
-
141
-
142
-
143
-
144
-
145
-
146
-
147
-
148
-
149
-
150
-
151
-
152
-
153
-
154
-
155
-
156
-
157
-
158
-
159
-
160
-
161
-
162
-
163
-
164
-
165
-
166
-
167
-
168
-
169
-
170
-
171
-
172
-
173
-
174
-
175
-
176
-
177
-
178
-
179
-
180
-
181
-
182
-
183
-
184
-
185
-
186
-
187
-
188
-
189
-
190
-
191
-
192
-
193
-
194
-
195
-
196
-
197
-
198
-
199
-
200
-
201
-
202
-
203
-
204
-
205
-
206
-
207
-
208
-
209
-
210
-
211
-
212
-
213
-
214
-
215
-
216
-
217
-
218
-
219
-
220
-
221
-
222
-
223
-
224
-
225
-
226
-
227
-
228
-
229
-
230
-
231
-
232
-
233
-
234
-
235
-
236
-
237
-
238
-
239
-
240
-
241
-
242
-
243
-
244
-
245
-
246
-
247
-
248
-
249
-
250
-
251
-
252
-
253
-
254
-
255
-
256
-
257
-
258
-
259
-
260
-
261
-
262
-
263
-
264
-
265
-
266
-
267
-
268
-
269
-
270
-
271
-
272
-
273
-
274
-
275
-
276
-
277
-
278
-
279
-
280
-
281
-
282
-
283
-
284
-
285
-
286
-
287
-
288
-
289
-
290
 |
 |
