Yamaha LS9-32 Owner's Manual - Page 175
Using an external head amp, Remotely controlling an external head amp, head amp - for sale
 |
View all Yamaha LS9-32 manuals
Add to My Manuals
Save this manual to your list of manuals |
Page 175 highlights
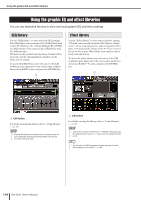
Using an external head amp Using an external head amp If an I/O card (expected to go on sale in the future) that supports the external head amp (Yamaha AD8HR) remote protocol is installed in an LS9 slot, you'll be able to remotely control parameters such as the external head amp's phantom power (+48V) on/off, gain, and HPF from the LS9. For an example of actual connections, refer to the owner's manual of the I/O card. Remotely controlling an external head amp Here's how to control the external head amp (subsequently called "external HA") from the LS9 via an I/O card installed in a slot. 1 Connect the LS9 and external HA. Refer to the owner's manual for the I/O card and for the external head amp. 2 Repeatedly press the [RACK 5-8] key to access the EXTERNAL HA screen. The EXTERNAL HA screen includes the following items. 1 2 3 4 1 COMM PORT box This box lets you select the communication port for the currently-installed I/O card(s). NOTE • When installing an MY16-ES64 or similar EtherSound interface card in an LS9-32, be sure to install it in SLOT 1. ● SLOT {SLOT1} Select the communication port for the I/O card installed in the slot {slot 1}. ● SLOT2 (LS9-32 only) Select the communication port for the I/O card installed in slot 2. B ID / Model name / +48V master This displays information for the external HA mounted in the rack. The ID number is assigned automatically as 1 to 2 {1 to 4} in the order in which devices are connected to the I/O card. This area also shows the on/off status of the master phantom power. C Virtual racks These are two {four} racks in which remotely controllable external HA units can be mounted. If an external HA is mounted, its settings (gain setting, phantom power on/off, HPF on/off) are shown. When you move the cursor to a rack and press the [ENTER] key, the EXTERNAL HA popup window for that rack will appear. D EXTERNAL HA PORT SELECT popup button This button accesses the EXTERNAL HA PORT SELECT popup window, where you can specify the input ports to which the external HA mounted in the rack will be connected. 3 To select the communication port for the I/O card, move the cursor to the COMM PORT box, use the dial or the [DEC]/[INC] keys to select a port, and press the [ENTER] key. 4 To specify the input ports for an external HA, move the cursor to the EXTERNAL HA PORT SELECT popup button for that rack, and press the [ENTER] key. The EXTERNAL HA PORT SELECT popup window will appear. The popup window includes the following items. 1 2 17 Graphic EQ and effects 1 PORT SELECT buttons These buttons specify the input ports to which the external HA is connected. B NO ASSIGN button This button defeats the port selection. LS9-16/32 Owner's Manual 175
-
 1
1 -
2
-
3
-
4
-
5
-
6
-
7
-
8
-
9
-
10
-
11
-
12
-
13
-
14
-
15
-
16
-
17
-
18
-
19
-
20
-
21
-
22
-
23
-
24
-
25
-
26
-
27
-
28
-
29
-
30
-
31
-
32
-
33
-
34
-
35
-
36
-
37
-
38
-
39
-
40
-
41
-
42
-
43
-
44
-
45
-
46
-
47
-
48
-
49
-
50
-
51
-
52
-
53
-
54
-
55
-
56
-
57
-
58
-
59
-
60
-
61
-
62
-
63
-
64
-
65
-
66
-
67
-
68
-
69
-
70
-
71
-
72
-
73
-
74
-
75
-
76
-
77
-
78
-
79
-
80
-
81
-
82
-
83
-
84
-
85
-
86
-
87
-
88
-
89
-
90
-
91
-
92
-
93
-
94
-
95
-
96
-
97
-
98
-
99
-
100
-
101
-
102
-
103
-
104
-
105
-
106
-
107
-
108
-
109
-
110
-
111
-
112
-
113
-
114
-
115
-
116
-
117
-
118
-
119
-
120
-
121
-
122
-
123
-
124
-
125
-
126
-
127
-
128
-
129
-
130
-
131
-
132
-
133
-
134
-
135
-
136
-
137
-
138
-
139
-
140
-
141
-
142
-
143
-
144
-
145
-
146
-
147
-
148
-
149
-
150
-
151
-
152
-
153
-
154
-
155
-
156
-
157
-
158
-
159
-
160
-
161
-
162
-
163
-
164
-
165
-
166
-
167
-
168
-
169
-
 170
170 -
 171
171 -
 172
172 -
 173
173 -
 174
174 -
 175
175 -
 176
176 -
 177
177 -
 178
178 -
 179
179 -
 180
180 -
181
-
182
-
183
-
184
-
185
-
186
-
187
-
188
-
189
-
190
-
191
-
192
-
193
-
194
-
195
-
196
-
197
-
198
-
199
-
200
-
201
-
202
-
203
-
204
-
205
-
206
-
207
-
208
-
209
-
210
-
211
-
212
-
213
-
214
-
215
-
216
-
217
-
218
-
219
-
220
-
221
-
222
-
223
-
224
-
225
-
226
-
227
-
228
-
229
-
230
-
231
-
232
-
233
-
234
-
235
-
236
-
237
-
238
-
239
-
240
-
241
-
242
-
243
-
244
-
245
-
246
-
247
-
248
-
249
-
250
-
251
-
252
-
253
-
254
-
255
-
256
-
257
-
258
-
259
-
260
-
261
-
262
-
263
-
264
-
265
-
266
-
267
-
268
-
269
-
270
-
271
-
272
-
273
-
274
-
275
-
276
-
277
-
278
-
279
-
280
-
281
-
282
-
283
-
284
-
285
-
286
-
287
-
288
-
289
-
290
 |
 |
