Yamaha LS9-32 Owner's Manual - Page 83
Operations in the SELECTED CHANNEL ST IN or STEREO MASTER
 |
View all Yamaha LS9-32 manuals
Add to My Manuals
Save this manual to your list of manuals |
Page 83 highlights
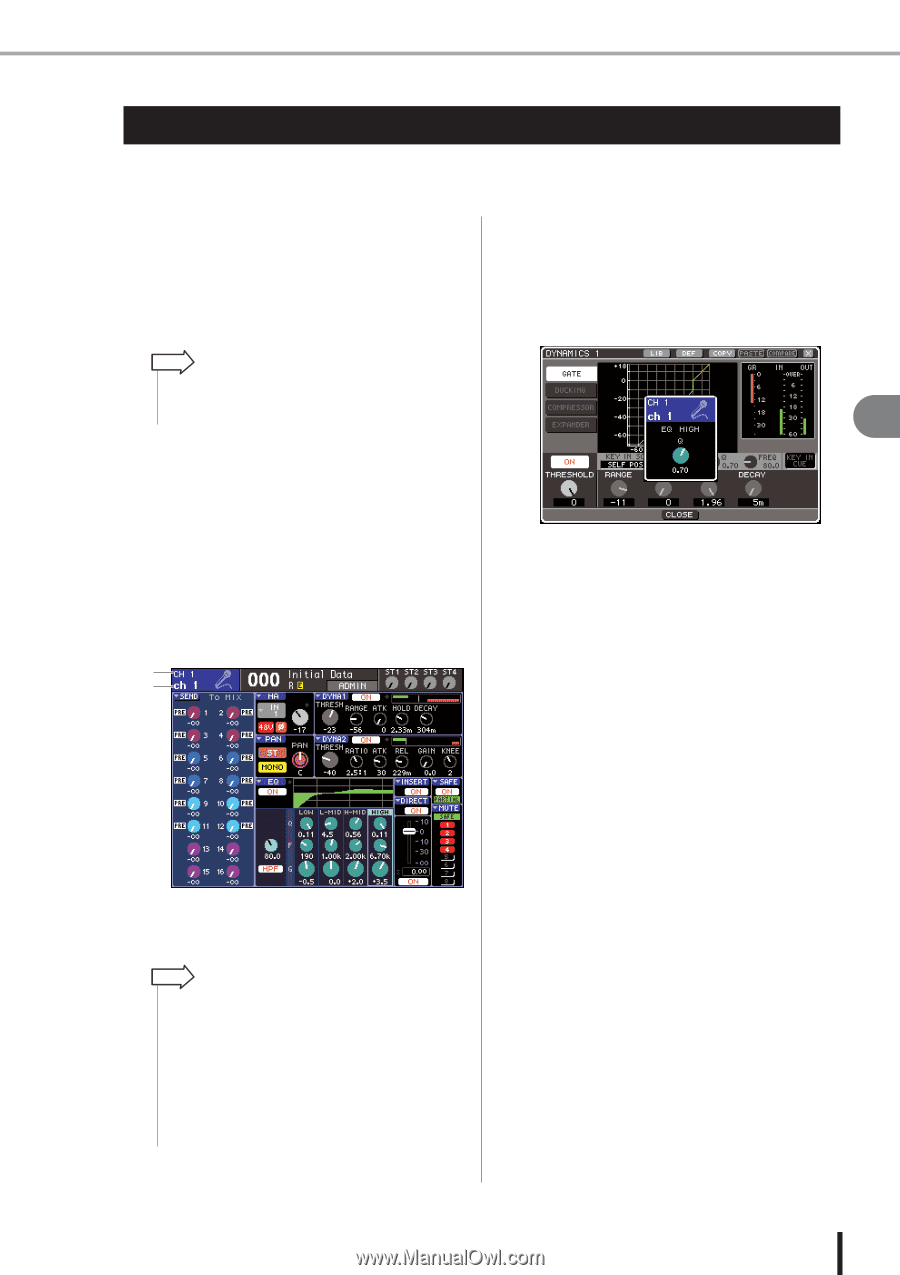
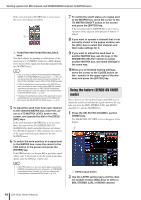
Operations in the SELECTED CHANNEL section Operations in the SELECTED CHANNEL section This section explains how you can use the SELECTED CHANNEL section to control all of the parameters for a specific channel. 1 Press the SELECTED CHANNEL section [HOME] key. The SELECTED CH VIEW screen will appear in the display. If you leave this screen displayed, you will always be able to view the settings in the screen while operating an encoder of the SELECTED CHANNEL section. Even if a screen other than the SELECTED CH VIEW screen is selected, the encoders of the SELECTED CHANNEL section always affect the currently selected channel. When you operate an encoder, a small popup window indicating the value of that parameter will appear in the screen. HINT • You can also access the SELECTED CH VIEW screen by pressing any one of the encoders in the SELECTED CHANNEL section. 2 Use the LAYER section to select the desired fader layer. 3 Press a [SEL] key in the channel module section, ST IN section, or STEREO MASTER section to select a channel. Operations in the SELECTED CHANNEL section will affect the channel that is currently selected by its [SEL] key. The number and name of the currently selected channel is shown in the upper left of the display. 7 4 Use the encoders of the SELECTED CHANNEL section and the buttons and knobs in the SELECTED CH VIEW screen to edit the parameters of the selected channel. 1 2 Operations in the SELECTED CHANNEL section 1 Channel number B Channel name HINT • In the case of ST IN channels or STEREO channels, you can switch between L and R by repeatedly pressing the same [SEL] key. • In order to select a MATRIX/MONO channel on the LS9-16, you must first select the custom fader layer to which you've assigned that channel, and then press the corresponding [SEL] key. • You can also move the cursor to the selected channel in the upper left of the display, and use the dial or the [DEC]/[INC] keys to change the selected channel. LS9-16/32 Owner's Manual 83
-
 1
1 -
2
-
3
-
4
-
5
-
6
-
7
-
8
-
9
-
10
-
11
-
12
-
13
-
14
-
15
-
16
-
17
-
18
-
19
-
20
-
21
-
22
-
23
-
24
-
25
-
26
-
27
-
28
-
29
-
30
-
31
-
32
-
33
-
34
-
35
-
36
-
37
-
38
-
39
-
40
-
41
-
42
-
43
-
44
-
45
-
46
-
47
-
48
-
49
-
50
-
51
-
52
-
53
-
54
-
55
-
56
-
57
-
58
-
59
-
60
-
61
-
62
-
63
-
64
-
65
-
66
-
67
-
68
-
69
-
70
-
71
-
72
-
73
-
74
-
75
-
76
-
77
-
 78
78 -
 79
79 -
 80
80 -
 81
81 -
 82
82 -
 83
83 -
 84
84 -
 85
85 -
 86
86 -
 87
87 -
 88
88 -
89
-
90
-
91
-
92
-
93
-
94
-
95
-
96
-
97
-
98
-
99
-
100
-
101
-
102
-
103
-
104
-
105
-
106
-
107
-
108
-
109
-
110
-
111
-
112
-
113
-
114
-
115
-
116
-
117
-
118
-
119
-
120
-
121
-
122
-
123
-
124
-
125
-
126
-
127
-
128
-
129
-
130
-
131
-
132
-
133
-
134
-
135
-
136
-
137
-
138
-
139
-
140
-
141
-
142
-
143
-
144
-
145
-
146
-
147
-
148
-
149
-
150
-
151
-
152
-
153
-
154
-
155
-
156
-
157
-
158
-
159
-
160
-
161
-
162
-
163
-
164
-
165
-
166
-
167
-
168
-
169
-
170
-
171
-
172
-
173
-
174
-
175
-
176
-
177
-
178
-
179
-
180
-
181
-
182
-
183
-
184
-
185
-
186
-
187
-
188
-
189
-
190
-
191
-
192
-
193
-
194
-
195
-
196
-
197
-
198
-
199
-
200
-
201
-
202
-
203
-
204
-
205
-
206
-
207
-
208
-
209
-
210
-
211
-
212
-
213
-
214
-
215
-
216
-
217
-
218
-
219
-
220
-
221
-
222
-
223
-
224
-
225
-
226
-
227
-
228
-
229
-
230
-
231
-
232
-
233
-
234
-
235
-
236
-
237
-
238
-
239
-
240
-
241
-
242
-
243
-
244
-
245
-
246
-
247
-
248
-
249
-
250
-
251
-
252
-
253
-
254
-
255
-
256
-
257
-
258
-
259
-
260
-
261
-
262
-
263
-
264
-
265
-
266
-
267
-
268
-
269
-
270
-
271
-
272
-
273
-
274
-
275
-
276
-
277
-
278
-
279
-
280
-
281
-
282
-
283
-
284
-
285
-
286
-
287
-
288
-
289
-
290
 |
 |