Yamaha LS9-32 Owner's Manual - Page 173
Using the Freeze effect, Tap Tempo function.
 |
View all Yamaha LS9-32 manuals
Add to My Manuals
Save this manual to your list of manuals |
Page 173 highlights
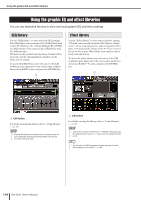
About the internal effects HINT • For details on the parameters of each effect type, refer to the supplementary material at the end of this manual (→ p. 233). 7 At the desired tempo, repeatedly press the user-defined key to which you assigned the Tap Tempo function. The average interval (BPM) at which you press the key will be calculated, and that value will be reflected by the BPM parameter. The average interval will be input (the average of a, b, and c) 4 Select "FREEZE" as the effect type. For details on selecting the effect type, refer to step 3 of "Editing the internal effect parameters" (→ p. 170). If the "FREEZE" effect type is selected, a PLAY button, REC button, and progress bar are shown in the special parameter field. 1 23 a b c First tap Second tap Third tap Fourth tap HINT • If the average value is outside the range of 20-300 BPM, it will be ignored. • If you turn on the MIDI CLK button in the special parameter field, the BPM parameter value will change according to the tempo of the MIDI timing clock received from the currentlyenabled MIDI port. Using the Freeze effect Here's how to use the "FREEZE" effect type, which provides the functionality of a simple sampler. When this effect type is selected, you can perform operations in the screen to record (sample) and play back a sound. 1 In the DISPLAY ACCESS section, press the [RACK 1-4] key and [RACK 5-8] key simultaneously to access the VIRTUAL RACK screen. 2 Mount an effect in rack 5 or rack 7. NOTE • Effect types "FREEZE" and "HQ.PITCH" can be used only in rack 5 or 7. 3 Move the cursor to the rack in which the effect you want to edit is mounted, and press the [ENTER] key. The RACK screen will appear, allowing you to edit the parameters of the effect. You can also access the RACK 5-8 screens by repeatedly pressing the [RACK 5-8] key. 1 PLAY button B REC button C Progress bar HINT • As an alternative to switching the effect type, you can also recall settings that use the "FREEZE" effect type from the effect library. 5 To begin recording (sampling), turn on the REC button to make it light, and then turn on the PLAY button. The signal being input to the effect will be recorded. The progress bar shows the current recording location. When a fixed time has elapsed, the buttons will automatically turn off. HINT • You can adjust the parameters in the window to make detailed settings for recording time, the way in which recording will begin, and the way in which the sample will play back. For details on the parameters, refer to the supplementary material at the end of this manual (→ p. 233). 17 Graphic EQ and effects 6 To play back the recorded sample, move the cursor to the PLAY button and press the [ENTER] key. NOTE • If, after recording, you turn on the REC button again to enter record-ready mode, the sampled content will be erased. LS9-16/32 Owner's Manual 173
-
 1
1 -
2
-
3
-
4
-
5
-
6
-
7
-
8
-
9
-
10
-
11
-
12
-
13
-
14
-
15
-
16
-
17
-
18
-
19
-
20
-
21
-
22
-
23
-
24
-
25
-
26
-
27
-
28
-
29
-
30
-
31
-
32
-
33
-
34
-
35
-
36
-
37
-
38
-
39
-
40
-
41
-
42
-
43
-
44
-
45
-
46
-
47
-
48
-
49
-
50
-
51
-
52
-
53
-
54
-
55
-
56
-
57
-
58
-
59
-
60
-
61
-
62
-
63
-
64
-
65
-
66
-
67
-
68
-
69
-
70
-
71
-
72
-
73
-
74
-
75
-
76
-
77
-
78
-
79
-
80
-
81
-
82
-
83
-
84
-
85
-
86
-
87
-
88
-
89
-
90
-
91
-
92
-
93
-
94
-
95
-
96
-
97
-
98
-
99
-
100
-
101
-
102
-
103
-
104
-
105
-
106
-
107
-
108
-
109
-
110
-
111
-
112
-
113
-
114
-
115
-
116
-
117
-
118
-
119
-
120
-
121
-
122
-
123
-
124
-
125
-
126
-
127
-
128
-
129
-
130
-
131
-
132
-
133
-
134
-
135
-
136
-
137
-
138
-
139
-
140
-
141
-
142
-
143
-
144
-
145
-
146
-
147
-
148
-
149
-
150
-
151
-
152
-
153
-
154
-
155
-
156
-
157
-
158
-
159
-
160
-
161
-
162
-
163
-
164
-
165
-
166
-
167
-
 168
168 -
 169
169 -
 170
170 -
 171
171 -
 172
172 -
 173
173 -
 174
174 -
 175
175 -
 176
176 -
 177
177 -
 178
178 -
179
-
180
-
181
-
182
-
183
-
184
-
185
-
186
-
187
-
188
-
189
-
190
-
191
-
192
-
193
-
194
-
195
-
196
-
197
-
198
-
199
-
200
-
201
-
202
-
203
-
204
-
205
-
206
-
207
-
208
-
209
-
210
-
211
-
212
-
213
-
214
-
215
-
216
-
217
-
218
-
219
-
220
-
221
-
222
-
223
-
224
-
225
-
226
-
227
-
228
-
229
-
230
-
231
-
232
-
233
-
234
-
235
-
236
-
237
-
238
-
239
-
240
-
241
-
242
-
243
-
244
-
245
-
246
-
247
-
248
-
249
-
250
-
251
-
252
-
253
-
254
-
255
-
256
-
257
-
258
-
259
-
260
-
261
-
262
-
263
-
264
-
265
-
266
-
267
-
268
-
269
-
270
-
271
-
272
-
273
-
274
-
275
-
276
-
277
-
278
-
279
-
280
-
281
-
282
-
283
-
284
-
285
-
286
-
287
-
288
-
289
-
290
 |
 |
