Yamaha LS9-32 Owner's Manual - Page 206
Word clock settings, MISC SETUP screen - digital console
 |
View all Yamaha LS9-32 manuals
Add to My Manuals
Save this manual to your list of manuals |
Page 206 highlights
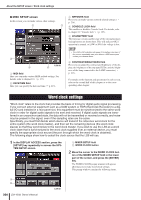
About the SETUP screen • Word clock settings ● MISC SETUP screen In this screen you can make various other settings. 2 3 1 4 LS9-32 5 6 1 MIDI field Here you can make various MIDI-related settings. For details, refer to chapter 18 (→ p. 177). B DATE/TIME field Here you can specify the date and time (→ p. 215). C NETWORK field Here you can make various network-related settings (→ p. 216). D CONSOLE LOCK field This enables or disables Console Lock. For details, refer to chapter 19 "Console lock" (→ p. 197). E CPU/BATTERY field The firmware version and the state of the internal memory backup battery are shown here. This will indicate OK if operation is normal, or LOW or NO if the voltage is low. NOTE • The LOW or NO indication will appear if the battery runs down. If this occurs, immediately save your data on a USB memory and contact your Yamaha dealer. F CONTRAST/BRIGHTNESS field Here you can adjust the contrast and brightness of the display, the brightness of the top panel LEDs, and the brightness of the lamp connected to the LAMP connector (→ p. 217). For details on the function and operations for each screen, refer to the second half of this chapter or to the corresponding other chapter. Word clock settings "Word clock" refers to the clock that provides the basis of timing for digital audio signal processing. If you connect external equipment such as a DAW system or HDR (Hard Disk Recorder) to a digital I/O card installed in a rear panel slot, this equipment must be synchronized to the same word clock in order for digital audio signals to be sent and received. If digital audio signals are transferred in an unsynchronized state, the data will not be transmitted or received correctly, and noise may be present in the signal, even if the sampling rates are the same. Specifically, you must first decide which device will transmit the reference word clock for the entire system (the word clock master), and then set the remaining devices (the word clock slaves) so that they synchronize to the word clock master. If you wish to use the LS9 as a word clock slave that is synchronized to the word clock supplied from an external device, you must specify the appropriate clock source (the port through which the word clock is obtained). The following steps show how to select the clock source that the LS9 will use. 1 In the DISPLAY ACCESS section, press the [SETUP] key repeatedly to access the SYSTEM SETUP screen. 1 MIXER SETUP field B WORD CLOCK button 2 Move the cursor to the WORD CLOCK button of the MIXER SETUP field in the lower part of the screen, and press the [ENTER] key. The WORD CLOCK popup window will appear, allowing you to make word clock settings. This popup window contains the following items. 1 2 206 LS9-16/32 Owner's Manual LS9-32
-
 1
1 -
2
-
3
-
4
-
5
-
6
-
7
-
8
-
9
-
10
-
11
-
12
-
13
-
14
-
15
-
16
-
17
-
18
-
19
-
20
-
21
-
22
-
23
-
24
-
25
-
26
-
27
-
28
-
29
-
30
-
31
-
32
-
33
-
34
-
35
-
36
-
37
-
38
-
39
-
40
-
41
-
42
-
43
-
44
-
45
-
46
-
47
-
48
-
49
-
50
-
51
-
52
-
53
-
54
-
55
-
56
-
57
-
58
-
59
-
60
-
61
-
62
-
63
-
64
-
65
-
66
-
67
-
68
-
69
-
70
-
71
-
72
-
73
-
74
-
75
-
76
-
77
-
78
-
79
-
80
-
81
-
82
-
83
-
84
-
85
-
86
-
87
-
88
-
89
-
90
-
91
-
92
-
93
-
94
-
95
-
96
-
97
-
98
-
99
-
100
-
101
-
102
-
103
-
104
-
105
-
106
-
107
-
108
-
109
-
110
-
111
-
112
-
113
-
114
-
115
-
116
-
117
-
118
-
119
-
120
-
121
-
122
-
123
-
124
-
125
-
126
-
127
-
128
-
129
-
130
-
131
-
132
-
133
-
134
-
135
-
136
-
137
-
138
-
139
-
140
-
141
-
142
-
143
-
144
-
145
-
146
-
147
-
148
-
149
-
150
-
151
-
152
-
153
-
154
-
155
-
156
-
157
-
158
-
159
-
160
-
161
-
162
-
163
-
164
-
165
-
166
-
167
-
168
-
169
-
170
-
171
-
172
-
173
-
174
-
175
-
176
-
177
-
178
-
179
-
180
-
181
-
182
-
183
-
184
-
185
-
186
-
187
-
188
-
189
-
190
-
191
-
192
-
193
-
194
-
195
-
196
-
197
-
198
-
199
-
200
-
 201
201 -
 202
202 -
 203
203 -
 204
204 -
 205
205 -
 206
206 -
 207
207 -
 208
208 -
 209
209 -
 210
210 -
 211
211 -
212
-
213
-
214
-
215
-
216
-
217
-
218
-
219
-
220
-
221
-
222
-
223
-
224
-
225
-
226
-
227
-
228
-
229
-
230
-
231
-
232
-
233
-
234
-
235
-
236
-
237
-
238
-
239
-
240
-
241
-
242
-
243
-
244
-
245
-
246
-
247
-
248
-
249
-
250
-
251
-
252
-
253
-
254
-
255
-
256
-
257
-
258
-
259
-
260
-
261
-
262
-
263
-
264
-
265
-
266
-
267
-
268
-
269
-
270
-
271
-
272
-
273
-
274
-
275
-
276
-
277
-
278
-
279
-
280
-
281
-
282
-
283
-
284
-
285
-
286
-
287
-
288
-
289
-
290
 |
 |
