HP Cluster Platform Interconnects v2010 Quadrics QsNetII Interconnect - Page 17
secondary destinations, Cabling Tables, Ethernet Cabling Tables, Core Components Guide
 |
View all HP Cluster Platform Interconnects v2010 manuals
Add to My Manuals
Save this manual to your list of manuals |
Page 17 highlights
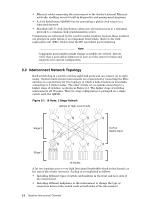
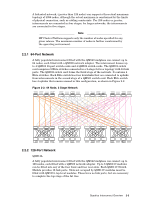
cabling links are specified as secondary destinations in the cabling tables. 11. Determine whether any of the supplemental rules apply, according to the cabling tables for your model and configuration of HP Cluster Platform. 12. Using the appropriate Cabling Tables as a worksheet, cable the cluster according to the cabling chart and supplemental rules. See Section 7.6 for information on connecting cables. (Some cluster configurations might specify optional connections). 13. Configure the clock box cabling, using the information in the cabling tables for your model and configuration of HP Cluster Platform. See Section 3.5.1 for clock network information and Chapter 6 for clock maintenance information. 14. Connect the network cables from the application and service nodes to the Ethernet network switches to complete the Console and Administration networks, as described in the Ethernet Cabling Tables. 15. Make any required connections from the ProCurve switches to your local area network. 16. Connect the cables from the KVM switch to the control (and optionally service) nodes, as described in the Core Components Guide. 17. Connect the cables from the service nodes to the storage components (optional). 18. Consult the operating system software (such as HP XC) for power-up instructions before applying power through the PDU breakers. 19. Connect all PDUs in all racks to the power bus bars. 20. Turn on the breakers on each PDU (switched to the left). 21. Verify that power is present. A red light on the PDU main breaker indicates there is source power. If power is not present, contact the site's qualified electrician. Overview of Quadrics-Based Clusters 1-7
-
 1
1 -
2
-
3
-
4
-
5
-
6
-
7
-
8
-
9
-
10
-
11
-
 12
12 -
 13
13 -
 14
14 -
 15
15 -
 16
16 -
 17
17 -
 18
18 -
 19
19 -
 20
20 -
 21
21 -
 22
22 -
23
-
24
-
25
-
26
-
27
-
28
-
29
-
30
-
31
-
32
-
33
-
34
-
35
-
36
-
37
-
38
-
39
-
40
-
41
-
42
-
43
-
44
-
45
-
46
-
47
-
48
-
49
-
50
-
51
-
52
-
53
-
54
-
55
-
56
-
57
-
58
-
59
-
60
-
61
-
62
-
63
-
64
-
65
-
66
-
67
-
68
-
69
-
70
-
71
-
72
-
73
-
74
-
75
-
76
-
77
-
78
-
79
-
80
-
81
-
82
-
83
-
84
-
85
-
86
-
87
-
88
-
89
-
90
-
91
-
92
-
93
-
94
-
95
-
96
-
97
-
98
-
99
-
100
-
101
-
102
-
103
-
104
-
105
-
106
-
107
-
108
-
109
-
110
-
111
-
112
-
113
-
114
-
115
-
116
-
117
-
118
-
119
-
120
-
121
-
122
-
123
-
124
-
125
-
126
-
127
-
128
-
129
-
130
-
131
-
132
-
133
-
134
-
135
-
136
-
137
-
138
-
139
-
140
-
141
-
142
-
143
-
144
-
145
-
146
-
147
-
148
-
149
-
150
-
151
-
152
-
153
-
154
-
155
-
156
-
157
-
158
-
159
-
160
-
161
-
162
-
163
-
164
-
165
-
166
 |
 |