HP Cluster Platform Interconnects v2010 Quadrics QsNetII Interconnect - Page 51
Attaching the Bracket to the Enclosure, Attaching the Tray Kit to the Rack
 |
View all HP Cluster Platform Interconnects v2010 manuals
Add to My Manuals
Save this manual to your list of manuals |
Page 51 highlights
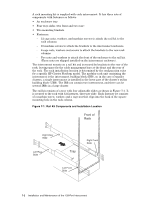
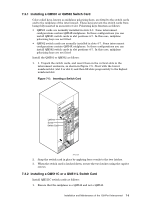
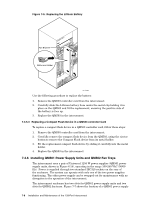
Use the following procedure to install the enclosure in the rack: 1. Unpack the interconnect enclosure and the rack mounting kit, ensuring that all components and fasteners are present. 2. Attach a bracket to each side of the interconnect enclosure using the 16 screws supplied, setting the position of the bracket as shown in Figure 7-2. Figure 7-2: Attaching the Bracket to the Enclosure 29.12 28.12 25.00 3. Secure the front slides to the rack columns as shown in Figure 2-3 using six cage nuts, bolts, and washers (three per slide), as shown in Figure 7-3. Figure 7-3: Attaching the Tray Kit to the Rack Rear of the Rack Front of the Rack 4. Slide the tray onto the front slides and then fit the rear slides into the tray until they are flush with the rear rack columns. 5. Secure the rear slides to the rear rack columns using six cage nuts, bolts, and washers (three per slide). Installation and Maintenance of the 128-Port Interconnect 7-3
-
 1
1 -
2
-
3
-
4
-
5
-
6
-
7
-
8
-
9
-
10
-
11
-
12
-
13
-
14
-
15
-
16
-
17
-
18
-
19
-
20
-
21
-
22
-
23
-
24
-
25
-
26
-
27
-
28
-
29
-
30
-
31
-
32
-
33
-
34
-
35
-
36
-
37
-
38
-
39
-
40
-
41
-
42
-
43
-
44
-
45
-
 46
46 -
 47
47 -
 48
48 -
 49
49 -
 50
50 -
 51
51 -
 52
52 -
 53
53 -
 54
54 -
 55
55 -
 56
56 -
57
-
58
-
59
-
60
-
61
-
62
-
63
-
64
-
65
-
66
-
67
-
68
-
69
-
70
-
71
-
72
-
73
-
74
-
75
-
76
-
77
-
78
-
79
-
80
-
81
-
82
-
83
-
84
-
85
-
86
-
87
-
88
-
89
-
90
-
91
-
92
-
93
-
94
-
95
-
96
-
97
-
98
-
99
-
100
-
101
-
102
-
103
-
104
-
105
-
106
-
107
-
108
-
109
-
110
-
111
-
112
-
113
-
114
-
115
-
116
-
117
-
118
-
119
-
120
-
121
-
122
-
123
-
124
-
125
-
126
-
127
-
128
-
129
-
130
-
131
-
132
-
133
-
134
-
135
-
136
-
137
-
138
-
139
-
140
-
141
-
142
-
143
-
144
-
145
-
146
-
147
-
148
-
149
-
150
-
151
-
152
-
153
-
154
-
155
-
156
-
157
-
158
-
159
-
160
-
161
-
162
-
163
-
164
-
165
-
166
 |
 |
