HP Cluster Platform Interconnects v2010 Quadrics QsNetII Interconnect - Page 56
Installing QM561 Power Supply Units and QM562 Fan Trays
 |
View all HP Cluster Platform Interconnects v2010 manuals
Add to My Manuals
Save this manual to your list of manuals |
Page 56 highlights
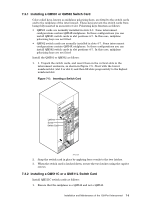
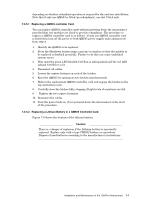
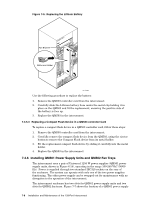
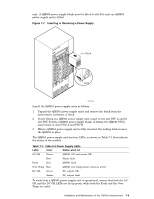
Figure 7-6: Replacing the Lithium Battery QUaDrics QsNet" PSU A Fan B/Ctrl B PSU B Batter and Holder HPTC-0034 Use the following procedure to replace the battery: 1. Remove the QM503 controller card from the interconnect. 2. Carefully slide the Lithium battery from under the metal clip holding it in place on the QM503 and fit the replacement, ensuring the positive side of the battery is face up. 3. Replace the QM503 in the interconnect. 7.3.5.3 Replacing a Compact Flash Device in a QM503 controller Card To replace a compact flash device in a QM503 controller card, follow these steps: 1. Remove the QM503 controller card from the interconnect. 2. Carefully remove the compact flash device from the QM503, using the ejector button to remove the Compact Flash device from its metal holder. 3. Fit the replacement compact flash device by sliding it carefully into the metal holder. 4. Replace the QM503 in the interconnect. 7.3.6 Installing QM561 Power Supply Units and QM562 Fan Trays The interconnect uses a pair of Universal 1250 W power supplies (QM561 power supply units, shown in Figure 6.14), operating in the range 100-240 VAC (50/60 Hz). Power is supplied through two standard IEC320 sockets on the rear of the enclosure. The system can operate with only one of the two power supplies functioning. The other power supply can be swapped out for maintenance with no disruption to the operation of the interconnect. The interconnect enclosure has two slots for QM561 power supply units and two slots for QM562 fan trays. Figure 7-7 shows the location of a QM561 power supply 7-8 Installation and Maintenance of the 128-Port Interconnect
-
 1
1 -
2
-
3
-
4
-
5
-
6
-
7
-
8
-
9
-
10
-
11
-
12
-
13
-
14
-
15
-
16
-
17
-
18
-
19
-
20
-
21
-
22
-
23
-
24
-
25
-
26
-
27
-
28
-
29
-
30
-
31
-
32
-
33
-
34
-
35
-
36
-
37
-
38
-
39
-
40
-
41
-
42
-
43
-
44
-
45
-
46
-
47
-
48
-
49
-
50
-
 51
51 -
 52
52 -
 53
53 -
 54
54 -
 55
55 -
 56
56 -
 57
57 -
 58
58 -
 59
59 -
 60
60 -
 61
61 -
62
-
63
-
64
-
65
-
66
-
67
-
68
-
69
-
70
-
71
-
72
-
73
-
74
-
75
-
76
-
77
-
78
-
79
-
80
-
81
-
82
-
83
-
84
-
85
-
86
-
87
-
88
-
89
-
90
-
91
-
92
-
93
-
94
-
95
-
96
-
97
-
98
-
99
-
100
-
101
-
102
-
103
-
104
-
105
-
106
-
107
-
108
-
109
-
110
-
111
-
112
-
113
-
114
-
115
-
116
-
117
-
118
-
119
-
120
-
121
-
122
-
123
-
124
-
125
-
126
-
127
-
128
-
129
-
130
-
131
-
132
-
133
-
134
-
135
-
136
-
137
-
138
-
139
-
140
-
141
-
142
-
143
-
144
-
145
-
146
-
147
-
148
-
149
-
150
-
151
-
152
-
153
-
154
-
155
-
156
-
157
-
158
-
159
-
160
-
161
-
162
-
163
-
164
-
165
-
166
 |
 |
