Kyocera KM-2030 Fax System (B) Instruction Handbook - Page 102
Printing Out an F-Code Based Relay Box List
 |
View all Kyocera KM-2030 manuals
Add to My Manuals
Save this manual to your list of manuals |
Page 102 highlights
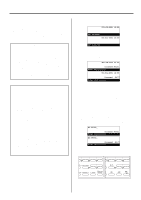
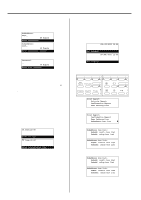
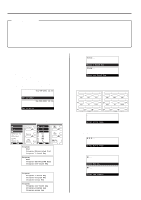
Section 4 Other Features of this Fax 5. Use the keypad to enter the appropriate subaddress. * This subaddress is required during an F-Code Based Communication in order to designate the box in the relay station's fax. It can be up to 20 digits in length and can include any combination of the numerals 0 - 9. SubAddress: 6635 20 Digits Enter SubAddress. Subaddress: 6635 20 Digits Enter subaddress numbers (Inch) (Metric) 6. Press the Enter key. Password: 20 Digits Enter Your Password 7. If necessary, enter the predetermined F-Code password. * This password is used during an F-Code Based Communication, but is not required if you agree in advance with the destination party not to use one. > The password can be up to 20 digits in length and can include any combination of the numerals 0 - 9 and the symbols " " and "#". > If you DO NOT need to enter an F-Code password, proceed to step 8. 8. Proceed to the appropriate step as indicated below: > If you pressed the Delayed Tx. key in step 2, proceed to step 9. > If you DID NOT press the Delayed Tx. key, proceed to step 11. 9. Press the Enter key. 10. Use the keypad to enter the desired time for the transmission to begin. * If you want to reset the displayed time to "00:00", simply press the Stop/Clear key. TX Time:20:00 (Inch) Enter TX Time TX time:20:00 (Metric) Enter transmission time 11. Press the Enter key. The transmission operation will begin. * If a time for the transmission to begin was designated, the transmission operation will begin when the appointed time is reached. 4-20 (10) Printing Out an F-Code Based Relay Box List Print out this list in order to check the information in each F-Code Based Relay Box as well as data regarding the existence of documents in each respective box. * If there are no F-Code Based Relay Boxes registered in this fax, an F-Code Based Relay Box List will not be printed out. * If you want to cancel the procedure part way through, press the Reset key. The operation panel will return to the initial mode settings. JUL-08-2001 12:00 (Inch) Set Document 08-JUL-2001 12:00 (Metric) Set original 1. Raise the cover plate and press the Print Reports key. The "Print Report" menu will appear in the message display. (Inch) (Metric) Print Report: Á Activity Report Confirmation Report User Setting List 2. Use the cursor up or the cursor down key to select "Subaddress box list". Print Report: Confirmation Report User Setting List Á Subaddress box list P 3. Press the Enter key. Subaddress box list: Á Subadd. confi. box list Subadd. relay box list (Inch) Subaddress box list: Á Subad. confid. box list Subaddr. relay box list (Metric) 4. Use the cursor up or the cursor down key to select "Subadd. relay box list" ["Subaddr. relay box list"]. Subaddress box list: Subadd. confi. box list Á Subadd. relay box list (Inch) Subaddress box list: Subad. confid. box list Á Subaddr. relay box list (Metric) 5. Press the Enter key. An F-Code Based Relay Box List will be printed out. * The operation panel will return to the initial mode settings. * If there are no F-Code Based Relay Boxes registered in this fax, an error message will be displayed before the operation panel returns to the initial mode settings.
-
 1
1 -
2
-
3
-
4
-
5
-
6
-
7
-
8
-
9
-
10
-
11
-
12
-
13
-
14
-
15
-
16
-
17
-
18
-
19
-
20
-
21
-
22
-
23
-
24
-
25
-
26
-
27
-
28
-
29
-
30
-
31
-
32
-
33
-
34
-
35
-
36
-
37
-
38
-
39
-
40
-
41
-
42
-
43
-
44
-
45
-
46
-
47
-
48
-
49
-
50
-
51
-
52
-
53
-
54
-
55
-
56
-
57
-
58
-
59
-
60
-
61
-
62
-
63
-
64
-
65
-
66
-
67
-
68
-
69
-
70
-
71
-
72
-
73
-
74
-
75
-
76
-
77
-
78
-
79
-
80
-
81
-
82
-
83
-
84
-
85
-
86
-
87
-
88
-
89
-
90
-
91
-
92
-
93
-
94
-
95
-
96
-
 97
97 -
 98
98 -
 99
99 -
 100
100 -
 101
101 -
 102
102 -
 103
103 -
 104
104 -
 105
105 -
 106
106 -
 107
107 -
108
-
109
-
110
-
111
-
112
-
113
-
114
-
115
-
116
-
117
-
118
-
119
-
120
-
121
-
122
-
123
-
124
-
125
-
126
-
127
-
128
-
129
-
130
-
131
-
132
-
133
-
134
-
135
-
136
-
137
-
138
-
139
-
140
-
141
-
142
-
143
-
144
-
145
-
146
-
147
-
148
-
149
-
150
-
151
-
152
-
153
-
154
-
155
-
156
-
157
-
158
-
159
-
160
-
161
-
162
-
163
-
164
-
165
-
166
-
167
-
168
-
169
-
170
-
171
-
172
-
173
-
174
-
175
-
176
-
177
-
178
 |
 |