Kyocera KM-2030 Fax System (B) Instruction Handbook - Page 135
Printing Out a Restricted Access Report
 |
View all Kyocera KM-2030 manuals
Add to My Manuals
Save this manual to your list of manuals |
Page 135 highlights
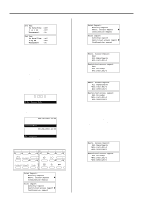
6. Press the Enter key. The setting for Restricted Access is complete. Set Fax: Rx Date/Time 2 in 1 RX Á Management :Off :Off :On Set fax: Rx date/Time 2-up RX Á Management :off :Off :On (Inch) (Metric) 7. Press the Reset key. The operation panel will return to the initial mode settings. (9) Printing Out a Restricted Access Report Print out this report in order to check the details, listed by department, of all communications occurring under Restricted Access. It is additionally possible to print out a report for an individual department, or for all departments at the same time. * You will need to turn Restricted Access ON and enter the registered management password before you can print out this report. (Refer to "Registering the Management Password", page 6-17.) * If no communications have taken place in this fax under Restricted Access, a Restricted Access Report will not be printed out. * If you want to cancel the procedure part way through, press the Reset key. The operation panel will return to the initial mode settings. Enter Access Code 1. Enter the registered management password. * If the entered management password matches the registered one, the message display will change to the initial mode for fax operation. JUL-08-2001 12:00 Set Document (Inch) 08-JUL-2001 12:00 (Metric) Set original 2. Raise the cover plate and press the Print Reports key. The "Print Report" menu will appear in the message display. (Inch) (Metric) Print Report: Á Activity Report Restr. Access Report Confirmation Report P (Inch) Print report: Á Activity report Restricted access report P (Metric) Confirmation report Section 4 Other Features of this Fax 3. Use the cursor up or the cursor down key to select "Restr. Access Report" ["Restricted access report"]. Print Report: Activity Report Á Restr. Access Report Confirmation Report P (Inch) Print report: Activity report Á Restricted access report P (Metric) Confirmation report 4. Press the Enter key. Restr. Access Report: End Á All Departments #01:1463:JKL-G Restricted access report: End Á All ID-codes #01:1463:JKL-G (Inch) (Metric) 5. Use the cursor up or the cursor down key to select the department for which you want to print out a Restricted Access Report. Restr. Access Report: All Departments *#01:1463:JKL-G Á #02:0258:LPG-D (Inch) Restricted access report: All ID-codes *#01:1463:JKL-G Á #02:0258:LPG-D (Metric) > If you want to print out a report for only a certain number of departments, select only those departments desired. > If you want to print out a report for all departments at one time, select "All Departments" ["All ID-codes"]. * The asterisk(s) (*) indicate those departments for which a Restricted Access Report will be printed out. * If you want to cancel a department that has already been selected, simply select that department once again and the asterisk will go out. 6. Press the Enter key. An asterisk (*) will appear next to the selected department indicating that a Restricted Access report will be printed out for that department. Restr. Access Report: All Departments *#01:1463:JKL-G Á*#02:0258:LPG-D (Inch) Restricted access report: All ID-codes *#01:1463:JKL-G Á*#02:0258:LPG-D (Metric) > If you want to continue selecting other departments, repeat steps 5 - 6. > If you are finished selecting departments, proceed to step 7. * If multiple departments are selected, each department selected will have an asterisk (*) next to it. * If no communications have taken place under Restricted Access for that department, an error message will appear in the message display. 4-53
-
 1
1 -
2
-
3
-
4
-
5
-
6
-
7
-
8
-
9
-
10
-
11
-
12
-
13
-
14
-
15
-
16
-
17
-
18
-
19
-
20
-
21
-
22
-
23
-
24
-
25
-
26
-
27
-
28
-
29
-
30
-
31
-
32
-
33
-
34
-
35
-
36
-
37
-
38
-
39
-
40
-
41
-
42
-
43
-
44
-
45
-
46
-
47
-
48
-
49
-
50
-
51
-
52
-
53
-
54
-
55
-
56
-
57
-
58
-
59
-
60
-
61
-
62
-
63
-
64
-
65
-
66
-
67
-
68
-
69
-
70
-
71
-
72
-
73
-
74
-
75
-
76
-
77
-
78
-
79
-
80
-
81
-
82
-
83
-
84
-
85
-
86
-
87
-
88
-
89
-
90
-
91
-
92
-
93
-
94
-
95
-
96
-
97
-
98
-
99
-
100
-
101
-
102
-
103
-
104
-
105
-
106
-
107
-
108
-
109
-
110
-
111
-
112
-
113
-
114
-
115
-
116
-
117
-
118
-
119
-
120
-
121
-
122
-
123
-
124
-
125
-
126
-
127
-
128
-
129
-
 130
130 -
 131
131 -
 132
132 -
 133
133 -
 134
134 -
 135
135 -
 136
136 -
 137
137 -
 138
138 -
 139
139 -
 140
140 -
141
-
142
-
143
-
144
-
145
-
146
-
147
-
148
-
149
-
150
-
151
-
152
-
153
-
154
-
155
-
156
-
157
-
158
-
159
-
160
-
161
-
162
-
163
-
164
-
165
-
166
-
167
-
168
-
169
-
170
-
171
-
172
-
173
-
174
-
175
-
176
-
177
-
178
 |
 |