Kyocera KM-2030 Fax System (B) Instruction Handbook - Page 156
Registering the Remote Test ID
 |
View all Kyocera KM-2030 manuals
Add to My Manuals
Save this manual to your list of manuals |
Page 156 highlights
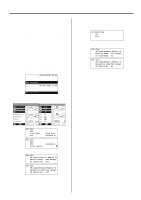
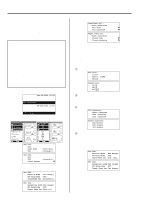
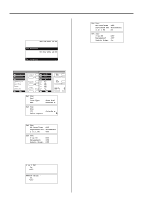
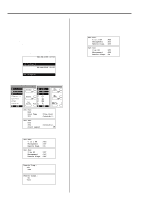
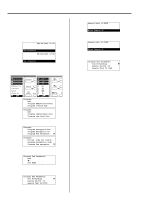
Section 6 Various Settings and Registration in this Fax Registering the Remote Test ID If you have entered into a contract with an authorized service center for their Remote Diagnosis service, it is necessary to register in advance the Remote Test ID that they designate for you. * A previously registered Remote Test ID can also be modified by performing the following procedure. * If you want to cancel the procedure part way through, press the Reset key. The operation panel will return to the initial mode settings. JUL-08-2001 12:00 Set Document (Inch) 08-JUL-2001 12:00 Set original (Metric) 1. Raise the cover plate and press the Register key. The "Program" menu will appear in the message display. (Inch) (Metric) 5. Press the Enter key. Remote Test ID:0000 Enter Remote ID 6. Use the keypad to enter the designated 4-digit Remote Test ID. Remote Test ID:7268 Enter Remote ID 7. Press the Enter key. Registration of the Remote Test ID is complete. Program Fax Parameter: Fax Forwarding P Remote Switch :55 Á Remote Test ID:7268 * If you are finished making settings, press the Reset key. The operation panel will return to the initial mode settings. Program: End Á Program Abbreviated Dial Program 1-Touch Key Program: End Á Program abbreviated dial Program one-touch key (Inch) (Metric) 2. Use the cursor up or the cursor down key to select "Program Fax Parameter". Program: Program encryption box Program Encryption ID Á Program Fax Parameter (Inch) P Program: Encryp. code box regist. Program encryption code (Metric) Á Program fax parameter P 3. Press the Enter key. Program Fax Parameter: End Á v: Own Name : 4. Use the cursor up or the cursor down key to select "Remote Test ID". Program Fax Parameter: Fax Forwarding P Remote Switch :55 Á Remote Test ID:0000 6-16
-
 1
1 -
2
-
3
-
4
-
5
-
6
-
7
-
8
-
9
-
10
-
11
-
12
-
13
-
14
-
15
-
16
-
17
-
18
-
19
-
20
-
21
-
22
-
23
-
24
-
25
-
26
-
27
-
28
-
29
-
30
-
31
-
32
-
33
-
34
-
35
-
36
-
37
-
38
-
39
-
40
-
41
-
42
-
43
-
44
-
45
-
46
-
47
-
48
-
49
-
50
-
51
-
52
-
53
-
54
-
55
-
56
-
57
-
58
-
59
-
60
-
61
-
62
-
63
-
64
-
65
-
66
-
67
-
68
-
69
-
70
-
71
-
72
-
73
-
74
-
75
-
76
-
77
-
78
-
79
-
80
-
81
-
82
-
83
-
84
-
85
-
86
-
87
-
88
-
89
-
90
-
91
-
92
-
93
-
94
-
95
-
96
-
97
-
98
-
99
-
100
-
101
-
102
-
103
-
104
-
105
-
106
-
107
-
108
-
109
-
110
-
111
-
112
-
113
-
114
-
115
-
116
-
117
-
118
-
119
-
120
-
121
-
122
-
123
-
124
-
125
-
126
-
127
-
128
-
129
-
130
-
131
-
132
-
133
-
134
-
135
-
136
-
137
-
138
-
139
-
140
-
141
-
142
-
143
-
144
-
145
-
146
-
147
-
148
-
149
-
150
-
 151
151 -
 152
152 -
 153
153 -
 154
154 -
 155
155 -
 156
156 -
 157
157 -
 158
158 -
 159
159 -
 160
160 -
 161
161 -
162
-
163
-
164
-
165
-
166
-
167
-
168
-
169
-
170
-
171
-
172
-
173
-
174
-
175
-
176
-
177
-
178
 |
 |
