Netgear GS724TPv2 User Manual - Page 61
High Power Mode, Go To Interface
 |
View all Netgear GS724TPv2 manuals
Add to My Manuals
Save this manual to your list of manuals |
Page 61 highlights
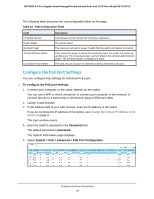
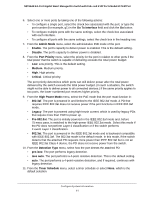
NETGEAR 24-Port Gigabit Smart Managed Pro Switch with PoE+ and 2 SFP Ports Model GS724TPv2 6. Select one or more ports by taking one of the following actions: • To configure a single port, select the check box associated with the port, or type the port number (for example, g1) in the Go To Interface field and click the Go button. • To configure multiple ports with the same settings, select the check box associated with each interface. • To configure all ports with the same settings, select the check box in the heading row. 7. From the Admin Mode menu, select the administrative PoE mode of the port: • Enable. The port's capacity to deliver power is enabled. This is the default setting. • Disable. The port's capacity to deliver power is disabled. 8. From the Port Priority menu, select the priority for the port in relation to other ports if the total power that the switch is capable of delivering exceeds the total power budget: • Low. Low priority. This is the default setting. • Medium. Medium priority. • High. High priority. • Critical. Critical priority. The port priority determines which ports can still deliver power after the total power delivered by the switch exceeds the total power budget. (In such a situation, the switch might not be able to deliver power to all connected devices.) If the same priority applies to two ports, the lower-numbered port receives higher priority. 9. From the High Power Mode menu, select the PoE mode that the port must function in: • 802.3af. The port is powered in and limited to the IEEE 802.3af mode. A PD that requires IEEE 802.3at does not receive power if the port functions in IEEE 802.3af mode. • Legacy. The port is powered using high-inrush current, which is used by legacy PDs that require more than 15W to power up. • Pre-802.3at. The port is initially powered in the IEEE 802.3af mode and, before 75 msec pass, is switched to the high-power IEEE 802.3at mode. Select this mode if the PD does not perform Layer 2 classification or if the switch performs 2-event Layer 1 classification. • 802.3at. The port is powered in the IEEE 802.3at mode and is backward compatible with IEEE 802.3af. The 802.3at mode is the default mode. In this mode, if the switch detects that the attached PD requests more power than IEEE 802.3af but is not an IEEE 802.3at Class 4 device, the PD does not receive power from the switch. 10. From the Detection Type menu, select how the port detects the attached PD: • pre-ieee. The port performs legacy detection. • ieee auto. The port performs a 4-point resistive detection. This is the default setting. • auto. The port performs a 4-point resistive detection, and if required, continues with legacy detection. 11. From the Timer Schedule menu, select a timer schedule or select None, which is the default selection. Configure System Information 61
-
 1
1 -
2
-
3
-
4
-
5
-
6
-
7
-
8
-
9
-
10
-
11
-
12
-
13
-
14
-
15
-
16
-
17
-
18
-
19
-
20
-
21
-
22
-
23
-
24
-
25
-
26
-
27
-
28
-
29
-
30
-
31
-
32
-
33
-
34
-
35
-
36
-
37
-
38
-
39
-
40
-
41
-
42
-
43
-
44
-
45
-
46
-
47
-
48
-
49
-
50
-
51
-
52
-
53
-
54
-
55
-
 56
56 -
 57
57 -
 58
58 -
 59
59 -
 60
60 -
 61
61 -
 62
62 -
 63
63 -
 64
64 -
 65
65 -
 66
66 -
67
-
68
-
69
-
70
-
71
-
72
-
73
-
74
-
75
-
76
-
77
-
78
-
79
-
80
-
81
-
82
-
83
-
84
-
85
-
86
-
87
-
88
-
89
-
90
-
91
-
92
-
93
-
94
-
95
-
96
-
97
-
98
-
99
-
100
-
101
-
102
-
103
-
104
-
105
-
106
-
107
-
108
-
109
-
110
-
111
-
112
-
113
-
114
-
115
-
116
-
117
-
118
-
119
-
120
-
121
-
122
-
123
-
124
-
125
-
126
-
127
-
128
-
129
-
130
-
131
-
132
-
133
-
134
-
135
-
136
-
137
-
138
-
139
-
140
-
141
-
142
-
143
-
144
-
145
-
146
-
147
-
148
-
149
-
150
-
151
-
152
-
153
-
154
-
155
-
156
-
157
-
158
-
159
-
160
-
161
-
162
-
163
-
164
-
165
-
166
-
167
-
168
-
169
-
170
-
171
-
172
-
173
-
174
-
175
-
176
-
177
-
178
-
179
-
180
-
181
-
182
-
183
-
184
-
185
-
186
-
187
-
188
-
189
-
190
-
191
-
192
-
193
-
194
-
195
-
196
-
197
-
198
-
199
-
200
-
201
-
202
-
203
-
204
-
205
-
206
-
207
-
208
-
209
-
210
-
211
-
212
-
213
-
214
-
215
-
216
-
217
-
218
-
219
-
220
-
221
-
222
-
223
-
224
-
225
-
226
-
227
-
228
-
229
-
230
-
231
-
232
-
233
-
234
-
235
-
236
-
237
-
238
-
239
-
240
-
241
-
242
-
243
-
244
-
245
-
246
-
247
-
248
-
249
-
250
-
251
-
252
-
253
-
254
-
255
-
256
-
257
-
258
-
259
-
260
-
261
-
262
-
263
-
264
-
265
-
266
-
267
-
268
-
269
-
270
-
271
-
272
-
273
-
274
-
275
-
276
-
277
-
278
-
279
-
280
-
281
-
282
-
283
-
284
-
285
-
286
-
287
-
288
-
289
-
290
-
291
-
292
-
293
-
294
-
295
-
296
-
297
-
298
-
299
-
300
-
301
-
302
-
303
-
304
-
305
-
306
-
307
-
308
-
309
-
310
-
311
-
312
-
313
-
314
-
315
-
316
-
317
 |
 |