Yamaha QL5 Reference Manual - Page 113
Inserting an internal effect into a channel, Adjusting the effect send level of a input channel
 |
View all Yamaha QL5 manuals
Add to My Manuals
Save this manual to your list of manuals |
Page 113 highlights
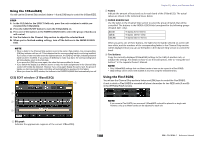
NOTE • If you're using a stereo source, assign the L/R signals of the stereo MIX channels to the L/R inputs of the rack. • If you're using the output of the effect in stereo, assign the R input of the ST IN channel selected in step 3 to the R output of the rack. • You can select more than one output destination for the effect. • For more information on setting the effect parameters, refer to "Editing the internal effect parameters" on page 114. Adjusting the effect send level of a input channel In the SEND field in the SELECTED CHANNEL VIEW screen, press and select the TO MIX SEND LEVEL knob for the MIX bus set as the input source for the rack, and use the [TOUCH AND TURN] knob to adjust the send level of the signal sent from each channel to that MIX bus. NOTE • When adjusting the effect send level, make sure that the send level from the ST IN channel you selected as the output destination for the rack to the corresponding MIX bus is set to -∞ dB. If you raise this send level, the output of the effect will be returned to the input of the same effect, possibly causing oscillation. • If you press the knob once again, the MIX SEND window (8ch) for the send-destination MIX bus will appear. This window contains on/off switches for the signals sent from each channel to the corresponding bus, and lets you select the send point (PRE or POST) (page 35). Adjusting the master level of the effect send Operate the fader for the MIX channel you specified as the input source for the rack. Set the level as high as possible without allowing the post-effect signal to reach the overload point. NOTE The input and output levels of the effect are shown by the input/output meters in the upper right of the EFFECT EDIT window. Adjusting the effect return level To adjust the effect return level, operate the fader for the ST IN channel you specified as the output destination for the rack. Graphic EQ, effects, and Premium Rack Inserting an internal effect into a channel This section explains how to insert an effect into a channel by assigning the input/output of the internal effect to the input/output of the desired channel (except for a ST IN channel). For details on editing the effect parameters, refer to "Editing the internal effect parameters" on page 114. STEP 1. Follow steps 1-3 described in "Virtual rack operations" on page 103, to mount an effect in a rack. 2. Press the INPUT PATCH L button in the VIRTUAL RACK window, and select the insert- out for one of the channels as the input source for the rack (page 103). 3. Press the OUTPUT PATCH L button in the VIRTUAL RACK window, and select the insert-1in or insert-2in of the same channel as the output destination for the rack (page 103). 4. Use the Bank Select keys and the [SEL] key to select the channel into which you inserted the effect. 5. Press the popup button in the INSERT field in the SELECTED CHANNEL VIEW screen. 6. In the INSERT/DIRECT OUT popup window, turn on the INSERT ON/OFF button for the channel into which you inserted the effect. 7. Display the EFFECT EDIT window again, and select the effect type and edit the effect parameters. 8. Using the fader of the channel you selected as the rack's output destination in step 3, adjust the level as appropriate. NOTE • If you are inserting an effect into a channel that handles a stereo source, assign the R channel insert-out/insert-in to the R input and output of the effect in the same way as step 3. • For more information about how to operate the INSERT/DIRECT OUT window, refer to "Inserting an external device into a channel" on page 18. • The levels before and after the effect are shown by the input and output meters in the upper right of the EFFECT EDIT window. • Adjust the effect send master level and the effect parameters so that the signal does not reach the overload point at the input or output stage of the effect. 113 Reference Manual
-
 1
1 -
2
-
3
-
4
-
5
-
6
-
7
-
8
-
9
-
10
-
11
-
12
-
13
-
14
-
15
-
16
-
17
-
18
-
19
-
20
-
21
-
22
-
23
-
24
-
25
-
26
-
27
-
28
-
29
-
30
-
31
-
32
-
33
-
34
-
35
-
36
-
37
-
38
-
39
-
40
-
41
-
42
-
43
-
44
-
45
-
46
-
47
-
48
-
49
-
50
-
51
-
52
-
53
-
54
-
55
-
56
-
57
-
58
-
59
-
60
-
61
-
62
-
63
-
64
-
65
-
66
-
67
-
68
-
69
-
70
-
71
-
72
-
73
-
74
-
75
-
76
-
77
-
78
-
79
-
80
-
81
-
82
-
83
-
84
-
85
-
86
-
87
-
88
-
89
-
90
-
91
-
92
-
93
-
94
-
95
-
96
-
97
-
98
-
99
-
100
-
101
-
102
-
103
-
104
-
105
-
106
-
107
-
 108
108 -
 109
109 -
 110
110 -
 111
111 -
 112
112 -
 113
113 -
 114
114 -
 115
115 -
 116
116 -
 117
117 -
 118
118 -
119
-
120
-
121
-
122
-
123
-
124
-
125
-
126
-
127
-
128
-
129
-
130
-
131
-
132
-
133
-
134
-
135
-
136
-
137
-
138
-
139
-
140
-
141
-
142
-
143
-
144
-
145
-
146
-
147
-
148
-
149
-
150
-
151
-
152
-
153
-
154
-
155
-
156
-
157
-
158
-
159
-
160
-
161
-
162
-
163
-
164
-
165
-
166
-
167
-
168
-
169
-
170
-
171
-
172
-
173
-
174
-
175
-
176
-
177
-
178
-
179
-
180
-
181
-
182
-
183
-
184
-
185
-
186
-
187
-
188
-
189
-
190
-
191
-
192
-
193
-
194
-
195
-
196
-
197
-
198
-
199
-
200
-
201
-
202
-
203
-
204
-
205
-
206
-
207
-
208
-
209
-
210
-
211
-
212
-
213
-
214
-
215
-
216
-
217
-
218
-
219
-
220
-
221
-
222
-
223
-
224
-
225
-
226
-
227
-
228
-
229
-
230
-
231
-
232
-
233
-
234
-
235
-
236
-
237
-
238
-
239
-
240
-
241
-
242
-
243
-
244
-
245
-
246
-
247
-
248
-
249
-
250
-
251
-
252
-
253
-
254
-
255
-
256
-
257
-
258
-
259
-
260
-
261
-
262
-
263
-
264
 |
 |
