Yamaha QL5 Reference Manual - Page 129
Remotely controlling an Rio unit, OUTPUT PATCH window
 |
View all Yamaha QL5 manuals
Add to My Manuals
Save this manual to your list of manuals |
Page 129 highlights
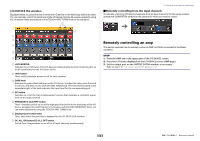
3 CLOSE button Completes the settings and closes the window. OUTPUT PATCH window Displayed when you press the device in the I/O DEVICE screen (DANTE PATCH page). Set the output patch. 1 1 Port select buttons Press one of the buttons to open the PORT SELECT popup window. I/O devices and external head amps Remotely controlling an Rio unit This section explains how to remotely control an Rio unit that's connected to the Dante connector. STEP 1. In the upper part of the I/O DEVICE screen, press the Rio tab to display the I/O DEVICE screen (Rio page). 2. Press the rack in which the I/O device on the head amp side is mounted. 3. Remotely control the head amp of the I/O device. 4. To remotely control a head amp from an input channel, press a knob in the SELECTED CHANNEL section to display the SELECTED CHANNEL VIEW screen. 5. Press the GAIN/PATCH field of the channel you want to adjust. The GAIN/PATCH window will appear. 6. Control the head amp of the I/O device in the GAIN/PATCH window. 7. When you have finished making settings, press the "x" symbol to close the window. 8. Press the rack in which the I/O device on the OUTPUT side is mounted. 9. Set the output port on the OUTPUT PATCH window, as necessary. Refer to step 7 in "I/O device patching"on page 127. 129 Reference Manual
-
 1
1 -
2
-
3
-
4
-
5
-
6
-
7
-
8
-
9
-
10
-
11
-
12
-
13
-
14
-
15
-
16
-
17
-
18
-
19
-
20
-
21
-
22
-
23
-
24
-
25
-
26
-
27
-
28
-
29
-
30
-
31
-
32
-
33
-
34
-
35
-
36
-
37
-
38
-
39
-
40
-
41
-
42
-
43
-
44
-
45
-
46
-
47
-
48
-
49
-
50
-
51
-
52
-
53
-
54
-
55
-
56
-
57
-
58
-
59
-
60
-
61
-
62
-
63
-
64
-
65
-
66
-
67
-
68
-
69
-
70
-
71
-
72
-
73
-
74
-
75
-
76
-
77
-
78
-
79
-
80
-
81
-
82
-
83
-
84
-
85
-
86
-
87
-
88
-
89
-
90
-
91
-
92
-
93
-
94
-
95
-
96
-
97
-
98
-
99
-
100
-
101
-
102
-
103
-
104
-
105
-
106
-
107
-
108
-
109
-
110
-
111
-
112
-
113
-
114
-
115
-
116
-
117
-
118
-
119
-
120
-
121
-
122
-
123
-
 124
124 -
 125
125 -
 126
126 -
 127
127 -
 128
128 -
 129
129 -
 130
130 -
 131
131 -
 132
132 -
 133
133 -
 134
134 -
135
-
136
-
137
-
138
-
139
-
140
-
141
-
142
-
143
-
144
-
145
-
146
-
147
-
148
-
149
-
150
-
151
-
152
-
153
-
154
-
155
-
156
-
157
-
158
-
159
-
160
-
161
-
162
-
163
-
164
-
165
-
166
-
167
-
168
-
169
-
170
-
171
-
172
-
173
-
174
-
175
-
176
-
177
-
178
-
179
-
180
-
181
-
182
-
183
-
184
-
185
-
186
-
187
-
188
-
189
-
190
-
191
-
192
-
193
-
194
-
195
-
196
-
197
-
198
-
199
-
200
-
201
-
202
-
203
-
204
-
205
-
206
-
207
-
208
-
209
-
210
-
211
-
212
-
213
-
214
-
215
-
216
-
217
-
218
-
219
-
220
-
221
-
222
-
223
-
224
-
225
-
226
-
227
-
228
-
229
-
230
-
231
-
232
-
233
-
234
-
235
-
236
-
237
-
238
-
239
-
240
-
241
-
242
-
243
-
244
-
245
-
246
-
247
-
248
-
249
-
250
-
251
-
252
-
253
-
254
-
255
-
256
-
257
-
258
-
259
-
260
-
261
-
262
-
263
-
264
 |
 |
