Yamaha QL5 Reference Manual - Page 58
Mute group, Controlling DCA groups, Assigning channels to mute groups
 |
View all Yamaha QL5 manuals
Add to My Manuals
Save this manual to your list of manuals |
Page 58 highlights
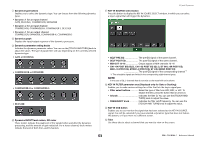
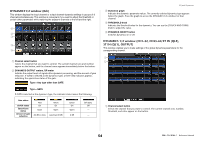
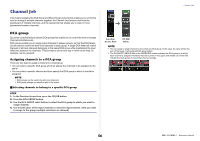
Controlling DCA groups Use the DCA faders to control DCA groups. STEP 1. Assign input channels to DCA groups. 2. Using the faders in the Channel Strip section or Master section on the top panel, adjust the relative balance between the input channels that belong to the DCA group you want to use. 3. Use the Bank Select keys to select the [ST IN/DCA] key. 4. Use the Channel Strip section to operate the DCA group. Using DCA groups Use the strip section to operate the DCA group. • Level adjustment: Faders .... The level of the channels assigned to that DCA group can be adjusted while preserving the level differences of each channel. The input faders will not operate at this time. • On/Mute switch: [ON] key When you press an [ON] key in the strip section to make the key indicator go dark, the channels assigned to that DCA group will be muted (the same state as when the faders are lowered to the -∞ dB position). • Cue monitor: [CUE] key ....... When you press the strip section [CUE] key to make it light, the [CUE] keys of the channels assigned to that DCA group will blink, and cue monitoring will be enabled. For more information about cue, refer to "Operating the Cue function" on page 92. Mute group QL series consoles feature eight mute groups. Mute groups enable you to use USER DEFINED keys [1]-[12] to mute or unmute multiple channels in a single operation. You can use this to cut out multiple channels simultaneously. Mute groups 1-8 can be used with both input channels and output channels. Both types of channels can exist in the same group. Assigning channels to mute groups As with the DCA group, there are the following two ways to assign channels to mute groups. • You can select a specific mute group first and then specify the channels to be assigned to the group. • You can select a specific channel and then specify the mute group to which it should be assigned. Channel Job Selecting the channels that will belong to a specific mute group STEP 1. In the Function Access Area, press the CH JOB button. 2. Press the MUTE GROUP button in the CH JOB menu. 3. Use the mute group master buttons in the DCA/MUTE GROUP ASSIGN MODE window to select the mute group to which you want to assign channels. 4. Press the [SEL] key for the input channels/output channels that you want to operate (multiple selections are allowed). Function Access Area CH JOB menu NOTE • You may assign a single channel to more than one mute group. • The DCA/MUTE GROUP field of the OVERVIEW screen indicates the mute group(s) to which each channel is assigned. Numbers that are lit red in the lower line of this field indicate the mute groups to which that channel belongs. • If the dimmer level is set to any level other than -∞ dB, and the corresponding MUTE GROUP MASTER button is turned on, these numbers will light orange. For a channel for which the Mute Safe function (page 60) has been turned on, an "S" indicator will light up green at the right end of the bottom row. 58 Reference Manual
-
 1
1 -
2
-
3
-
4
-
5
-
6
-
7
-
8
-
9
-
10
-
11
-
12
-
13
-
14
-
15
-
16
-
17
-
18
-
19
-
20
-
21
-
22
-
23
-
24
-
25
-
26
-
27
-
28
-
29
-
30
-
31
-
32
-
33
-
34
-
35
-
36
-
37
-
38
-
39
-
40
-
41
-
42
-
43
-
44
-
45
-
46
-
47
-
48
-
49
-
50
-
51
-
52
-
 53
53 -
 54
54 -
 55
55 -
 56
56 -
 57
57 -
 58
58 -
 59
59 -
 60
60 -
 61
61 -
 62
62 -
 63
63 -
64
-
65
-
66
-
67
-
68
-
69
-
70
-
71
-
72
-
73
-
74
-
75
-
76
-
77
-
78
-
79
-
80
-
81
-
82
-
83
-
84
-
85
-
86
-
87
-
88
-
89
-
90
-
91
-
92
-
93
-
94
-
95
-
96
-
97
-
98
-
99
-
100
-
101
-
102
-
103
-
104
-
105
-
106
-
107
-
108
-
109
-
110
-
111
-
112
-
113
-
114
-
115
-
116
-
117
-
118
-
119
-
120
-
121
-
122
-
123
-
124
-
125
-
126
-
127
-
128
-
129
-
130
-
131
-
132
-
133
-
134
-
135
-
136
-
137
-
138
-
139
-
140
-
141
-
142
-
143
-
144
-
145
-
146
-
147
-
148
-
149
-
150
-
151
-
152
-
153
-
154
-
155
-
156
-
157
-
158
-
159
-
160
-
161
-
162
-
163
-
164
-
165
-
166
-
167
-
168
-
169
-
170
-
171
-
172
-
173
-
174
-
175
-
176
-
177
-
178
-
179
-
180
-
181
-
182
-
183
-
184
-
185
-
186
-
187
-
188
-
189
-
190
-
191
-
192
-
193
-
194
-
195
-
196
-
197
-
198
-
199
-
200
-
201
-
202
-
203
-
204
-
205
-
206
-
207
-
208
-
209
-
210
-
211
-
212
-
213
-
214
-
215
-
216
-
217
-
218
-
219
-
220
-
221
-
222
-
223
-
224
-
225
-
226
-
227
-
228
-
229
-
230
-
231
-
232
-
233
-
234
-
235
-
236
-
237
-
238
-
239
-
240
-
241
-
242
-
243
-
244
-
245
-
246
-
247
-
248
-
249
-
250
-
251
-
252
-
253
-
254
-
255
-
256
-
257
-
258
-
259
-
260
-
261
-
262
-
263
-
264
 |
 |
