Yamaha QL5 Reference Manual - Page 149
Directory structure of a USB flash drive, REC RATE button, Display switch buttons, REW button
 |
View all Yamaha QL5 manuals
Add to My Manuals
Save this manual to your list of manuals |
Page 149 highlights
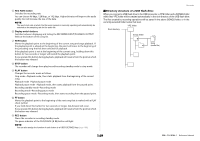
5 REC RATE button Switches the recording rate. You can choose 96 kbps, 128 kbps, or 192 kbps. Higher bit rates will improve the audio quality, but will increase the size of the data. NOTE The word clock rate at which the QL series console is currently operating will automatically be selected as the sampling rate for the audio file. 6 Display switch buttons Switches between displaying and hiding the RECORDER INPUT/PLAYBACK OUTPUT fields at the bottom of the song list. 7 REW button Moves the playback point to the beginning of the current song and stops playback. If the playback point is already at the beginning, the point will move to the beginning of the preceding song that has been selected for playback. If the playback point is not at the beginning of the current song, holding down this button for two seconds or longer will rewind the playback point. If you operate this button during playback, playback will resume from the point at which the button was released. 8 STOP button The recorder will change from play/record/recording-standby mode to stop mode. 9 PLAY button Changes the recorder mode as follows. Stop modePlayback mode, then starts playback from the beginning of the current song. Playback modePlayback-pause mode Playback pause modePlayback mode, then starts playback from the paused point. Recording standby modeRecording mode Recording modeRecording-pause mode Recording-pause modeRecording mode, then starts recording from the paused point. 0 FF button Moves the playback point to the beginning of the next song that is marked with a PLAY check symbol. If you hold down this button for two seconds or longer, fast-forward will occur. If you operate this button during playback, playback will resume from the point at which the button was released. A REC button Places the recorder in recording standby mode. The pause indicator of the PLAY/PAUSE ( ) button will light. NOTE You can also assign the function of each button to a USER DEFINED key (page 169). Recorder Directory structure of a USB flash drive When you connect a USB flash drive to the USB connector, a YPE folder and a SONGS folder within that YPE folder will be created automatically in the root directory of the USB flash drive. The files created by recording operations will be saved in the above SONGS folder, or in the currently-selected folder below that level. YPE folder Root directory Songs folder Song (audio file) 149 Reference Manual
-
 1
1 -
2
-
3
-
4
-
5
-
6
-
7
-
8
-
9
-
10
-
11
-
12
-
13
-
14
-
15
-
16
-
17
-
18
-
19
-
20
-
21
-
22
-
23
-
24
-
25
-
26
-
27
-
28
-
29
-
30
-
31
-
32
-
33
-
34
-
35
-
36
-
37
-
38
-
39
-
40
-
41
-
42
-
43
-
44
-
45
-
46
-
47
-
48
-
49
-
50
-
51
-
52
-
53
-
54
-
55
-
56
-
57
-
58
-
59
-
60
-
61
-
62
-
63
-
64
-
65
-
66
-
67
-
68
-
69
-
70
-
71
-
72
-
73
-
74
-
75
-
76
-
77
-
78
-
79
-
80
-
81
-
82
-
83
-
84
-
85
-
86
-
87
-
88
-
89
-
90
-
91
-
92
-
93
-
94
-
95
-
96
-
97
-
98
-
99
-
100
-
101
-
102
-
103
-
104
-
105
-
106
-
107
-
108
-
109
-
110
-
111
-
112
-
113
-
114
-
115
-
116
-
117
-
118
-
119
-
120
-
121
-
122
-
123
-
124
-
125
-
126
-
127
-
128
-
129
-
130
-
131
-
132
-
133
-
134
-
135
-
136
-
137
-
138
-
139
-
140
-
141
-
142
-
143
-
 144
144 -
 145
145 -
 146
146 -
 147
147 -
 148
148 -
 149
149 -
 150
150 -
 151
151 -
 152
152 -
 153
153 -
 154
154 -
155
-
156
-
157
-
158
-
159
-
160
-
161
-
162
-
163
-
164
-
165
-
166
-
167
-
168
-
169
-
170
-
171
-
172
-
173
-
174
-
175
-
176
-
177
-
178
-
179
-
180
-
181
-
182
-
183
-
184
-
185
-
186
-
187
-
188
-
189
-
190
-
191
-
192
-
193
-
194
-
195
-
196
-
197
-
198
-
199
-
200
-
201
-
202
-
203
-
204
-
205
-
206
-
207
-
208
-
209
-
210
-
211
-
212
-
213
-
214
-
215
-
216
-
217
-
218
-
219
-
220
-
221
-
222
-
223
-
224
-
225
-
226
-
227
-
228
-
229
-
230
-
231
-
232
-
233
-
234
-
235
-
236
-
237
-
238
-
239
-
240
-
241
-
242
-
243
-
244
-
245
-
246
-
247
-
248
-
249
-
250
-
251
-
252
-
253
-
254
-
255
-
256
-
257
-
258
-
259
-
260
-
261
-
262
-
263
-
264
 |
 |
