Yamaha QL5 Reference Manual - Page 164
Changing the password, In the LOAD FROM USB STORAGE field of the LOGIN window, press the LOAD .CLU
 |
View all Yamaha QL5 manuals
Add to My Manuals
Save this manual to your list of manuals |
Page 164 highlights
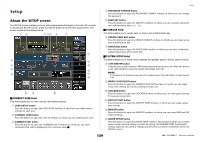
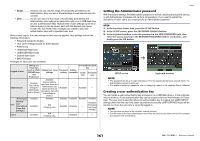
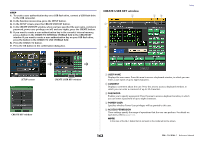
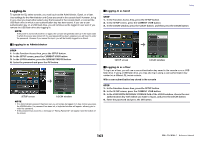
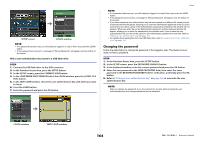
SETUP screen LOGIN window NOTE • If no password has been set, you will simply be logged-in in step 3 when you press the LOGIN button. • If the password was incorrect, a message of "Wrong Password!" will appear near the bottom of the screen. With a user authentication key stored in a USB flash drive STEP 1. Connect the USB flash drive to the USB connector. 2. In the Function Access Area, press the SETUP button. 3. In the SETUP screen, press the CURRENT USER button. 4. In the LOAD FROM USB STORAGE field of the LOGIN window, press the (LOAD .CLU FILE) button. 5. In the SAVE/LOAD window, choose the user authentication key with which you want to log in. 6. Press the LOAD button. 7. Enter the password and press the OK button. Setup NOTE • If no password has been set, you will simply be logged-in in step 6 when you press the LOAD button. • If the password was incorrect, a message of "Wrong Password!" will appear near the bottom of the screen. • If you have selected a user authentication key that was created on a different QL series console, a keyboard window will appear, allowing you to enter the Administrator password of the QL series console that you will be using. (If the Administrator passwords are identical, this window will not appear.) When you enter the correct Administrator password, another keyboard window will appear, allowing you to enter the password for the selected user. If you re-save the user authentication key, you will not be asked for the Administrator password the next time. Refer to "Editing a user authentication key" on page 165. • For details about loading files from the USB flash drive, refer to "Loading a file from a USB flash drive" on page 180. Changing the password Follow the steps below to change the password of the logged-in user. The Guest account does not have a password. STEP 1. In the Function Access Area, press the SETUP button. 2. In the SETUP screen, press the PASSWORD CHANGE button. 3. In the keyboard window, enter the current password and press the OK button. 4. Enter the new password in the NEW PASSWORD field, then enter the same password in the RE-ENTER PASSWORD field for verification, and finally press the OK button. 5. Refer to "Editing a user authentication key" on page 165 to overwrite the user authentication key. NOTE After you change the password, if you log out from the console without saving the user authentication key, the changed password will be discarded. LOGIN window SAVE/LOAD window 164 Reference Manual
-
 1
1 -
2
-
3
-
4
-
5
-
6
-
7
-
8
-
9
-
10
-
11
-
12
-
13
-
14
-
15
-
16
-
17
-
18
-
19
-
20
-
21
-
22
-
23
-
24
-
25
-
26
-
27
-
28
-
29
-
30
-
31
-
32
-
33
-
34
-
35
-
36
-
37
-
38
-
39
-
40
-
41
-
42
-
43
-
44
-
45
-
46
-
47
-
48
-
49
-
50
-
51
-
52
-
53
-
54
-
55
-
56
-
57
-
58
-
59
-
60
-
61
-
62
-
63
-
64
-
65
-
66
-
67
-
68
-
69
-
70
-
71
-
72
-
73
-
74
-
75
-
76
-
77
-
78
-
79
-
80
-
81
-
82
-
83
-
84
-
85
-
86
-
87
-
88
-
89
-
90
-
91
-
92
-
93
-
94
-
95
-
96
-
97
-
98
-
99
-
100
-
101
-
102
-
103
-
104
-
105
-
106
-
107
-
108
-
109
-
110
-
111
-
112
-
113
-
114
-
115
-
116
-
117
-
118
-
119
-
120
-
121
-
122
-
123
-
124
-
125
-
126
-
127
-
128
-
129
-
130
-
131
-
132
-
133
-
134
-
135
-
136
-
137
-
138
-
139
-
140
-
141
-
142
-
143
-
144
-
145
-
146
-
147
-
148
-
149
-
150
-
151
-
152
-
153
-
154
-
155
-
156
-
157
-
158
-
 159
159 -
 160
160 -
 161
161 -
 162
162 -
 163
163 -
 164
164 -
 165
165 -
 166
166 -
 167
167 -
 168
168 -
 169
169 -
170
-
171
-
172
-
173
-
174
-
175
-
176
-
177
-
178
-
179
-
180
-
181
-
182
-
183
-
184
-
185
-
186
-
187
-
188
-
189
-
190
-
191
-
192
-
193
-
194
-
195
-
196
-
197
-
198
-
199
-
200
-
201
-
202
-
203
-
204
-
205
-
206
-
207
-
208
-
209
-
210
-
211
-
212
-
213
-
214
-
215
-
216
-
217
-
218
-
219
-
220
-
221
-
222
-
223
-
224
-
225
-
226
-
227
-
228
-
229
-
230
-
231
-
232
-
233
-
234
-
235
-
236
-
237
-
238
-
239
-
240
-
241
-
242
-
243
-
244
-
245
-
246
-
247
-
248
-
249
-
250
-
251
-
252
-
253
-
254
-
255
-
256
-
257
-
258
-
259
-
260
-
261
-
262
-
263
-
264
 |
 |
