Yamaha QL5 Reference Manual - Page 158
Playing a multi-track project - firmware
 |
View all Yamaha QL5 manuals
Add to My Manuals
Save this manual to your list of manuals |
Page 158 highlights
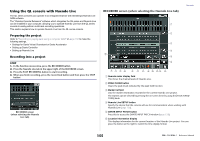
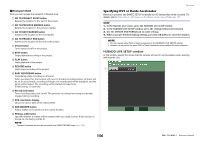
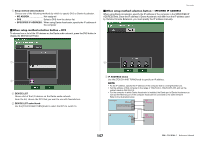
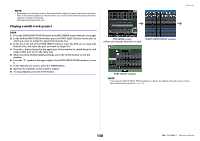
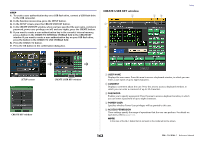
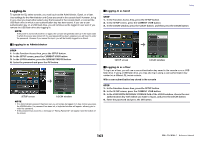
NOTE • Depending on the firmware version, Dante Accelerator might not support redundant networking. Refer to the following website to check whether your version of the Dante Accelerator firmware supports redundant networking. http://www.yamahaproaudio.com/ Playing a multi-track project STEP 1. Press the DANTE INPUT PATCH button in the RECORDER screen (Nuendo Live page). 2. In the DANTE INPUT PATCH window, press the PORT SELECT button for the port to which you want to assign the signal from Nuendo Live. 3. In the list at the left of the PORT SELECT window, select the DVS you're using with Nuendo Live, and select the port you want to assign it to. 4. Press the + button located in the upper part of the window to switch the port, and assign a DVS port to it in the same way. 5. When you have finished making settings, press the CLOSE button to exit the window. 6. Press the "X" symbol in the upper right of the DANTE INPUT PATCH window to close it. 7. In the Nuendo Live screen, press the START button. 8. Operate the channels so that sound is output. 9. To stop playback, press the STOP button. Recorder RECORDER screen DANTE INPUT PATCH window (when selecting the Nuendo Live tab) PORT SELECT window NOTE If you save the DANTE INPUT PATCH settings in a library, the settings of the QL series console can be switched conveniently (page 128). 158 Reference Manual
-
 1
1 -
2
-
3
-
4
-
5
-
6
-
7
-
8
-
9
-
10
-
11
-
12
-
13
-
14
-
15
-
16
-
17
-
18
-
19
-
20
-
21
-
22
-
23
-
24
-
25
-
26
-
27
-
28
-
29
-
30
-
31
-
32
-
33
-
34
-
35
-
36
-
37
-
38
-
39
-
40
-
41
-
42
-
43
-
44
-
45
-
46
-
47
-
48
-
49
-
50
-
51
-
52
-
53
-
54
-
55
-
56
-
57
-
58
-
59
-
60
-
61
-
62
-
63
-
64
-
65
-
66
-
67
-
68
-
69
-
70
-
71
-
72
-
73
-
74
-
75
-
76
-
77
-
78
-
79
-
80
-
81
-
82
-
83
-
84
-
85
-
86
-
87
-
88
-
89
-
90
-
91
-
92
-
93
-
94
-
95
-
96
-
97
-
98
-
99
-
100
-
101
-
102
-
103
-
104
-
105
-
106
-
107
-
108
-
109
-
110
-
111
-
112
-
113
-
114
-
115
-
116
-
117
-
118
-
119
-
120
-
121
-
122
-
123
-
124
-
125
-
126
-
127
-
128
-
129
-
130
-
131
-
132
-
133
-
134
-
135
-
136
-
137
-
138
-
139
-
140
-
141
-
142
-
143
-
144
-
145
-
146
-
147
-
148
-
149
-
150
-
151
-
152
-
 153
153 -
 154
154 -
 155
155 -
 156
156 -
 157
157 -
 158
158 -
 159
159 -
 160
160 -
 161
161 -
 162
162 -
 163
163 -
164
-
165
-
166
-
167
-
168
-
169
-
170
-
171
-
172
-
173
-
174
-
175
-
176
-
177
-
178
-
179
-
180
-
181
-
182
-
183
-
184
-
185
-
186
-
187
-
188
-
189
-
190
-
191
-
192
-
193
-
194
-
195
-
196
-
197
-
198
-
199
-
200
-
201
-
202
-
203
-
204
-
205
-
206
-
207
-
208
-
209
-
210
-
211
-
212
-
213
-
214
-
215
-
216
-
217
-
218
-
219
-
220
-
221
-
222
-
223
-
224
-
225
-
226
-
227
-
228
-
229
-
230
-
231
-
232
-
233
-
234
-
235
-
236
-
237
-
238
-
239
-
240
-
241
-
242
-
243
-
244
-
245
-
246
-
247
-
248
-
249
-
250
-
251
-
252
-
253
-
254
-
255
-
256
-
257
-
258
-
259
-
260
-
261
-
262
-
263
-
264
 |
 |
