Yamaha QL5 Reference Manual - Page 50
HIGH SHELVING ON/OFF button, EQ IN/OUT level meters - digital mixer
 |
View all Yamaha QL5 manuals
Add to My Manuals
Save this manual to your list of manuals |
Page 50 highlights
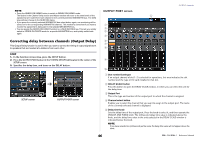
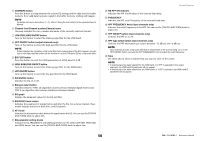
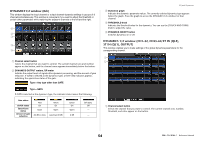
5 COMPARE button Press this button to swap between the current EQ settings and the data stored in buffer memory. If no valid data has been copied in the buffer memory, nothing will happen. NOTE For details on how to use buttons 1-5, refer to "Using the tool buttons" in the separate Owner's Manual. 6 Channel icon/Channel number/Channel name This area indicates the icon, number and name of the currently-selected channel. 7 LOW SHELVING ON/OFF button Turn on this button to select the shelving-type filter for the LOW band. 8 HPF ON/OFF button (output channels only) Turn on this button to select the high pass filter for the LOW band. NOTE Output channels do not feature a high-pass filter that is independent of the EQ. However, you can turn on the high-pass filter button on the window to use the LOW band EQ as a high-pass filter. 9 EQ FLAT button Press this button to reset the GAIN parameters of all EQ band to 0 dB. 0 HIGH SHELVING ON/OFF button Turn on this button to select the shelving-type filter for the HIGH band. A LPF ON/OFF button Turn on this button to select the low pass filter for the HIGH band. B EQ ON/OFF button Switches the EQ on or off. C EQ type select button Switches between TYPE I (an algorithm used in previous Yamaha digital mixers) and TYPE II (an algorithm that reduces interference between bands). D EQ graph Displays the parameter values for the EQ and filter. E EQ IN/OUT level meters Indicates the peak level of signals before and after the EQ. For a stereo channel, these meters indicate the level of both the L and R channels. F ATT knob Indicates the attenuation value before the signal enters the EQ. You can use the [TOUCH AND TURN] knob to adjust this. G EQ parameter setting knobs Indicates the Q, FREQUENCY, and GAIN parameters for the LOW, LOW MID, HIGH MID, and HIGH bands. You can use the [TOUCH AND TURN] knob to adjust this. EQ and Dynamics H HA HPF ON indicator Indicates the HPF on/off status of the external head amp. I FREQUENCY Indicates the HPF cutoff frequency of the external head amp. J HPF FREQUENCY knob (input channels only) Indicates the cutoff frequency of the HPF. You can use the [TOUCH AND TURN] knob to adjust this. K HPF ON/OFF button (input channels only) Switches the HPF on or off. L HPF type select button (input channels only) Switches the HPF attenuation per octave between -12 dB/oct and -6 dB/oct. NOTE Input channels provide a high-pass filter that is independent of the four-band EQ. Turn on the HPF ON/OFF button, and use the HPF FREQUENCY knob to adjust the cutoff frequency. M Tabs Use these tabs to select a channel that you want to view on the screen. NOTE • If shelving type has been selected for the LOW band, or if HPF is selected for the output channels, the LOW band Q parameter will not appear. • If shelving type has been selected for the HIGH band, or if LPF is selected, the HIGH band Q parameter will not appear. 50 Reference Manual
-
 1
1 -
2
-
3
-
4
-
5
-
6
-
7
-
8
-
9
-
10
-
11
-
12
-
13
-
14
-
15
-
16
-
17
-
18
-
19
-
20
-
21
-
22
-
23
-
24
-
25
-
26
-
27
-
28
-
29
-
30
-
31
-
32
-
33
-
34
-
35
-
36
-
37
-
38
-
39
-
40
-
41
-
42
-
43
-
44
-
 45
45 -
 46
46 -
 47
47 -
 48
48 -
 49
49 -
 50
50 -
 51
51 -
 52
52 -
 53
53 -
 54
54 -
 55
55 -
56
-
57
-
58
-
59
-
60
-
61
-
62
-
63
-
64
-
65
-
66
-
67
-
68
-
69
-
70
-
71
-
72
-
73
-
74
-
75
-
76
-
77
-
78
-
79
-
80
-
81
-
82
-
83
-
84
-
85
-
86
-
87
-
88
-
89
-
90
-
91
-
92
-
93
-
94
-
95
-
96
-
97
-
98
-
99
-
100
-
101
-
102
-
103
-
104
-
105
-
106
-
107
-
108
-
109
-
110
-
111
-
112
-
113
-
114
-
115
-
116
-
117
-
118
-
119
-
120
-
121
-
122
-
123
-
124
-
125
-
126
-
127
-
128
-
129
-
130
-
131
-
132
-
133
-
134
-
135
-
136
-
137
-
138
-
139
-
140
-
141
-
142
-
143
-
144
-
145
-
146
-
147
-
148
-
149
-
150
-
151
-
152
-
153
-
154
-
155
-
156
-
157
-
158
-
159
-
160
-
161
-
162
-
163
-
164
-
165
-
166
-
167
-
168
-
169
-
170
-
171
-
172
-
173
-
174
-
175
-
176
-
177
-
178
-
179
-
180
-
181
-
182
-
183
-
184
-
185
-
186
-
187
-
188
-
189
-
190
-
191
-
192
-
193
-
194
-
195
-
196
-
197
-
198
-
199
-
200
-
201
-
202
-
203
-
204
-
205
-
206
-
207
-
208
-
209
-
210
-
211
-
212
-
213
-
214
-
215
-
216
-
217
-
218
-
219
-
220
-
221
-
222
-
223
-
224
-
225
-
226
-
227
-
228
-
229
-
230
-
231
-
232
-
233
-
234
-
235
-
236
-
237
-
238
-
239
-
240
-
241
-
242
-
243
-
244
-
245
-
246
-
247
-
248
-
249
-
250
-
251
-
252
-
253
-
254
-
255
-
256
-
257
-
258
-
259
-
260
-
261
-
262
-
263
-
264
 |
 |
