Yamaha QL5 Reference Manual - Page 165
Editing a user authentication key, Changing the user level, Close the USER SETUP window.
 |
View all Yamaha QL5 manuals
Add to My Manuals
Save this manual to your list of manuals |
Page 165 highlights
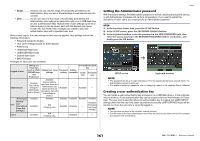
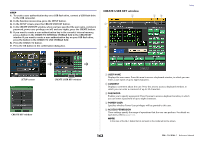
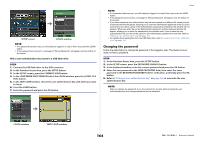
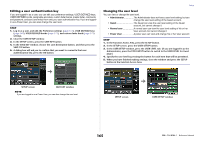
Editing a user authentication key If you are logged-in as a user, you can edit your preference settings, USER DEFINED keys, USER DEFINED knobs, assignable encoders, custom fader banks, master fader, comments, and password, and save (overwrite) them onto your user authentication key. If you are loggedin as a Power User, you can also change the user level. STEP 1. Log in as a user, and edit the Preference settings (page 167), USER DEFINED keys (page 169), USER DEFINED knobs (page 173), and custom fader bank (page 175) settings. 2. Close the USER SETUP window. 3. In the SETUP screen, press the SAVE KEY button. 4. In the SAVE KEY window, choose the save-destination button, and then press the SAVE TO button. 5. A dialog box will ask you to confirm that you want to overwrite that user authentication key; press the OK button. Setup Changing the user level You can view or change the user level. • Administrator The Administrator does not have a user level setting, but can change the user level setting of the Guest account. • Guest The Guest can view the user level setting of the Guest account, but cannot change it. • Normal user A normal user can view the user level setting of his or her User account, but cannot change it. • Power User A power user can view and change his or her User account. STEP 1. In the Function Access Area, press the SETUP button. 2. In the SETUP screen, press the USER SETUP button. 3. In the USER SETUP window, press the USER LEVEL tab. (If you are logged-in as the Administrator, press the FOR GUEST button to switch to the USER LEVEL for Guest page.) 4. Specify the user level by pressing the button for each item that will be permitted. 5. When you have finished making settings, close the window and press the SETUP button in the Function Access Area. SETUP screen SAVE KEY window NOTE If you are logged-in as a Power User, you can also change the user level. SETUP screen USER SETUP window 165 Reference Manual
-
 1
1 -
2
-
3
-
4
-
5
-
6
-
7
-
8
-
9
-
10
-
11
-
12
-
13
-
14
-
15
-
16
-
17
-
18
-
19
-
20
-
21
-
22
-
23
-
24
-
25
-
26
-
27
-
28
-
29
-
30
-
31
-
32
-
33
-
34
-
35
-
36
-
37
-
38
-
39
-
40
-
41
-
42
-
43
-
44
-
45
-
46
-
47
-
48
-
49
-
50
-
51
-
52
-
53
-
54
-
55
-
56
-
57
-
58
-
59
-
60
-
61
-
62
-
63
-
64
-
65
-
66
-
67
-
68
-
69
-
70
-
71
-
72
-
73
-
74
-
75
-
76
-
77
-
78
-
79
-
80
-
81
-
82
-
83
-
84
-
85
-
86
-
87
-
88
-
89
-
90
-
91
-
92
-
93
-
94
-
95
-
96
-
97
-
98
-
99
-
100
-
101
-
102
-
103
-
104
-
105
-
106
-
107
-
108
-
109
-
110
-
111
-
112
-
113
-
114
-
115
-
116
-
117
-
118
-
119
-
120
-
121
-
122
-
123
-
124
-
125
-
126
-
127
-
128
-
129
-
130
-
131
-
132
-
133
-
134
-
135
-
136
-
137
-
138
-
139
-
140
-
141
-
142
-
143
-
144
-
145
-
146
-
147
-
148
-
149
-
150
-
151
-
152
-
153
-
154
-
155
-
156
-
157
-
158
-
159
-
 160
160 -
 161
161 -
 162
162 -
 163
163 -
 164
164 -
 165
165 -
 166
166 -
 167
167 -
 168
168 -
 169
169 -
 170
170 -
171
-
172
-
173
-
174
-
175
-
176
-
177
-
178
-
179
-
180
-
181
-
182
-
183
-
184
-
185
-
186
-
187
-
188
-
189
-
190
-
191
-
192
-
193
-
194
-
195
-
196
-
197
-
198
-
199
-
200
-
201
-
202
-
203
-
204
-
205
-
206
-
207
-
208
-
209
-
210
-
211
-
212
-
213
-
214
-
215
-
216
-
217
-
218
-
219
-
220
-
221
-
222
-
223
-
224
-
225
-
226
-
227
-
228
-
229
-
230
-
231
-
232
-
233
-
234
-
235
-
236
-
237
-
238
-
239
-
240
-
241
-
242
-
243
-
244
-
245
-
246
-
247
-
248
-
249
-
250
-
251
-
252
-
253
-
254
-
255
-
256
-
257
-
258
-
259
-
260
-
261
-
262
-
263
-
264
 |
 |
