Yamaha QL5 Reference Manual - Page 52
Using dynamics, DYNAMICS1/2 window 1ch
 |
View all Yamaha QL5 manuals
Add to My Manuals
Save this manual to your list of manuals |
Page 52 highlights
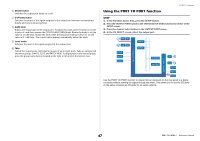
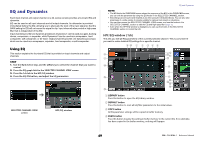
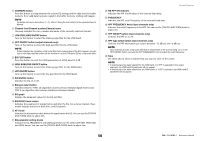
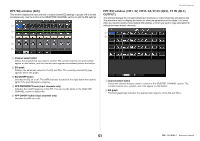
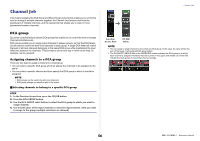
Using dynamics Input channels feature two dynamics processors; output channels feature one dynamics processor. STEP 1. Use the Bank Select keys and the [SEL] keys to select the channel for which you want to control the dynamics. 2. Press the THRESHOLD knob in the DYNAMICS1/DYNAMICS2 field in the SELECTED CHANNEL VIEW screen. 3. Press the 1 ch tab in the DYNAMICS1/2 window. 4. Press the DYNAMICS ON button, and adjust the dynamics parameters. SELECTED CHANNEL VIEW screen DYNAMICS1/2 window NOTE • The DYNAMICS 1/2 field on the OVERVIEW screen displays the dynamics on/off status and the amount of gain reduction. • Dynamics settings can be saved and recalled at any time using the dedicated library. You can also take advantage of a wide variety of presets suitable for various instruments or situations. • You can also access the SELECTED CHANNEL VIEW screen, and use the knobs in the SELECTED CHANNEL section to edit the dynamics settings on page 9. • Even when the DYNAMICS 1/2 window is displayed, you can use the knobs in the SELECTED CHANNEL section to control the dynamics. EQ and Dynamics DYNAMICS1/2 window (1ch) All dynamics parameters can be viewed and edited by channel. This is convenient when you want to make detailed dynamics settings for a specific channel. 81 2 345 6 0 7 C B 9 A D 1 LIBRARY button Press this button to open the DYNAMICS Library window. 2 DEFAULT button Press this button to reset all dynamics parameters to the initial values. 3 COPY button All dynamics parameter settings will be copied in buffer memory. 4 PASTE button Press this button to apply the settings in buffer memory to the current dynamics. If no valid data has been copied in the buffer memory, nothing will happen. 5 COMPARE button Press this button to swap between the current dynamics settings and the data stored in buffer memory. If no valid data has been copied in the buffer memory, nothing will happen. NOTE For details on how to use buttons 1-5, refer to "Using the tool buttons" in the separate Owner's Manual. 6 Channel icon/Channel number/Channel name This area indicates the icon, number, and name of the currently-selected channel. 52 Reference Manual
-
 1
1 -
2
-
3
-
4
-
5
-
6
-
7
-
8
-
9
-
10
-
11
-
12
-
13
-
14
-
15
-
16
-
17
-
18
-
19
-
20
-
21
-
22
-
23
-
24
-
25
-
26
-
27
-
28
-
29
-
30
-
31
-
32
-
33
-
34
-
35
-
36
-
37
-
38
-
39
-
40
-
41
-
42
-
43
-
44
-
45
-
46
-
 47
47 -
 48
48 -
 49
49 -
 50
50 -
 51
51 -
 52
52 -
 53
53 -
 54
54 -
 55
55 -
 56
56 -
 57
57 -
58
-
59
-
60
-
61
-
62
-
63
-
64
-
65
-
66
-
67
-
68
-
69
-
70
-
71
-
72
-
73
-
74
-
75
-
76
-
77
-
78
-
79
-
80
-
81
-
82
-
83
-
84
-
85
-
86
-
87
-
88
-
89
-
90
-
91
-
92
-
93
-
94
-
95
-
96
-
97
-
98
-
99
-
100
-
101
-
102
-
103
-
104
-
105
-
106
-
107
-
108
-
109
-
110
-
111
-
112
-
113
-
114
-
115
-
116
-
117
-
118
-
119
-
120
-
121
-
122
-
123
-
124
-
125
-
126
-
127
-
128
-
129
-
130
-
131
-
132
-
133
-
134
-
135
-
136
-
137
-
138
-
139
-
140
-
141
-
142
-
143
-
144
-
145
-
146
-
147
-
148
-
149
-
150
-
151
-
152
-
153
-
154
-
155
-
156
-
157
-
158
-
159
-
160
-
161
-
162
-
163
-
164
-
165
-
166
-
167
-
168
-
169
-
170
-
171
-
172
-
173
-
174
-
175
-
176
-
177
-
178
-
179
-
180
-
181
-
182
-
183
-
184
-
185
-
186
-
187
-
188
-
189
-
190
-
191
-
192
-
193
-
194
-
195
-
196
-
197
-
198
-
199
-
200
-
201
-
202
-
203
-
204
-
205
-
206
-
207
-
208
-
209
-
210
-
211
-
212
-
213
-
214
-
215
-
216
-
217
-
218
-
219
-
220
-
221
-
222
-
223
-
224
-
225
-
226
-
227
-
228
-
229
-
230
-
231
-
232
-
233
-
234
-
235
-
236
-
237
-
238
-
239
-
240
-
241
-
242
-
243
-
244
-
245
-
246
-
247
-
248
-
249
-
250
-
251
-
252
-
253
-
254
-
255
-
256
-
257
-
258
-
259
-
260
-
261
-
262
-
263
-
264
 |
 |
