Yamaha QL5 Reference Manual - Page 57
DCA/MUTE GROUP ASSIGN MODE window, Selecting the DCA groups to which a specific channel will belong
 |
View all Yamaha QL5 manuals
Add to My Manuals
Save this manual to your list of manuals |
Page 57 highlights
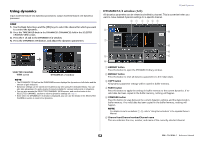
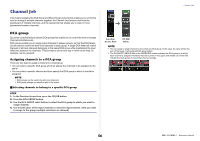
DCA/MUTE GROUP ASSIGN MODE window Here you can specify the channels that will be assigned to each DCA group. 1 2 3 4 5 Channel Job 6 POST ONLY button Specifies the object of muting in the DCA group as POST only. 7 PRE & POST button Specifies the object of muting in the DCA group as PRE and POST. The PRE & POST indicator is shown below a DCA group that has this setting. 8 CLOSE button Closes the window. Selecting the DCA groups to which a specific channel will belong STEP 1. Press a [SEL] key to select the input channel you want to operate. 2. Use the DCA group select buttons in the SELECTED CHANNEL VIEW screen to select the DCA group(s) to which the currently-selected channel will be assigned (multiple selections are allowed). 8 67 1 CLEAR ALL button Clears all channels that are assigned to the currently-selected DCA group. 2 DCA GROUP ASSIGN/MUTE GROUP ASSIGN buttons Toggle between the DCA GROUP ASSIGN window and MUTE GROUP ASSIGN window. 3 DCA group assign field This area displays the channels assigned to the currently-selected DCA group. While this window is displayed, press the [SEL] key for the channel that you want to assign to the DCA group. The channel will be assigned to the DCA group, and the on-screen fader for that channel will turn yellow. Press the same [SEL] key once again if you want to remove the channel from the group. NOTE In the case of the QL1, faders that do not exist on the model will not be shown. 4 NAME EDIT button Edits the group name of the currently-selected DCA group. When you press this button the keyboard window will appear, allowing you to enter or edit the text. 5 DCA group select button Selects the DCA group that you want to assign. SELECTED CHANNEL VIEW screen DCA/MUTE field 57 Reference Manual
-
 1
1 -
2
-
3
-
4
-
5
-
6
-
7
-
8
-
9
-
10
-
11
-
12
-
13
-
14
-
15
-
16
-
17
-
18
-
19
-
20
-
21
-
22
-
23
-
24
-
25
-
26
-
27
-
28
-
29
-
30
-
31
-
32
-
33
-
34
-
35
-
36
-
37
-
38
-
39
-
40
-
41
-
42
-
43
-
44
-
45
-
46
-
47
-
48
-
49
-
50
-
51
-
 52
52 -
 53
53 -
 54
54 -
 55
55 -
 56
56 -
 57
57 -
 58
58 -
 59
59 -
 60
60 -
 61
61 -
 62
62 -
63
-
64
-
65
-
66
-
67
-
68
-
69
-
70
-
71
-
72
-
73
-
74
-
75
-
76
-
77
-
78
-
79
-
80
-
81
-
82
-
83
-
84
-
85
-
86
-
87
-
88
-
89
-
90
-
91
-
92
-
93
-
94
-
95
-
96
-
97
-
98
-
99
-
100
-
101
-
102
-
103
-
104
-
105
-
106
-
107
-
108
-
109
-
110
-
111
-
112
-
113
-
114
-
115
-
116
-
117
-
118
-
119
-
120
-
121
-
122
-
123
-
124
-
125
-
126
-
127
-
128
-
129
-
130
-
131
-
132
-
133
-
134
-
135
-
136
-
137
-
138
-
139
-
140
-
141
-
142
-
143
-
144
-
145
-
146
-
147
-
148
-
149
-
150
-
151
-
152
-
153
-
154
-
155
-
156
-
157
-
158
-
159
-
160
-
161
-
162
-
163
-
164
-
165
-
166
-
167
-
168
-
169
-
170
-
171
-
172
-
173
-
174
-
175
-
176
-
177
-
178
-
179
-
180
-
181
-
182
-
183
-
184
-
185
-
186
-
187
-
188
-
189
-
190
-
191
-
192
-
193
-
194
-
195
-
196
-
197
-
198
-
199
-
200
-
201
-
202
-
203
-
204
-
205
-
206
-
207
-
208
-
209
-
210
-
211
-
212
-
213
-
214
-
215
-
216
-
217
-
218
-
219
-
220
-
221
-
222
-
223
-
224
-
225
-
226
-
227
-
228
-
229
-
230
-
231
-
232
-
233
-
234
-
235
-
236
-
237
-
238
-
239
-
240
-
241
-
242
-
243
-
244
-
245
-
246
-
247
-
248
-
249
-
250
-
251
-
252
-
253
-
254
-
255
-
256
-
257
-
258
-
259
-
260
-
261
-
262
-
263
-
264
 |
 |
