Yamaha QL5 Reference Manual - Page 155
Using the QL console with Nuendo Live, Preparing the project, Recording into a project
 |
View all Yamaha QL5 manuals
Add to My Manuals
Save this manual to your list of manuals |
Page 155 highlights
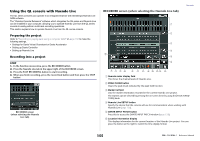
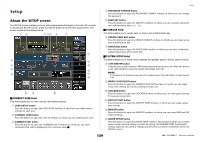
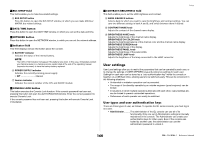
Using the QL console with Nuendo Live The QL series consoles can operate in an integrated manner with Steinberg's Nuendo Live DAW software. The "Yamaha Console Extension" software which integrates the QL series and Nuendo Live can be installed in your computer, allowing you to operate Nuendo Live from the QL series console to easily perform multi-track recording operations. This section explains how to operate Nuendo Live from the QL series console. Preparing the project Refer to "Recording or playing back using a computer DAW" on page 152 to make the following settings. • Settings for Dante Virtual Soundcard or Dante Accelerator • Setting up Dante Controller • Setting up Nuendo Live Recording into a project STEP 1. In the Function Access Area, press the RECORDER button. 2. Press the Nuendo Live tab in the upper right of the RECORDER screen. 3. Press the EASY RECORDING button to start recording. 4. When you finish recording, press the record lock button and then press the STOP button. RECORDER screen (when selecting the Nuendo Live tab) RECORDER screen (when selecting the Nuendo Live tab) Recorder 1 2 3 4 G 5 6 7 8 9 0 A B C D H EI F 1 Nuendo meter display field This shows the channel levels of Nuendo Live. 2 PEAK CLEAR button Clears the peak levels indicated by the peak hold function. 3 Marker list field Lists the marker information recorded in the current Nuendo Live project. The markers can be selected by pressing the on-screen list or by using the [TOUCH AND TURN] knob. 4 Nuendo Live SETUP button Specify the device that the console will use for communication when working with Nuendo Live (page 156). 5 DANTE INPUT PATCH button Press this to access the DANTE INPUT PATCH window (page 128). 6 Location information display This displays information for the current location of the Nuendo Live project. You can press the button at the right to switch the time display format. 155 Reference Manual
-
 1
1 -
2
-
3
-
4
-
5
-
6
-
7
-
8
-
9
-
10
-
11
-
12
-
13
-
14
-
15
-
16
-
17
-
18
-
19
-
20
-
21
-
22
-
23
-
24
-
25
-
26
-
27
-
28
-
29
-
30
-
31
-
32
-
33
-
34
-
35
-
36
-
37
-
38
-
39
-
40
-
41
-
42
-
43
-
44
-
45
-
46
-
47
-
48
-
49
-
50
-
51
-
52
-
53
-
54
-
55
-
56
-
57
-
58
-
59
-
60
-
61
-
62
-
63
-
64
-
65
-
66
-
67
-
68
-
69
-
70
-
71
-
72
-
73
-
74
-
75
-
76
-
77
-
78
-
79
-
80
-
81
-
82
-
83
-
84
-
85
-
86
-
87
-
88
-
89
-
90
-
91
-
92
-
93
-
94
-
95
-
96
-
97
-
98
-
99
-
100
-
101
-
102
-
103
-
104
-
105
-
106
-
107
-
108
-
109
-
110
-
111
-
112
-
113
-
114
-
115
-
116
-
117
-
118
-
119
-
120
-
121
-
122
-
123
-
124
-
125
-
126
-
127
-
128
-
129
-
130
-
131
-
132
-
133
-
134
-
135
-
136
-
137
-
138
-
139
-
140
-
141
-
142
-
143
-
144
-
145
-
146
-
147
-
148
-
149
-
 150
150 -
 151
151 -
 152
152 -
 153
153 -
 154
154 -
 155
155 -
 156
156 -
 157
157 -
 158
158 -
 159
159 -
 160
160 -
161
-
162
-
163
-
164
-
165
-
166
-
167
-
168
-
169
-
170
-
171
-
172
-
173
-
174
-
175
-
176
-
177
-
178
-
179
-
180
-
181
-
182
-
183
-
184
-
185
-
186
-
187
-
188
-
189
-
190
-
191
-
192
-
193
-
194
-
195
-
196
-
197
-
198
-
199
-
200
-
201
-
202
-
203
-
204
-
205
-
206
-
207
-
208
-
209
-
210
-
211
-
212
-
213
-
214
-
215
-
216
-
217
-
218
-
219
-
220
-
221
-
222
-
223
-
224
-
225
-
226
-
227
-
228
-
229
-
230
-
231
-
232
-
233
-
234
-
235
-
236
-
237
-
238
-
239
-
240
-
241
-
242
-
243
-
244
-
245
-
246
-
247
-
248
-
249
-
250
-
251
-
252
-
253
-
254
-
255
-
256
-
257
-
258
-
259
-
260
-
261
-
262
-
263
-
264
 |
 |
