Yamaha QL5 Reference Manual - Page 136
EXTERNAL HA PORT SELECT window, EXTERNAL HA window, VIEW switch buttons, COMM PORT switch buttons
 |
View all Yamaha QL5 manuals
Add to My Manuals
Save this manual to your list of manuals |
Page 136 highlights
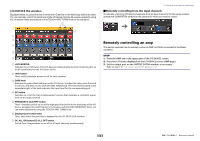
5 VIEW switch buttons Switch the virtual rack display between SB168-ES and AD8HR. Select the view that's appropriate for the connected device. 6 COMM PORT switch buttons Specify whether the external HA connected to the slot will be controlled remotely. Select "SLOT1" if you want to remotely control the external HA. EXTERNAL HA PORT SELECT window Select the input port for the external head amp. Display this window by pressing the EXTERNAL HA PORT SELECT button in the I/O DEVICE screen (EXTERNAL HA page). 1 1 PORT SELECT buttons Specify the input ports to which the external HA is connected. I/O devices and external head amps EXTERNAL HA window Remotely control the external head amp. Display this window by pressing the virtual rack in the I/O DEVICE screen (EXTERNAL HA page). 1 2 3 4 5 1 +48V MASTER If an external HA is connected, the master phantom power on/off status is shown here. (The on/off setting is made on the external HA unit itself.) 2 +48V button These switch phantom power on/off for each channel. 3 GAIN knob These indicate the gain of the external HA. If you press and select the GAIN knob, you can make adjustments to gain using the [TOUCH AND TURN] knob. The level meter located at the immediate right of the knob indicates the input level for the corresponding port. 4 FREQUENCY knob/HPF button These controllers switch on or off the high-pass filter built into the external HA, and adjust its cutoff frequency. If you press and select the FREQUENCY knob, you can make adjustments using the [TOUCH AND TURN] knob. 5 Rack select tabs These tabs switch the rack that is displayed in the EXTERNAL HA window. NOTE • If you connect an additional AD8HR, the setting for this AD8HR will be used. These knobs and buttons are displayed in the EXTERNAL HA window even if an AD8HR is not connected, allowing you to create and store a scene even while the AD8HR is not connected. • Error messages related to the SB168-ES will not be displayed. In addition, you will be unable to set the EtherSound parameters. Use AVS-ESMonitor for these functions. 136 Reference Manual
-
 1
1 -
2
-
3
-
4
-
5
-
6
-
7
-
8
-
9
-
10
-
11
-
12
-
13
-
14
-
15
-
16
-
17
-
18
-
19
-
20
-
21
-
22
-
23
-
24
-
25
-
26
-
27
-
28
-
29
-
30
-
31
-
32
-
33
-
34
-
35
-
36
-
37
-
38
-
39
-
40
-
41
-
42
-
43
-
44
-
45
-
46
-
47
-
48
-
49
-
50
-
51
-
52
-
53
-
54
-
55
-
56
-
57
-
58
-
59
-
60
-
61
-
62
-
63
-
64
-
65
-
66
-
67
-
68
-
69
-
70
-
71
-
72
-
73
-
74
-
75
-
76
-
77
-
78
-
79
-
80
-
81
-
82
-
83
-
84
-
85
-
86
-
87
-
88
-
89
-
90
-
91
-
92
-
93
-
94
-
95
-
96
-
97
-
98
-
99
-
100
-
101
-
102
-
103
-
104
-
105
-
106
-
107
-
108
-
109
-
110
-
111
-
112
-
113
-
114
-
115
-
116
-
117
-
118
-
119
-
120
-
121
-
122
-
123
-
124
-
125
-
126
-
127
-
128
-
129
-
130
-
 131
131 -
 132
132 -
 133
133 -
 134
134 -
 135
135 -
 136
136 -
 137
137 -
 138
138 -
 139
139 -
 140
140 -
 141
141 -
142
-
143
-
144
-
145
-
146
-
147
-
148
-
149
-
150
-
151
-
152
-
153
-
154
-
155
-
156
-
157
-
158
-
159
-
160
-
161
-
162
-
163
-
164
-
165
-
166
-
167
-
168
-
169
-
170
-
171
-
172
-
173
-
174
-
175
-
176
-
177
-
178
-
179
-
180
-
181
-
182
-
183
-
184
-
185
-
186
-
187
-
188
-
189
-
190
-
191
-
192
-
193
-
194
-
195
-
196
-
197
-
198
-
199
-
200
-
201
-
202
-
203
-
204
-
205
-
206
-
207
-
208
-
209
-
210
-
211
-
212
-
213
-
214
-
215
-
216
-
217
-
218
-
219
-
220
-
221
-
222
-
223
-
224
-
225
-
226
-
227
-
228
-
229
-
230
-
231
-
232
-
233
-
234
-
235
-
236
-
237
-
238
-
239
-
240
-
241
-
242
-
243
-
244
-
245
-
246
-
247
-
248
-
249
-
250
-
251
-
252
-
253
-
254
-
255
-
256
-
257
-
258
-
259
-
260
-
261
-
262
-
263
-
264
 |
 |
