Yamaha QL5 Reference Manual - Page 151
Editing the title list, PLAY MODE field
 |
View all Yamaha QL5 manuals
Add to My Manuals
Save this manual to your list of manuals |
Page 151 highlights
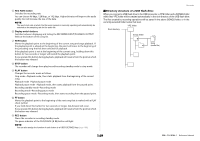
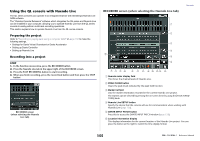
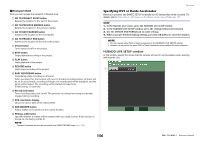
4 Sub-directory Indicates each song's track number, the name of upper level directory, and whether a sub-directory exists (in the case that the directory has been selected). • Upper level............Press this to move up to the directory that is one level higher than the current one. • Sub-directory ........Press this to move to that sub-directory. NOTE • If you switch folders, that folder will be selected as the recording destination. • The folders that can be selected are restricted to the SONGS folder inside the YPE folder, and folders located below the SONGS folder. 5 PLAY check symbol Enables you to select multiple files that will be played back consecutively. 6 SELECT knob Use the [TOUCH AND TURN] knob to select a song. 7 NOW PLAYING button Press this button to always select the currently-playing song on the list. 8 MOVE UP/MOVE DOWN buttons Change the order of the selected song in the list. 9 Display switch buttons Switch the list between the SONG TITLE display and the FILE NAME display. 0 SAVE LIST button Saves the order of the current title list and PLAY check symbol settings as a playlist. A RELOAD button Loads the playlist that was saved most recently. Use this button to revert the current playlist you are editing back to the previous state. PLAY MODE field Sets the playback method of the currently selected song. B SINGLE button If this button is on, the recorder will stop after playback of the current song is complete. If this button is off, the recorder will play the next song on the list after playback of the current song is complete. Recorder C REPEAT button If this button is on, after playback of the current song is complete, the recorder will play the first song on the list that is marked with a PLAY check symbol (unless there are no subsequent songs that are marked with a PLAY check symbol). If this button is off, the recorder will stop after playback of the current song is complete (unless there are no subsequent songs that are marked with a PLAY check symbol). One of the following playback methods is selected according to the on/off settings of the SINGLE button and the REPEAT button. SINGLE button On On Off Off REPEAT button On Off On Off Mode The currently-selected song will play repeatedly until you stop playback. The currently-selected song will play once and then stop. Songs with the PLAY checkmark selected are played in order, starting with the currently-selected song, and then they are played again from the first song in the title list. The currentlyselected song will play repeatedly until you stop playback. Songs with the PLAY checkmark selected are played in order, starting with the currently-selected song. After the final song in the title list is played, playback stops. Editing the title list You can change the order of the audio files shown in the title list, and edit the titles or artist names. STEP 1. Connect a USB flash drive containing audio files to the USB connector. 2. In the Function Access Area, press the RECORDER button. 3. Press the No. button and the change directory icon in the RECORDER screen to view a list of the contents of the folder that includes the desired file. 4. If you want to edit a title in the title list, press the SONG TITLE/FILE NAME EDIT button. If you want to edit the artist name, press the ARTIST EDIT button. 5. Edit the title or artist name, and press the OK button. 6. If necessary, use the SONG TITLE/FILE NAME SORT button, ARTIST SORT button, and MOVE UP/MOVE DOWN buttons on screen to change the order of the title list. 7. When editing is complete, press the SAVE LIST button to save the changes. NOTE • If the title or artist name contains characters that cannot be displayed, these characters will be converted into for display. • The title and the artist name can be edited only for MP3 format audio files. 151 Reference Manual
-
 1
1 -
2
-
3
-
4
-
5
-
6
-
7
-
8
-
9
-
10
-
11
-
12
-
13
-
14
-
15
-
16
-
17
-
18
-
19
-
20
-
21
-
22
-
23
-
24
-
25
-
26
-
27
-
28
-
29
-
30
-
31
-
32
-
33
-
34
-
35
-
36
-
37
-
38
-
39
-
40
-
41
-
42
-
43
-
44
-
45
-
46
-
47
-
48
-
49
-
50
-
51
-
52
-
53
-
54
-
55
-
56
-
57
-
58
-
59
-
60
-
61
-
62
-
63
-
64
-
65
-
66
-
67
-
68
-
69
-
70
-
71
-
72
-
73
-
74
-
75
-
76
-
77
-
78
-
79
-
80
-
81
-
82
-
83
-
84
-
85
-
86
-
87
-
88
-
89
-
90
-
91
-
92
-
93
-
94
-
95
-
96
-
97
-
98
-
99
-
100
-
101
-
102
-
103
-
104
-
105
-
106
-
107
-
108
-
109
-
110
-
111
-
112
-
113
-
114
-
115
-
116
-
117
-
118
-
119
-
120
-
121
-
122
-
123
-
124
-
125
-
126
-
127
-
128
-
129
-
130
-
131
-
132
-
133
-
134
-
135
-
136
-
137
-
138
-
139
-
140
-
141
-
142
-
143
-
144
-
145
-
 146
146 -
 147
147 -
 148
148 -
 149
149 -
 150
150 -
 151
151 -
 152
152 -
 153
153 -
 154
154 -
 155
155 -
 156
156 -
157
-
158
-
159
-
160
-
161
-
162
-
163
-
164
-
165
-
166
-
167
-
168
-
169
-
170
-
171
-
172
-
173
-
174
-
175
-
176
-
177
-
178
-
179
-
180
-
181
-
182
-
183
-
184
-
185
-
186
-
187
-
188
-
189
-
190
-
191
-
192
-
193
-
194
-
195
-
196
-
197
-
198
-
199
-
200
-
201
-
202
-
203
-
204
-
205
-
206
-
207
-
208
-
209
-
210
-
211
-
212
-
213
-
214
-
215
-
216
-
217
-
218
-
219
-
220
-
221
-
222
-
223
-
224
-
225
-
226
-
227
-
228
-
229
-
230
-
231
-
232
-
233
-
234
-
235
-
236
-
237
-
238
-
239
-
240
-
241
-
242
-
243
-
244
-
245
-
246
-
247
-
248
-
249
-
250
-
251
-
252
-
253
-
254
-
255
-
256
-
257
-
258
-
259
-
260
-
261
-
262
-
263
-
264
 |
 |
