Yamaha QL5 Reference Manual - Page 114
EFFECT EDIT window, Editing the internal effect parameters
 |
View all Yamaha QL5 manuals
Add to My Manuals
Save this manual to your list of manuals |
Page 114 highlights
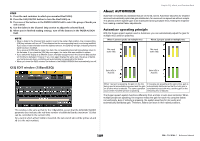
Editing the internal effect parameters This section explains how to change the effect type and edit the parameters. For a rack in which an effect is mounted, the following information is shown in the VIRTUAL RACK window. 1 2 1 Effect title/type Displays the effect title, the name of the type that is used, and a graphic. The number of input and output channels (1 IN/2 OUT or 2 IN/2 OUT) of this effect is also shown. 2 Input/output meters Indicate the level of the signals before and after the effect. STEP 1. Press the rack container in which the effect you want to edit is mounted. 2. To change the effect type, press the effect type field in the EFFECT EDIT window, and select the effect type in the EFFECT TYPE window. 3. Press a knob in the effect parameter field in the EFFECT EDIT window to select it, and turn the [TOUCH AND TURN] knob to edit the effect parameters. 4. Edit the settings in the special parameter field as necessary. Graphic EQ, effects, and Premium Rack EFFECT EDIT window Allows you to adjust the effect parameters. NOTE • For details on the parameters of each effect type, refer to the QL Data List (End of Manual). • Pressing a top panel [SEL] key while operating the effect parameter will switch to the popup window of GEQ, effect, or premium rack that is inserted in that channel. 3 42 5 0 6 7 1 8 9 A 1 INPUT L/R buttons 2 OUTPUT L/R buttons Press this button to open the CH SELECT window. 3 Effect type field Displays the effect title, the name of the type that is used, and a graphic. The number of input and output channels (1 IN/2 OUT or 2 IN/2 OUT) of this effect is also shown. Press this field to open the EFFECT TYPE window, in which you can select the effect type. 114 Reference Manual
-
 1
1 -
2
-
3
-
4
-
5
-
6
-
7
-
8
-
9
-
10
-
11
-
12
-
13
-
14
-
15
-
16
-
17
-
18
-
19
-
20
-
21
-
22
-
23
-
24
-
25
-
26
-
27
-
28
-
29
-
30
-
31
-
32
-
33
-
34
-
35
-
36
-
37
-
38
-
39
-
40
-
41
-
42
-
43
-
44
-
45
-
46
-
47
-
48
-
49
-
50
-
51
-
52
-
53
-
54
-
55
-
56
-
57
-
58
-
59
-
60
-
61
-
62
-
63
-
64
-
65
-
66
-
67
-
68
-
69
-
70
-
71
-
72
-
73
-
74
-
75
-
76
-
77
-
78
-
79
-
80
-
81
-
82
-
83
-
84
-
85
-
86
-
87
-
88
-
89
-
90
-
91
-
92
-
93
-
94
-
95
-
96
-
97
-
98
-
99
-
100
-
101
-
102
-
103
-
104
-
105
-
106
-
107
-
108
-
 109
109 -
 110
110 -
 111
111 -
 112
112 -
 113
113 -
 114
114 -
 115
115 -
 116
116 -
 117
117 -
 118
118 -
 119
119 -
120
-
121
-
122
-
123
-
124
-
125
-
126
-
127
-
128
-
129
-
130
-
131
-
132
-
133
-
134
-
135
-
136
-
137
-
138
-
139
-
140
-
141
-
142
-
143
-
144
-
145
-
146
-
147
-
148
-
149
-
150
-
151
-
152
-
153
-
154
-
155
-
156
-
157
-
158
-
159
-
160
-
161
-
162
-
163
-
164
-
165
-
166
-
167
-
168
-
169
-
170
-
171
-
172
-
173
-
174
-
175
-
176
-
177
-
178
-
179
-
180
-
181
-
182
-
183
-
184
-
185
-
186
-
187
-
188
-
189
-
190
-
191
-
192
-
193
-
194
-
195
-
196
-
197
-
198
-
199
-
200
-
201
-
202
-
203
-
204
-
205
-
206
-
207
-
208
-
209
-
210
-
211
-
212
-
213
-
214
-
215
-
216
-
217
-
218
-
219
-
220
-
221
-
222
-
223
-
224
-
225
-
226
-
227
-
228
-
229
-
230
-
231
-
232
-
233
-
234
-
235
-
236
-
237
-
238
-
239
-
240
-
241
-
242
-
243
-
244
-
245
-
246
-
247
-
248
-
249
-
250
-
251
-
252
-
253
-
254
-
255
-
256
-
257
-
258
-
259
-
260
-
261
-
262
-
263
-
264
 |
 |
