Yamaha QL5 Reference Manual - Page 169
USER DEFINED keys, Using the Alternate function
 |
View all Yamaha QL5 manuals
Add to My Manuals
Save this manual to your list of manuals |
Page 169 highlights
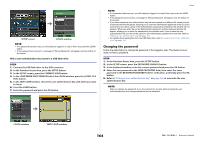
USER DEFINED keys This section explains how to assign the desired functions to the USER DEFINED keys in the USER DEFINED KEYS section on the top panel, and to press these keys to execute the defined function. If you are logged-in as a user, you can make USER DEFINED key settings for the user. If you are logged-in as the Administrator, you can also make the USER DEFINED key settings for the Guest account. NOTE For details on the assignable functions and their parameters, refer to "Functions that can be assigned to USER DEFINED keys" on page 170. STEP 1. In the Function Access Area, press the SETUP button. 2. In the SETUP screen, press the USER SETUP button. 3. In the USER SETUP window, press the USER DEFINED KEYS tab. 4. Press the button corresponding to the USER DEFINED key to which you want to assign a function. 5. In the FUNCTION field of the USER DEFINED KEY SETUP window, select the function you want to assign. 6. If the selected function has parameters, press the PARAMETER 1 or 2 field to move the frame, then select parameters 1 and 2 in the same way. 7. Press the OK button to close the USER DEFINED KEY SETUP window. 8. To execute an assigned function, press the corresponding USER DEFINED [1]-[12] key on the panel. USER SETUP window (USER DEFINED KEYS page) USER DEFINED KEY SETUP window NOTE • If you are logged-in as the Administrator, you can also turn on the FOR GUEST button to access the USER DEFINED KEYS for Guest page and make USER DEFINED key settings for the Guest account. Setup • The twelve buttons in the USER DEFINED KEYS page correspond to USER DEFINED keys [1]- [12] on the top panel. The name of the function or parameter assigned to each key appears to the right of the corresponding button. If nothing is assigned to the key, an indication of "---" will appear next to the button. • The list shown in the USER DEFINED KEY SETUP window is the same for all models of the QL series. For the QL1, the display will indicate "Cannot Assign!" if you specify a parameter that does not exist on that model. Using the Alternate function If you assign the Alternate function (ALTERNATE FUNCTION) to a USER DEFINED key, you will be able to switch parameters on or off by operating the knobs in the SELECTED CHANNEL section while pressing and holding down the USER DEFINED key. The console enters Alternate mode when you press and hold down the USER DEFINED key to which the Alternate function has been assigned (the key will light). The Alternate function features two options: LATCH and UNLATCH. • UNLATCH Alternate mode is turned on only while you are pressing and holding down the USER DEFINED key. • LATCH Each press of the USER DEFINED key will turn Alternate mode on or off. You do not need to hold down the key. NOTE • If you select LATCH for the Alternate function, the console disables the Alternate function when you switch the display between the OVERVIEW screen and the SELECTED CHANNEL VIEW screen, or when you open a window. • In Alternate mode, "ALT" will be displayed in the user name field of the Function Access Area. In Alternate mode, the following knobs change their behavior. • [GAIN] knob Rotate the knob to adjust the digital gain value. If DIGITAL GAIN has been selected for HA KNOB FUNCTION on the PREFERENCE page in the USER SETUP window, rotate this knob to adjust the analog gain value of the head amp. • [HPF] knob Press this knob to switch the high-pass filter on or off. • [DYNAMICS 1] knob Press this knob to switch DYNAMICS 1 on or off. • [DYNAMICS 2] knob Press this knob to switch DYNAMICS 2 on or off. NOTE In Alternate mode, all knobs in the SELECTED CHANNEL section other than those knobs mentioned above will be disabled. 169 Reference Manual
-
 1
1 -
2
-
3
-
4
-
5
-
6
-
7
-
8
-
9
-
10
-
11
-
12
-
13
-
14
-
15
-
16
-
17
-
18
-
19
-
20
-
21
-
22
-
23
-
24
-
25
-
26
-
27
-
28
-
29
-
30
-
31
-
32
-
33
-
34
-
35
-
36
-
37
-
38
-
39
-
40
-
41
-
42
-
43
-
44
-
45
-
46
-
47
-
48
-
49
-
50
-
51
-
52
-
53
-
54
-
55
-
56
-
57
-
58
-
59
-
60
-
61
-
62
-
63
-
64
-
65
-
66
-
67
-
68
-
69
-
70
-
71
-
72
-
73
-
74
-
75
-
76
-
77
-
78
-
79
-
80
-
81
-
82
-
83
-
84
-
85
-
86
-
87
-
88
-
89
-
90
-
91
-
92
-
93
-
94
-
95
-
96
-
97
-
98
-
99
-
100
-
101
-
102
-
103
-
104
-
105
-
106
-
107
-
108
-
109
-
110
-
111
-
112
-
113
-
114
-
115
-
116
-
117
-
118
-
119
-
120
-
121
-
122
-
123
-
124
-
125
-
126
-
127
-
128
-
129
-
130
-
131
-
132
-
133
-
134
-
135
-
136
-
137
-
138
-
139
-
140
-
141
-
142
-
143
-
144
-
145
-
146
-
147
-
148
-
149
-
150
-
151
-
152
-
153
-
154
-
155
-
156
-
157
-
158
-
159
-
160
-
161
-
162
-
163
-
 164
164 -
 165
165 -
 166
166 -
 167
167 -
 168
168 -
 169
169 -
 170
170 -
 171
171 -
 172
172 -
 173
173 -
 174
174 -
175
-
176
-
177
-
178
-
179
-
180
-
181
-
182
-
183
-
184
-
185
-
186
-
187
-
188
-
189
-
190
-
191
-
192
-
193
-
194
-
195
-
196
-
197
-
198
-
199
-
200
-
201
-
202
-
203
-
204
-
205
-
206
-
207
-
208
-
209
-
210
-
211
-
212
-
213
-
214
-
215
-
216
-
217
-
218
-
219
-
220
-
221
-
222
-
223
-
224
-
225
-
226
-
227
-
228
-
229
-
230
-
231
-
232
-
233
-
234
-
235
-
236
-
237
-
238
-
239
-
240
-
241
-
242
-
243
-
244
-
245
-
246
-
247
-
248
-
249
-
250
-
251
-
252
-
253
-
254
-
255
-
256
-
257
-
258
-
259
-
260
-
261
-
262
-
263
-
264
 |
 |
